Beautiful Card Designs Made Easy

April 25, 2012

Belle Rose...


This is a new Spellbinder die that I bought a few weeks ago and I know it is back to flowers again ... but for me they make such a beautiful focal point that I find very hard to resist.
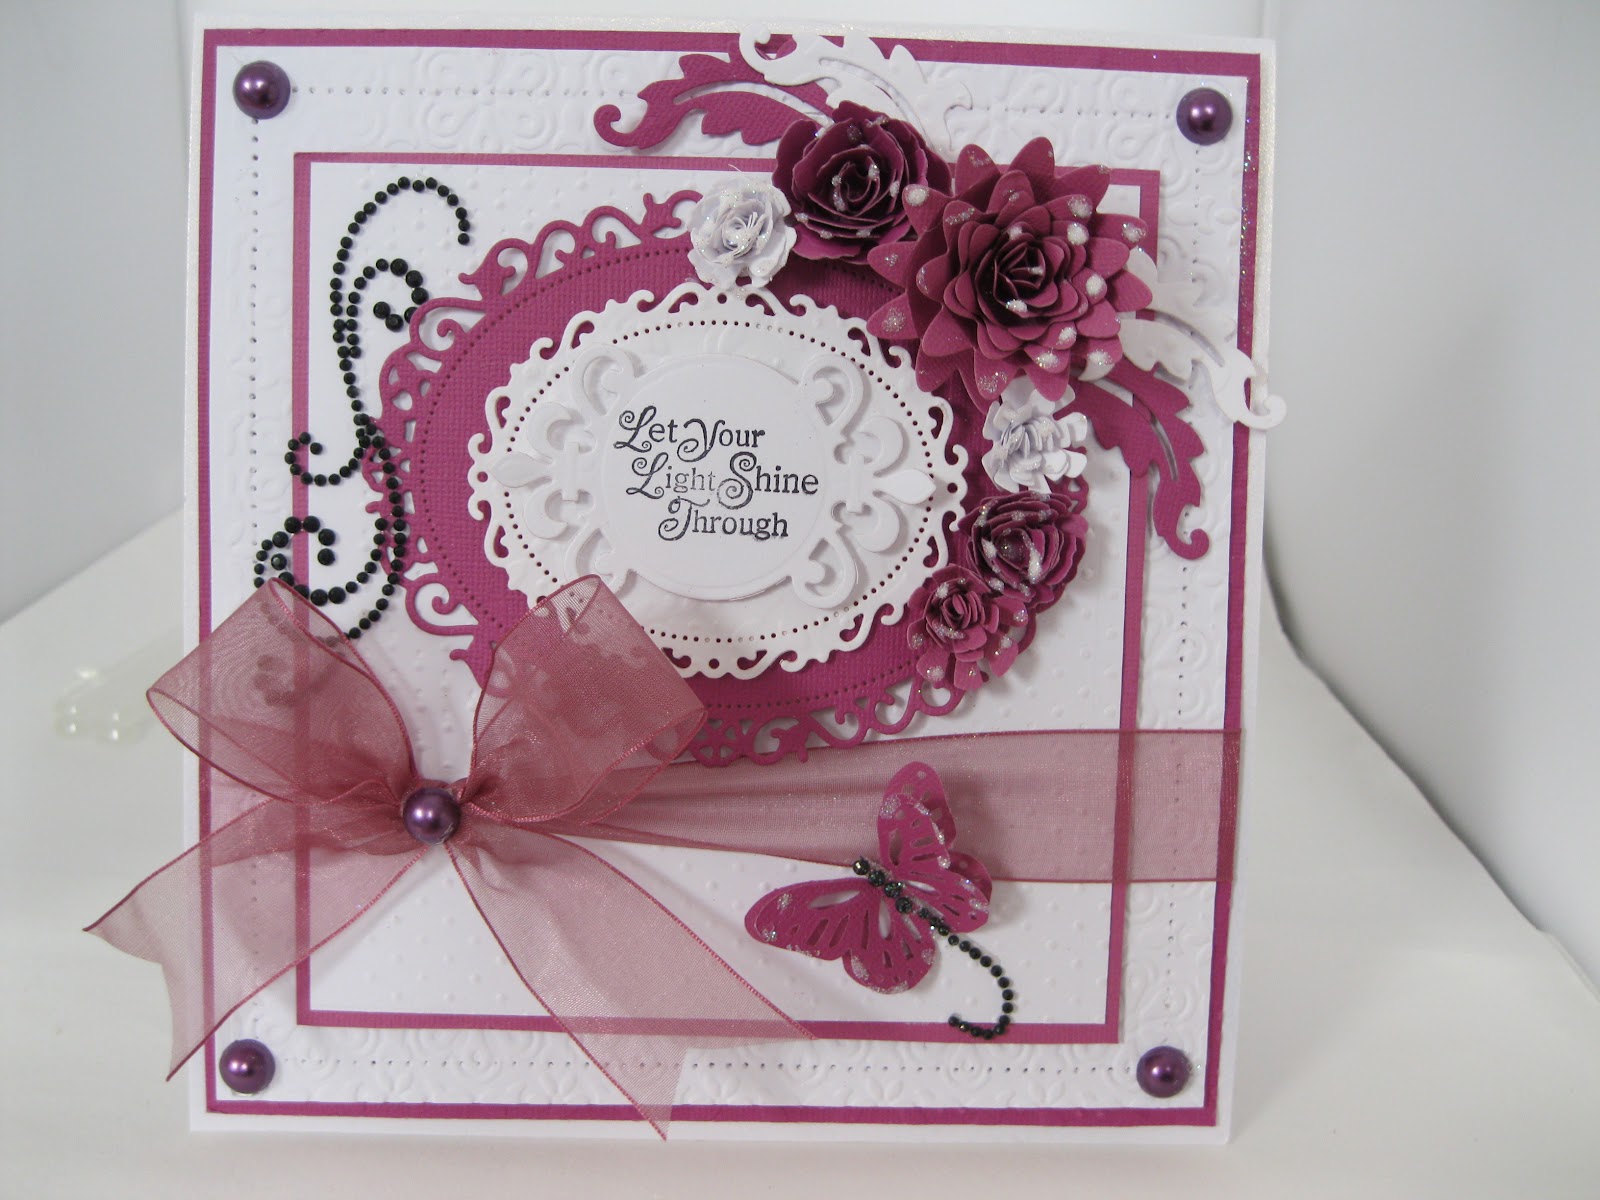
This one is the Belle Rose and it is from Heartfelt Creations, a company that Spellbinders make dies for.
There is a lovely stamp set that accompanies the die and with them you can create the most gorgeous roses for your cards,  that you can colour in yourself.

I used an M-Bossablilty folder to create the background panel and this one is the So Trendy.
I embossed the top part of the card first and then the lower, so that I had the plain space in which to add my sentiment.
 I stamped that with ink that matched my colour scheme and then matted it onto the same card used for the flower and flourish.

The glitter strips have been done with double sided tape and sprinkled with Glamour dust.
But the die produces the most gorgeous flourish and it is quite large and I sat it under the blossom.
The card itself is an A5 so that will give you some idea of how large the die is, as it almost covers the bottom part of the card.

A large white pearl for the centre of the flower and some Glamour Dust around the edges and there you are... a quick and easy card to create and only one flower...

Hugs xx


April 24, 2012

Look No Flowers ...

I am adding these cards to day just to prove to myself that I can make a card with out the aid of some flowers and I now need to go and  lie down in a darkened room to get over it....

I couldn't make one though without  using my much loved Spellbinders.

They always have such a dramtaic effect on any card and they never let me down.

As always the name of the Spellbinders used will be BOLD to help you with any purchase you may have as you add to your collection
Both of these cards have been created with the Layered Scalloped Posy from Heartfelt Creations.
The central border is mixing two sets of Edgeabilites,  Classic Postage Stamp Insert  with theTriple Scallop cutting edge.

The sentiment is onto  two sizes of Lacy Circles.  Both have embossed backgrounds from the M-Bossabilities folders

This is one of my favorite ones and is the SoTrendy folder which is double sided ... with a unique pattern on each side.
So twice the value and twice the fun. And  there we are  ... cards with clean and simple lines, for any occasion ... and not a flower in sight.  (Sigh!)

Hugs xx


April 23, 2012

More Flowers...

The names to all the Spellbinders dies that I have used will be  BOLD  so that you will know what has been used should you wish to add them to your collection.


Here are those Bitty Blossoms again and they have been combined with the Damask Motifs  from Spellbinders.
I have layered them over the Romantic Rectangles with one of the Fancy Tags 3 at the front, and the leaf shapes tucked behind the flowers are from the Damask Accents. 

The buckle on the ribbon is from the Ribbon Buckles and there are lots in that set for you to use.

This card is going to be for a wedding and so the name and date have been left off and will be added later.

The pearly flourish is fromWant2Scrap and I have coloured them,  the butterlfy and the pearl flower centres with Promarkers to match my colour scheme.
I have added Cosmic Shimmer around the edge to create the look of pearls

Hope you like....

Hugs xx


April 22, 2012

Playing with Spellbinders...

I love, love, love my Spellbinders and I use one set or another on almost every card I make.

I will add the names of the Spellbinders that I use BOLD so that you will know which sets they are should you wish to purchase them to build up  your own collections.

It is also no secret that I like to add flowers to my cards too.

I just love the effect they give to a card and I openly admit to being a "More is more...." kind of a card maker.

I know it is not to everyones taste and I do love the elegant looks to a more simple card ... I make them that way too ..... but if I can make a card were I can add the "Bling" then I am happy to add it.

I have bought a lot of my flowers from Wild Orchid Crafts   in the past, and the look they give is so beautiful.

But my latest love is the Bitty Blossoms and the Spiral Blossom 3   from Spellbinders

When combined together they make the most beautiful floral spray to grace any card.

On this card I have added the Floral Flourishes behind the flowers and the blue background  is glitter card.

I have also added some Nestabling around the sentiment
The purple colour with pure white make these flowers really pretty and I have sprinkled them with Glamour Dust.

The organza ribbon and the flourish set off the Lacy Ovals and the trail from the butterfly is a left over piece of the pearly swirl.


The Nestabling is from  Want2Scrap and always makes a card look special what ever the style. 

Here I have used them with the Spiral Blossom 1 ... which makes the most gorgeous roses ... and the Floral Flourishes again.     The lovely sentiment is from                                   Clarity Stamp     

The Hatpin is tucked into the flower spray and can be removed by the recipient so don't forget to tell them.

It makes a lovely lapel pin for them to wear.

      
Hugs xx

April 21, 2012

A Fun Card

This is the latest addition to the tutorials and there are both written and video instructions for this fun card.

It is one that kids really enjoy ... and hopefully you will too.

The  Magic Slider Card is very easy to create but because of the way it is designed it will have children fascinated with how it works.... but  keep  'em guessing!

This is how the card will look when it is given and it can fit into a standard envelope if you keep the height of the flowers low.  
 I have added Poppies to the front to match the theme of the card and they are from Wild Orchid Crafts  I have mixed them with some Ivy leaves and  red gingham ribbon.

The Poppy stamp is from Clarity Stamp and I have coloured it in with Spectrum Noir Pens  from Crafters Companion

As the card is pulled from the sleeve this is what will be seen and the result is quite amazing.
So I hope you will take a look at the short video tutorial on how to get this look and if you are new to cardmaking don't be put off and think it is too hard to do,  it really isn't.

And you will be pleased with the result especially when the children that receive it plead with you to tell them how you did the magic.

Hugs xx


April 20, 2012

And last but not least ...

Having covered lots of variations on the Easel cards over the last few days this is one that combines two different folds.

The  Gatefold Easel Card  is another easy card and  if you are new to this lovely hobby it is one that will have the recipients saying   "How did you do it ...."

Trying out new ideas is what will keep your interest going and stop you getting into a rut.


And the whole point of the Website was to show "Newbies" how to get these looks for themselves in easy steps.

There is no point in having all this lovely card in your "Stash" if you are too scared to cut into it  ... and so it was my plan to help folks build that confidence to get started.

Once again I apologise to any one who is a more experienced card maker ... it is not my intention to talk down to anyone.

If you already know about all this then that is fine but please remember that many people don't ... and to them it is all a learning curve and I only want to offer any help that I can.


So over the last few days I have brought to you some really easy ways to make your cards stand out from the ordinary and I hope, if you are new to cardmaking that you have enjoyed them.


There is a permanent link to the Website at the top of the Blog since it has had it's make over and I would be honored if you would pay me a visit.... either there or on FaceBook.


Hugs xx

April 19, 2012

Quad Easel Card

This one is really special and it is the card that was actually mentioned on Create and Craft TV by Hunkydory.

The demonstrator  (Ruth)  said she had got the inspiration for the  Quad Easel Card card from "Christina"

It certainly created a stir as people were emailing me asking if I was the Christina that had been mentioned, because they had seen the card on my website ... and at that time I didn't know.
So of course I had to find out and spoke to Ruth herself and she said she had got the inspiration from Card Making Magic.

I explained that it was my wesbsite and I went down to meet Ruth later in the month.  I often go into the shop in Preston for some of the lovely goodies that they have in there.

Cardcraft Plus  is the name and they  will send you  a  catalogue that is well worth browsing through.

So here is the card and the link at the top of the page will take you through to the written instructions ... 
but on there is also  a    video tutorial    that is very easy to follow, and I hope you will enjoy it.

There has also been added a "Tutorials" title at the top of the Blog and there you will find a list of some of the tutorials that I have on the website.

None of them are long so why not get your favorite brew and take a look and see if you woud like to try some of them for yourself.

Hugs xx

April 18, 2012

Triple Twisted Easel

Now that's a bit of a tongue twister on the quiet but the card isn't .... it's very easy to do and there are full instructions if you are new to this kind of fold.

The Triple Twisted Easel Card   has step by step instructions and you can add the twist in whichever way you want.
Have them all going one way,  or one of the easels straight while the others are turned.  But whatever you do the card will look different each time. 

I have used Mirror card on my base and some lovely turquoise paper that was free with a magazine, and there is a mixture of flowers on one of the easels and some silk ribbon on the other side.

Spellbinder ovals have been used as the stop on this card and gemstones dotted aound the shape.  You can just make out the small organza butterfly resting on the base.

Another version tomorrow

Hugs xx


April 17, 2012

Triple Easel Card

Now after a few days of creating Easel cards in several different variations we are starting to get a little more daring.

This one is the Triple Easel Card  and now we are getting adventurous.

This one is very pretty in pink and the flowers on this are from   Wild Orchid Crafts  and they are trailed down the card to act as a stop for the easel.

The leaves are from the Ash Branch punch from  L-Em

A lovely wide organza organza ribbon is tied in a bow.

Once again I have featured the Butterfly from Marianne Creatables, with a large oval gemstone for the body

The lovely sentiment is from     ClarityStamp  and is one of many that are on the website.

Another variation tomorrow.

Hugs xx


April 16, 2012

Double Twisted Easel

To continue with the making of Easel cards this one is the   Double Twisted Easel 

Again if you are a seasoned cardmaker then my apologies for the basics, but not everybody knows how to create these different folds and it is for those folk that I add these steps.

 These cards were made quite a long time ago and it is interesting for me to see how I have progressed in card making.

I don't make them quite the same anymore and my flowers are much more elaborate these days.

But the Spellbinders are still in use although now I have learned how to make them work harder too.

But the method to making the card is the same whatever standard you are at.

I really don't remember where the flowers are from but I tell you what.... I am glad I have none left as they seem so flat and boring.

The image though is still in use and is one of the adorable Tilda characters and she  has been coloured in with Promarkers.

More tomorrow with the Triple Easel Card

Hugs xx

April 15, 2012

Double Easel Card

The previous days have been about getting the look of Easel Cards and twisitng them as you go along.

So today is the turn of the Double Easel Card  ...  which is just as easy but a little more interesting.
,
I have used a large die cut Butterfly from Marianne Createables and some hot pink ribbon with butterflies in it to match.
Self adhesive pearls create the butterfly trail and a template from Bassill Basics was used to get it correct

Using a template  to get the effect will help you to place the pearls or gems neatly in the position that you want them.

The Easel stops have been created from the sentiments to suit the occasion and thay are raised onto foam pads so that they will keep the easel open.

Tomorrow the same card will be Twisted for yet another look.

Hugs xx


April 14, 2012

Twisted Easel Card

Here is the Twisted variation on yesterdays card and this is just as easy to do with very little effort.

The butterfly is a large die cut shape, from Marianne Creatables,  and it has been sprayed with Spray and Sparkle from                         Crafters Companion
The flowers are from my "Stash" and they have also had a light spraying,  and Card Candi added to the centres

The Scalloped Oval is cut from Spellbinders and around the edge I have wrapped some silver twine.

The papers are some that I designed and they are there for you to use on the webiste. The link will take you to the page if you would like to try some   Free Backing Papers

Tomorrow is the turn of the Double Easel Card

Hugs xx

April 13, 2012

Easel Card

This week I thought I would go back to basics with a card fold that is very popular,  and one that is very easy for those new to cardmaking. 

Then over the week I will show all the ways  to make this card ... right up to the four variation.

The image is from  the Back to Nature CD from  Polka Doodles  and it has been decoupaged on to the front of the easel.


So this is the Easel Card in it's simplest form.  It can be made to any size you like by just folding the card in half and then folding one of those halves in half again.   The link is to a short video tutorial. 

If you are a seasoned cardmaker then you will know exactly what to do to get this look, so I apologise if it seems I am being too basic.

But there are new starters to this hobby everyday and they don't know where to start.

I get emails from lots of people asking me to start at the begining and that is what I try to do, and they can find many many projects and card folds at   Card Making Magic

The flowers on this card are from my "Stash" but the metal spacer centres are from The Hobby House   and they have been attached with Pearl Brads.

The Twisted Easel will be tomorrows card ...

Hugs xx

April 12, 2012

Blog Makeover ...

This is the first day of the new look to my Blog and  I am really delighted with it.

It is just how I pictured it would be and I want to say a big "Thank You" to Katie Price who has put in the work to create the look. 

I like all the elements that have been added staying with the theme of Flowers, Ribbons and Pearls and the page is clean and fresh.

Please feel free to grab the button to the Blog,  and I would be thrilled if you added it to your page.

All you need to do is right click  the link under the button that you would like and select all , copy  and paste it into your own blog page ..... Please ... Pretty Please!!

So at the moment I am happy to just gaze at it and tomorrow I will start adding some new stuff to the pages.

I hope you like the look and will come and visit more often... and if you are looking for a new look to your own Blog then check out    Priceless Design Studios  and let Katie help you come up with your own individual style.

Hugs


April 11, 2012

Cute Little Mouse

This character is from the Sugar Plum Daisy CD from Polka Doodles and is one of the many cute images on there.

The papers and sentiment are all from the same CD and have been layered up with Spellbinders

The flowers are from Wild Orchid Crafts and they are all added to the bottom of the card with some Pinflair Glue

But the interesting piece is the strip along the left hand side.

I cut some Spellbinder borders for another card and by carefully positioning the die  this is the  strip that was left over

Normally this is the bit that is just thrown away ... but I decided to add some yellow ribbon  wrapped  aound the shape and I think it makes a really neat addition to the card.

And as always ... being a Frugal crafter ... I can't throw anything away ... that's why my "Stash" is spilling out the door

The pearls around the edge of the card are all made with  Cosmic Shimmer  glue ... which is a cheaper alternative to the real thing.

Very shortly there is going to be a whole new look to the Blog.

I have been working with Katie Price and she has come up with a really beautiful design for my pages. It is all pink and flowery to match the title of the Blog and I am very pleased with the result.

Let me know what you think about it.

Hugs Christina xx