Beautiful Card Designs Made Easy

May 22, 2016

Spellbinders New Prizm Machine

Hi Everybody,

I thought I would share this snippet from Spellbinders with you about their dinky new machine which is coming soon.   
Coming June 2016! 

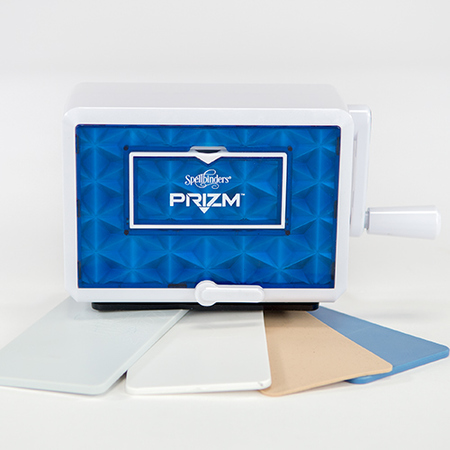
The NEW Prizm Die Cutting & Embossing Machine was designed with your creativity in mind. It's the latest in Spellbinders Creative Arts line of innovative die cutting and embossing machines. 

This adorable lightweight machine is perfect to use with many S1 and S2 sized Spellbinder dies. 
Also compatible with many other small die templates.

The Prizm  Machine is ...
  • Small & Portable - 5 ¾” x 4 ¼” x 2 ¾”
  • Cuts up to 2 ½” wide
  •  Lightweight – It’s just 1.8 pounds!
  •  Fold down platform
  •  Easy crank handle
  •  Locking suction base
  •  Includes: Base Plate, Embossing Plate, Cutting Plate, & Embossing Mat
++++++++++++++++++++++++++++++++++++++++++++++++++++


I am sure that you are going to love this new addition to the range and it will sit very neatly on your work top to be on hand whenever you need it.

More tomorrow ...

Hugs xx


May 21, 2016

Todays Winner ...

Hi Everybody,.

It's a bit wet and windy here today but supposed to be brightening up later.  I really hope so as we are taking a walk over to the sea front this evening as the Red Arrows are doing an anniversary air show at 6 pm.

The Red Arrows never fail to put on one of the most amazing air displays and they are so exciting to watch.  Griff is going to try and film some of their tricks and we are both hoping it will be fine and a little warmer by then.

The draw for the Friday Freebie card has been done and the name this week is you ...

Sally 

please email me with your postal address to 
christina@card-making-magic.com
and the card will be in the post to you straight away.

I hope that you will like it and please let me know when it arrives with you.

More tomorrow ...

Hugs xx

May 20, 2016

Friday Freebie 119

Hi Everybody,

A Spellbinders Texture plate has been used to get the Letterpress effect on this card and it is in a very soft pale pink.

I have layered it onto silver and white. It is really pretty and could be used for any occasion. The inside is lined on this one

The plate is called Lace and Frills   and it is quite large. The sentiment is Sentiments Three set

The panel has been wrapped with lace and white ribbon with a double bow attached from Mei Flower

The flowers and lace are from Wild Orchid Crafts and so is the pearl trim. The pearl flourish behind the flowers is from Want2Scrap 

If this is a card that you would like to have then all you need to do is leave me a comment.

From those comments a name will be chosen and the winner announced in tomorrows blog post ... so please come back and check if it is you.

More tomorrow ...

Hugs xx

May 19, 2016

New YT Video

Hi Everybody,

Todays card is featured on YouTube and uses texture past and a stencil. Embossing with Stencils   will show you how I got this look and it is a quick and easy card to create

I have covered the raised area with Distress Inks but chalks would do the same job.

You would need crafters chalks and not your childrens as they will not do the job properly.

The stencil I have used was free with Papercraft Essentials   and the issue number is 133.

It was on sale on the 5th May so should still be around in the shops

There is a gift with the magazine each month. You can use any floral stencil that you have in your own "Stash"

The texture/embossing/modelling paste are more or less the same thing and they all provide a raised surface.

You can colour this paste or add glitter to it or do as I have done and cover it with embossing powder and heat.

It will bubble up and give even more texture to your design and it gets HOT  so mind you don't burn your fingers.

Spread it onto your work with an old store card if you don't have the spatula but be sure to wash it and your stencil straight away because the paste dries hard and will spoil both if you leave it on them.

I hope you enjoy the video and there is a Shabby Chic one lined up for next week 

More tomorrow ...

Hugs xx


May 18, 2016

Water Colour Wednesday - Strike up the Band !

Hi Everybody,

These cute mice are from My Favorite Things and it is called Strike Up The Band

It has a separate die set that you can purchase and there are six mice altogether with different instruments.

Both are available from Sevenhills Crafts

I have masked off areas and added the mice in the position I wanted them and then water coloured them with Gansai Tambi.

I think this card would be suitable for any age group .. male or female .. and could be for other occasions too either using other sentiments in the set or another set that you may have

Exciting news for me .... I became a Great Grandmother for the second time at 4.49 this morning when my Granddaughter Robyn gave birth to 8 lbs 11 ozs boy to be named Carter. We will get to meet him later and both are well. There's a good reason to strike up the band !!

More tomorrow ...

Hugs xx


May 17, 2016

Tuesday Tutorial - Circular Floral Card

Hi Everybody,

Many of you collected the Grand Dies when they where available and  made really good use of them for larger cards. Sadly they have been retired from Spellbinders website but that doesn't mean that we have to forget about them and if you have them in your collection then it is time to dust them off again.
Spellbinders Supplies:
Other Supplies:
  • Flowers/Leaves
  • Glitter
  • White/Dotty/Striped Card 
Instructions:
These are the dies that I am using and they are numbered the same in any set from Spellbinders with #1 always being the smallest. 
(Please bear in mind that Grand Dies are much larger than the normal sized dies)
With die #3 from the Grand Circles cut two pieces of card in white for the base
With #1 from the Grand Stately Circles cut another white layer
With die #2 from the Grand Circles cut two pieces in different patterns. I have used stripes and dotty card for mine. Choose one of these and stamp and emboss a sentiment onto it
 You will also need one more  in this size in white 
With the two that you have cut for the base you will need to fold one of them back about half an inch down and score. And on this same piece you will need to level the bottom off so that the circle will stand  Only do these actions on the piece that is going to be the back of the card
 Don't fold the scored part all the way back as it needs glue adding to the small area and then marrying up with the other piece. This is now your base card.
With the other patterned panel and the white one add the border die across them and cut and emboss.  Placing the die about two thirds up the card will give you a good depth to these two layers.
Add foam pads to the back of each piece and start to layer together.
My foam pads are about 1mm thick and give really nice dimension to my card.
Add the Grand Stately Circle to the base and then add your patterned circle to the top.
Layer the two cut pieces so that they are offset and add them also.
Add in your flowers so that they make a pleasing display and to curl the stems on the flower buds I have wrapped them around a BBQ stick
Tuck in the leaves as you like and add some sparkle to the petals with the glitter

More tomorrow ... 

Hugs xx


May 16, 2016

More Shabby Chic ...

Hi Everybody,

So many of you have said that you like this type of Shabby Chic look for cards and so here is another done in that way.  This one is a soft yellow and coffee colour and it really is better in the hand than on photo.
I have created a chipboard effect with the birdcage from Spellbinders  Flight 1  by cutting it several times and gluing them all together.

My lovely flowers are from Wild Orchid Crafts and they blend beautifully with the colour scheme.

I added two really large brads alongside them and arranged Foliage around them for effect. The brads are some that you can add your own colour to the centres and then cover with a plastic dome and I got them from my local craft shop.

I have tucked lace flowers into the distressed edges around the card  and machine stitched around the two layers of papers.

I really like this style of card as it is something that you can go to town with and add lots of beautiful embellishments.

More tomorrow ...

Hugs xx


May 15, 2016

International Ambassadors Informal Blog Hop ...

Hi Everybody,

Time for another Informal Blog Hop and this time we have chosen to use Embossing Folders for our theme.  For my card I chose the Medallion Design by Donna Salazar  and it gives a really elegant look to the card.

I did a video awhile ago on how to get the  Letterpress Technique   and that way you can make the most of any of your folders to give you two different designs.
The flowers are from Wild Orchid Crafts and as always they are sparkled with fine glitter. The links are at the bottom of the post for you to view the products.  The sentiment has been stamped and embossed and then fussy cut and added to a parchment circle

So now it's time to hop your way to the next Blog post and see what my very talented friends have created for your delight this month ..

Linda Lucas  ...  Australia
Yvonne van de Grijp  ...  Netherlands
Christine Emberson  ...  UK

Please leave a comment and then we know you have visited and thank you for taking part again this month. We all really appreciate your support and we will see you again on the next Blog Hop

More tomorrow ...

Hugs xx 

May 14, 2016

Todays Winner Is ...

Hi Everybody,

So the good news is that after putting on 3 lbs in weight on my holiday to Portugal ... this morning at Slimming World I have lost 1 1/2 of them again and so I can now get back on track.

It was well worth it as the fresh pancakes that the chef at the hotel cooked each morning were just too good to pass up.  I may have had one or two or six at breakfast complete with chocolate sauce but they weren't big pancakes and that is all I can say in my defence !!

The draw for the card offered yesterday has now been done and the name this week chosen at random is you ...

Nancy Vondra
please email me with your postal address to 
christina@card-making-magic.com
and the card will be on its way to you.

I hope you will like it and please let me know when it arrives with you.

More tomorrow ...

Hugs xx

May 13, 2016

Friday Freebie 118

Hi Everybody,

Todays offered card is a large one and has beautiful flowers along the edge.

They are from Wild Orchid Crafts  and are a mixture of  Roses, Chrysanthemums,  Cherry Blossoms and Sweetheart Blossoms.

All have been sparkled with fine glitter from Glitter Magic

The spotty pink ribbon is Grosgrain but is some that I have had in my "Stash" for a while and I brought this back with me from Phoenix a few years ago

The large pearl centre to the bow is from several on a sheet and I can't remember where that is from.

If you would like to win this card then all you need to do is leave me a comment at the end of the post.

From those comments a name will be chosen and the winner announced in tomorrows blog post.

 I also add the names to the  Winners Page   and the link to that page is in the side bar to the left so that you can always come back and check if it is you who has won the prize.

On that page it tells you what to do to claim the card

More tomorrow ...

Hugs xx

May 12, 2016

Patterned Panels - Budding Vine

Hi Everybody,


Todays card is another that is available to view now on YouTube and this is called

For this card I have used the Budding Vine  die from Tonic-Gold which is a two part set.

 This means that you have different ways that you can use it either using the pieces separately or combing the two together 

The video will show you how I have arranged the panels on my card and I have used gold and white for a clean and simple look

The only additions to the front are the Finesse Pearl Flourish and one of the sentiments from the sheet of stamps by Altenew

There are some lovely sayings on this stamp sheet and any would make a good choice for your cards

More tomorrow ...

Hugs xx


May 11, 2016

Water Colour Wednesday - Flower Bouquet

Hi Everybody,

Todays card is water coloured with Gansai Tambi and I have used the new stamp and die set from Spellbinders by Donna Salazar

This one is called  Flower Bouquet   and it has three parts to the set.  For my card I have coloured and then die cut the main image out and added in some of the flourishes behind

I have raised them up with foam pads to stand proud from the base card and this creates depth and shadow to the image

Then all I have done is dress it with some silver sequins that I got in a large packet from the £££Shop

The card is a one layer A2 size and I rounded the corners as a little extra shape.

Over the flower I brushed some clear Wink Of Stella but this moved the water colour a little as I applied it.  Still not  bad little card and could be for any occasion

More tomorrow ...

Hugs xx

May 10, 2016

Tuesday Tutorial - Circle Dies and Parchment

Hi Everybody,

Todays card is really easy to create using just a few basic dies and an embossing folder. Use any folder that you have in your "Stash" and like wise the flowers and the sentiment.  You are sure to make a really pretty card and here are the steps to follow ...

 Spellbinders Supplies:

Other Supplies:
  • Flowers
  • Glitter
  • Diamante
  • Woodware stamps
Instructions:
Create a Hinged Card  in white with Matting Basics A #7 
Cut two panels with #7 Matting Basics B ... One coloured and the other in Parchment. 
And remember that die #1 is always the smallest
Emboss the parchment in your folder.
(Tip: if your parchment is thin then sandwiching it between copy paper will help to stop it from tearing as you emboss it)
With dies #5 and #6 tape them together onto some more coloured card and cut three frames.
Taping them together ensures that all your frames will be the same
Glue them all together
With smallest of the two circle dies cut an aperture into the parchment piece where you would like it to sit and then add the glued frame to the top.
Save any surplus die cuts for another project
With #7 and #6 from Matting Basics B repeat the taping and cutting process to make two frames and glue these together also and add to the top of the parchment
Stamp and emboss your sentiment onto a circle of white card cut with die #6 and position it on the coloured card inside the circle aperture. To make sure that it is in the correct position place the parchment on top of your coloured card, where you want it to be, and then slot the stamped sentiment circle  in to the space.
Make sure it is straight and carefully remove the parchment panel ... without moving the sentiment circle.  You can then glue the sentiment circle permanantly in place knowing it is in the correct space
Add small pieces of foam tape around the circle and the outer frame so that they cannot be seen from the front. This raises up the parchment from the coloured layer
Glue them all onto the white base card and dress with flowers as you like.
I have added extra sparkle to my card by cutting up some diamante "Bling"  and laying it around the flowers

More tomorrow ...

Hugs xx