Beautiful Card Designs Made Easy

May 24, 2023

Altenew Flower Cards

Hi Everybody,

All three of these cards featured today are using a die and  layering stencil from Altenew. It is the Bitterroot Flower die set 

I have altered the look by colouring them in different colours and adding them to a different background each time.

This first one has simply been coloured with the stencil direct to card and then that has been layered onto oink mats and a base card of a deeper shade of pink. 

I used the Card Making Magic Torn Edges die set for the layers.

The gingham ribbon has been wrapped around the top two layers before adding it to the base card, and the sentiment is from another Altenew stamp set that has also been added direct to the card.

This card has been coloured with purple and lilac inks and added with foam pads to a die cut shape.

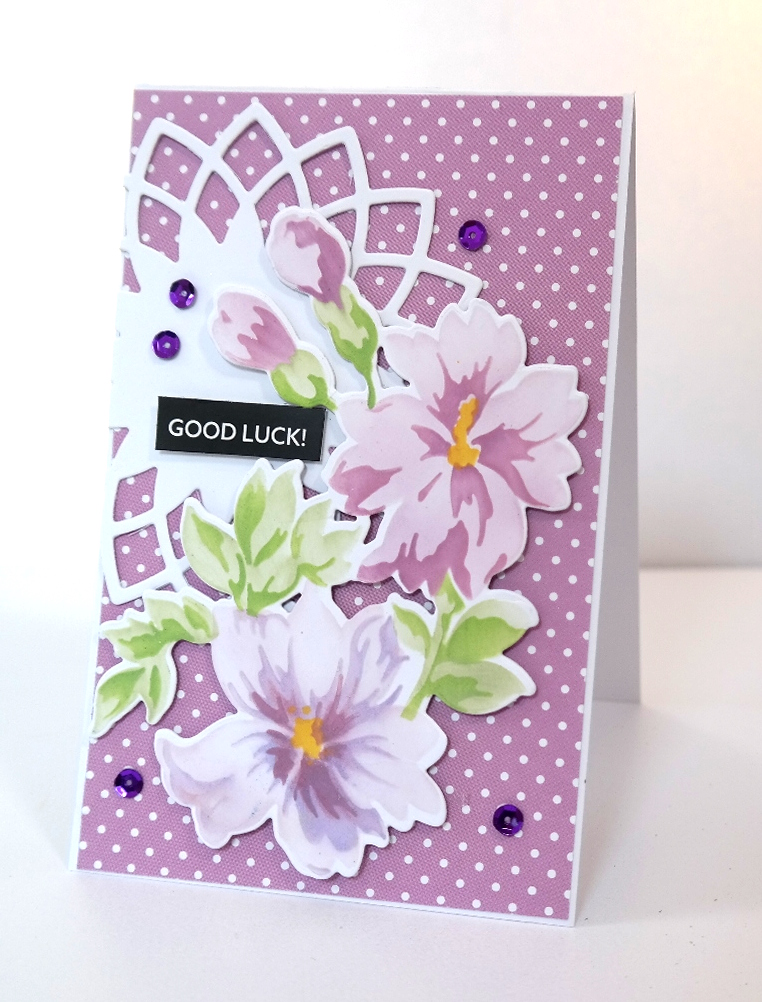
The dotty card background has been trimmed to fit an A6 base with just a small border around the edge. 

The card itself is from Anna Marie Designs  and can be seen in this pack from their website. The white die cut is a really old Spellbinders die

You could of course stencil extra flowers or leaves and add them to your card as well to fill out our display even further.

When doing this colouring I find it easier to die cut the shape out first and then stencil the die cut turning the stencil as I need it.

For the card to the right I have created one of my Plaid backgrounds, and the video for that is here

I also used an Alcohol marker and a ruler to highlight the edges which gives the appearance of the card being layered.

This way of giving the layered look saves on postage costs if that is something that you ned to consider.

I thing all three look really pretty whichever colourway you use but the plaid one has to be my favourite

And they have all been dressed up with either pearls or sequins 

More tomorrow ...

Hugs xx

May 23, 2023

Flower card

Hi Everybody,

Todays card has used a paper pad that I bought from Home Bargains and it is a beautiful double sided pad that is foiled on one side.

But I wanted to dress it up a little more so on the foiled side I added in a text stamp in a random way and allowed it to dry.

The foiling on this piece is bronze coloured dots scattered over the paper.

Once it was dry I trimmed the panel down and matted it onto black card.

 I used the other side of the paper to layer onto some smaller shaped panels and added them to my base card in the top right and bottom left of the white 5x7 card 

The text piece has been added with foam pads and the Happy Birthday is cut from parchment and  Bronze glitter card for the bottom of the card.

I selected the flowers in different sizes, and I used roses and tulips and the long Gypsophillia stem, and I cut lots of leaves, in two shades of green, from the Rose Flourish die set. I also used the Eucalyptus die set that was free with a magazine, some time ago, to fill out my bouquet.

The last thing for me to do is add my glitter to the flowers and the finished card is much prettier than the photo shows and I am happy with the end result. 

More tomorrow ...

Hugs xx

May 22, 2023

Paper Napkin Cards

Hi Everybody,

As promised today I am adding the video showing how I made these cards with paper napkins.

There are so many designs to choose from that you never need to be stuck. Lots of beautiful florals and lacey designs for any of your feminine cards.

For the men you could choose  a geometric pattern or maybe something with animals or boats on them and then add the sentiment to suit the occasion.

.

I was limited to what I could find in the shop I went to and I didn't have the time to look elsewhere but the patterns are out there if you have the time to search for them.
But I will be on the look out now for more to use in this way.

And don't throw away the layers that you peel off the napkins as they can always be used in a previous technique that I showed in a previous video that I have linked below

                      Everyday Items ....

Here is the video on how I made these featured cards and I hope you enjoy watching it


Make use of any dies or embellishments that you already have to add more to the card and I have added links to the Nesting Dies that I used in my creative process.

More tomorrow ...

Hugs xx

May 21, 2023

Bejay Roles - Winner

 Hi Everybody,

What a glorious weekend this has been and the weather is fantastic. I hope it has been the same for you all too. Ruby and I have just come in from a long walk and we are both tired now. After a little sit down it will be time for tea and I am sure we will both enjoy it today ..

Mine with a glass of red wine !!!

I have done the draw for the beautiful butterfly that is on offer and the name this week is 

Bejay Roles

And if you would send me your postal address please to

christina@card-making-magic.com

I will get it in the post to you straight away.  Please do not add any personal details here on the blog send them privately to the email address shown. Be sure to let me know when you have it please.

I am sorry to say that the Lavender Kit has not been claimed again, and that now makes twice I have offered that kit … twice somebody has been chosen and named on the blog and twice the named person has not come forward to claim it. It seems I can’t give that kit away no matter how I try. And it is such a pretty kit to have too, with everything you need in the box. 

So I will try one more time and if it is not claimed again it will go to the charity shop as I am sure there is somebody that will love it.

More tomorrow…

Hugs xx

May 19, 2023

Friday Freebie - Beautiful Butterfly

 Hi Everybody, 

Today I have a beautiful die set designed by Chloe Endean on offer and this will add a large butterfly to your designs.  

There are also some sentiment dies to go with it, and the magazine to give you even more ideas on how to use them all.

Is this something that you would like ?
After all butterflies are always very popular for any time of the year and any occasion too,

If you would like to win this then all you need to do is leave me your comment at the end of this post with your FULL NAME

But as I always say .... be sure to come back and check on Sunday to see if it is your name that is shown as the winner.

More tomorrow ...

Hugs xx