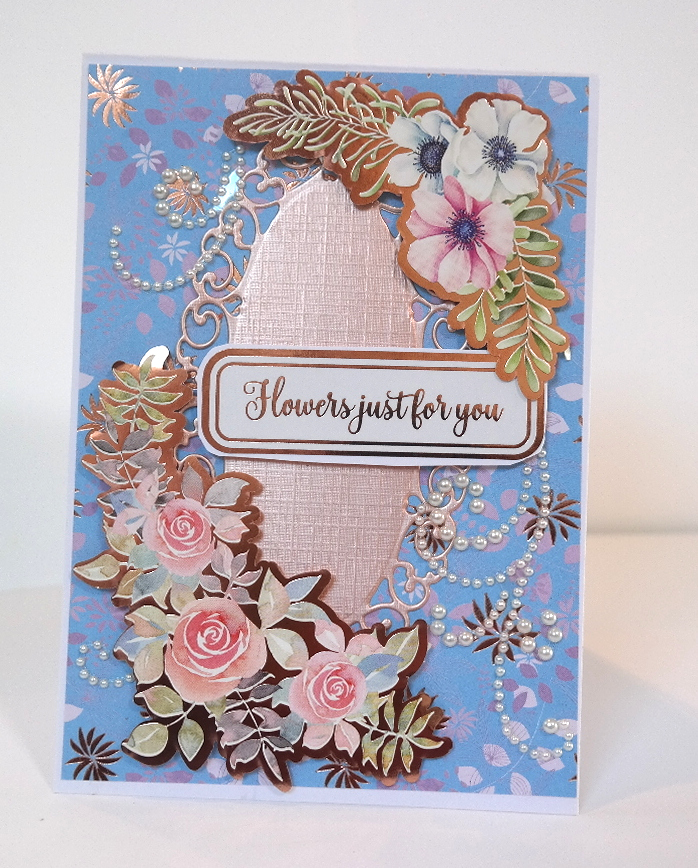
My little corner of Blogland where I can share my creations with you. There are many video tutorials as well as links to good quality websites for all your crafting needs.
These are some more of the cards inspired by the 3-D Embossing Folder I mentioned yesterday.
The pattern is much deeper on 3-D folders than it is on ordinary ones as it gives you other layers to the embossing.
Burt if you don't have this type of folder then try it with others that you do have in your own collection and see what works for you.
Floral folders always give a really pretty look and using coloured inks will make them even prettier.
This one is created with white ink on the raised areas and then I used the gold wax to highlight them even more.
The panel was wrapped several times with gold twine before adding it to a gold layer to lave a small border around the edge and then I added it to the brown card base.
The sentiment is from another collection and I am using them up on other cards as there are so many in the pack.
This was added to the same gold card and adhered with foam pads to the card front.
Try embossing parchment for another look or even acetate.
And if you make a mistake then why not fussy cut the flowers out and add them separately to another card base so as not to waste them or your time.
This has been etched with the black ink and added to a black and white Dottie card.
The sentiment is from yet another collection that has many in it.
With all the cards that I have made recently I needed envelopes to put them in and buying them was an option.
But I needed lots of different sizes and it would have been an expensive shop around to get them all.
So I decided to make my own and this little gadget from Creative Craft Products at Craft Stash made life so much more simple.
This is the envelope and box maker and with this I used lots of the pretty 12x12 papers I have in my cupboards.
This little video will show you just how easy it is to use this inexpensive tool, and then you too can make your own envelopes of lots of different sizes, and use up any of the papers that you may have lying around.
A really cheap and easy way to vary the look of your cards is to use items that you are sure to find around the home.
This card has been created with an everyday household sponge that I have cut into pieces to use with water based inks.
Quick, easy and very effective and if you change the colours you will vary the look.
I have used the pre printed and foiled sentiment strip that came with the most recent paper packs that have been released and there are such a lot in each of the packs.
The video is not too long but will give you time to relax with a cuppa and hopefully a new idea. You may have already tried this in the past or you would like to do so now.
Here as promised is the latest video where I have used Washi Tapes on my cards. I have a box full of these and I rarely think to use them on my cards.
I should do really because they are so pretty. And that is why I thought to get them out again and put them to good use.
The one shown to the right is using Washi Tapes with some Acetate for a really lovely look that seems to hover above the card base.
I will be trying this again with other colours and shapes and seeing what I come up with
And I also put the cut off bits to some use as well.
Waste Not ... Want Not !! And this card is just as pretty.
Just add the pieces in a random way over the card panel and die cut it if you prefer before adding it to your cards.
Today we have made some flowers from the Washi using flower dies to get the look.
Yesterday I showed you a pink card that had the acetate cut into a heart shape and that would be so useful for occasions like Valentines Day.
Whichever shape you create it will look good and Washi Tape comes in many colours, patterns and widths that you are sure t see somethings hat takes your fancy.
As promised here is the video of the making of eight beautiful cards using matching coloured card and some imagination.
I really enjoyed using this process and making the shapes fit my designs to get as many cards from the three sheets of card that I had.
All of the cards are now ready to be sent to whoever I need them for.
Or alternatively they can go into my charity box to be taken to the shop.
I don't have many old die cuts lying around on my work top any more as I have managed to use them up with the cards I have made
I am glad that this idea of using up ready made die cuts from other creative sessions has sparked your imagination, and I know you will nit be disappointed with the cards that you come up with.
Every crafting session is a learning curve and the more we do the more we learn, and we should enjoy the process as we do.
I have been giving away one of these handmade Pokey Tools each week for a few weeks now and I have been asked to show how I made them.
So always happy to oblige I have done just that and I am adding it here for you to view.
I used these really cheap Turkey Lacers from Amazon for the base and I have literally hundreds of beads in my craft room, from when I used to make the hatpins that I added to my cards.
There are other ways to use up beads, old zips and wire and here are just a few ideas that you may like to try, most of them are videos.
This is the card I bought at last weeks craft show and it is the knitted background from Anna Marie Designs.
This particular piece was the cover card in the front of the pack and rather than waste it I turned it into a card front instead.
It shows you all the colours that are in the actual pack and it is really petty card.
The flowers and leaves are cut from 300 gsm smooth white and then coloured with Distress Oxide Inks.
The larger ones are cut from silver card and tucked behind
The sentiment I have had for some time and they are also from a craft show that I went to.
This card is using a larger portion of the card and this time it is a A4 size.
I chose the grey from the pack and the hearts are some that I did from Acetate and the technique shown in the video above The flowers and leaves are also cut from smooth white card and coloured with Distress Oxides
This link will take you to me website where there are nose photos of the same technique Caught In Crystal Technique I have added some white splattering to this card and a couple of butterflies for effect.
I really like this knitted card and the finish is suitable for male or female cards.
This collection is lot of fun to work with and can be coloured any way that you prefer.
I have made cards in various styles and sizes using this, from A6 to Gatefold and all are easy to achieve.
This is the video that was shown with the launch but I am adding it here in case you missed that or would like a refresher on the card itself.
You can stamp any combination for the background or simply cut the Paisley out of the papers and use that for your background instead.
I have added pearls to some of my cards but you can ad any embellishment that you prefer. Some ribbon would look particularly good with some of the styles.
Whatever you decide to do just enjoy the process and have fun while you make. I hope you enjoy the short video
This style of card I have created before and done a vidoe to show you how it is done. In this video I am using the Paisley Dreams Collection that was launched last week.
For this I have used two of the paper from the pack that will blend together and I coloured the images in with pencils.
You could use your favourite medium and take your time as you colour but I used pencils for the quickness so that the video is not too long.
The paper pack is really good quality and is abut 270 gsm so quite substantial for all your die cutting.
The pattern is one that has been around for many many years and it will suit any age group or gender or style of card.
So have a go and make some really lovely cards for any of your friends and family.
This die set is also part if the Designer Card front Collection and it will help you to make a really pretty card.
In the links below I have included all the A5 dies that are made to match these Designer Card Front Die Sets
This is just one idea and this is the Half Scallop, you will find videos on my YouTube Chanel in the Playlist section for Designer Card Fronts
The boxes are made from the Complete Card and Box Dies set and will add the perfect finishing touch to any of your creations.
The one to the left is using the Teardrop Shape and this was a video I added not that long ago.
So there you have two different cards that are just as pretty as each other, an maybe they will inspire you to try one of these die sets for your self.
Neither video is too long and I hope you will enjoy them as you relax with your favourite beverage.
All of these dies will make larger cards for you and so if you prefer the A5 sized cards then these dies will be right up your street.
But although they create larger cards you can also cut them down to make them smaller or even DL or Slimline.
This is a paper pack from Card Making Magic that has been out for a little while now and it is one that I really enjoyed playing with.
The flowers and the colours are very bright and the cards that they make are gorgeous. I have used this a lot and it is still available at Craft Stash.
I have used it with embossed backgrounds and other die cuts that I have on my desk and it mixes well with other items that I have, and I am sure you will have many embellishments lying around too.
The cards to the right is an A6 size and I have used some of the pink paper from the pack as one of the layers.
The card to the left is a Dl size and I have created the card base from one of the sheets of card in the pack.
I used the papers that are scraps to create the background and covered the join with one of the ribbon strips in the pack.
I did some videos using this pack and here is one that creates a larger card using all the kit.
The launch of the new Look at layers Collection is here and the cards that I have made are being shared with you.
Here is a video using the Ovals and Rectangles and in that I have produced four cards which are quick and easy to do.
These dies will work with any other collections that you have and there are lots of word or sentiment dies that can be added to the cards for any occasion.
The video is not too long but I hope it will be enjoyable for you as you relax.
I have another video that is available for you to view at Craft Stash using the Circles and Squares and creating an easel card , here is the link ...
The collection is with Craft Stash so please use the links below to purchase as they are affiliate links and will give me a small commission at no extra cost to yourself.
I have covered monochrome cards in the past where they have been just one colour for the whole card, but today I am sharing monogrammed cards using just one letter.
This one is for my eldest daughter Amanda and the other is for my youngest daughter Victoria. And I thought it was an excellent way to use those Alphabet dies on smaller cards.
I am really pleased with the result and I am sure your recipient would be too.
I have used the solid letters and then covered them with the filigree overlays to give a lovely delicate feel to the letter.
You can use any flowers, leaves or shape to the background that you have in your own stash.
And the same with the embossing folders, just use any that you have.
If you wanted to make a larger card and you also have the lower case alphabets then you can spell out the complete name
This very quick card is so easy to make using the items from the kit and is perfect for those new to card making.
The video show this particular card but you would be able to come up with so many more as you played with the designs.
They are so delicate and feminine and you could add any embellishments that you have in your own stash to enhance them even more.
It is such a pretty pack and has fast become one of my favourite "Go To's" for a card in a hurry.
For more videos using this pack pop over to the Craft Stash page on YouTube and Facebook
Another beauty of this pack is the price as it is not expensive at all and it could make you lots and lots of different cards in many different shapes.
Todays card is a bit of mixed media with stamping, text stamps, ink blending, Washi Tape, texture paste with gold embossing powder and a pearly flourish to add to the look.
The end result is very pretty and I love how the colours all go together.
I have used some home made texture paste on the butterfly and the Basket Weave stencil from the Plaited with Love Collection, with gold embossing powder.
I added a video a while ago to show how I made my own paste and I will ad the video again here in case you wanted to give it a try.
Homemade Texture paste is created easily and none of the ingredients are expensive.
I used a really cheap talcum powder, white paint and the largest bottle of school glue I could find from The Range
Keep the paste in an airtight jar and only mix up as much as you need, but it will last for months in the jar and is a lot cheaper than buying a branded name.
The sentiment is from a pack of strips that I cut up and I got these from a Craft Show I visited a while ago.
They came in black and white and a very useful when you don't feel like getting out the stamps and inks.
There are loads in the pack and they will last me a long time.
Todays card is created with the Elegant Nestables and it is the A5 size. This is the perfect answer to make those larger cards.
I have chosen the grey and white colour scheme to keep the card looking as Elegant as I could and the yellow flowers just set it all off.
Tucked along the side is a small organza butterfly in the same vibrant yellow and I have had some of these for a long time.
I cannot remember where they are from but there are several in the pack in different colours, and they always look really pretty when added to a card.
These dies where released a while ago but they are some of my favourite dies to use. The video shows you how I created the card and is a good reminder should you not have seen it before.