Beautiful Card Designs Made Easy

Showing posts with label Video Tutorials. YouTube. Show all posts

June 04, 2025

Flowers with Ribbons

 Hi Everybody,

Ribbon roses are something that I have covered in the past and I added a video to YouTube about 14 years ago so its a bit old fashioned now but still gets the idea across for you to follow

It does have a little tip in it about storing the flowers you make in an ole egg carton so I will add the link in case you wanted to view it.

Old video ... Ribbon Rose

Today I am adding in the new video and this will show you two ways in which to get the flowers. 

I would warn you though that they will need boxes and if your ribbons is wider than mine then your flowers will be a different size.

They are a lot of fun to make though and so here is the link to the 

new video  ...    Making Flowers with Ribbons

I hope you will enjoy the videos ... both of them if you watch them and I thank you for your support.

Bye for now ...

Hugs xx

May 29, 2025

Making Flowers - Spiral Roses

 Hi Everybody,


Todays card is complete with video and once again I am using the Brushos.

They are such and easy way to colour your card and they last for ever. 

In this video I have used the Spiral Blossom Die Set and this is such a versatlie die and can be used with lots of different materials.

Here is the new video ...

Making Flowers Spiral Blossom Roses

I hope you enjoy this video and next week I will be looking at ways to make flowers with ribbons so I hope you will join me for those and perhaps send me photos of the ones you make.

Bye for now ...

Hugs xx.

May 16, 2025

Stamped Background

Hi Everybody

This card has used a stamped and stiffened background on the front and I have added gold and white frames to surround it. This technique was shown in a video last week and I adding the link here ...


The card is an A6 size and is the last I will be showing with the Hessian backgrounds or flowers .... for now !!

I am going to be adding one video per week for a few weeks and using a different material for making my flowers, and probably more than one project in each video.

I hope you will stick around for that and I also hope you enjoy my makes. 

You don't need the same things that I use, just make the moat of items that you already have in your. personal stash.

But maybe you do have the dies and things I use and then you can follow along with me as we make things together.

Bye for now ...

Hugs xx
 

May 15, 2025

Two More Hessian Flowers

Hi Everybody
Flower One

Today I am adding two more ways in which you can create hessian flowers and these are so pretty once they are made..

You can make both of these styles to any size you prefer but I have made mine a little smaller this time around.

The one to the right is added to an A6 card and the background is stencilled for added texture,

I have used the hessian in the original colour and added diamante to each petal for decoration.


Flower Two
They are quick and easy to make and are a real focal point on the card front.

The card to the left is using another stiffened and die cut oval and the flowers on both cards are made in the video


I hope I have covered lots of different ideas for you to use this inexpensive material in your flowers and that you have enjoyed the process.

It certainly makes a change from Mulberry flowers though you will need to make boxes for the finished cards,

Bye for now ...

Hugs xx

May 12, 2025

Making Flowers Stamping Hessian

Hi Everybody

In todays video I am sharing how I stamped text onto my stiffened Hessian flowers to give them an individual look for my cards.

They have been die cut and layered together with a pearl centre and because they are stiffened the petals have been pinched into shape.

I have used a stencilled background for each of my designs and used a simple hole punch for added decoration .

I am quite pleased with both of these cards and the colour scheme is bright and cheerful  when combined with the white.

You don't need to buy anything special just use what you already have in your stash and I know you will be delighted with it.. 

Here is the video
Stamping On Hessian 

I have one more video to add with two more ways to make the flowers from Hessian /Burlap / Jute and then I will  move onto another fabric and share how I make those flowers

Flowers are such a popular addition to cards and as well as making your cards look pretty they can also hide a multitude of sins.
 Know what I mean !!

And notice I didn't say mistakes there....

Bye for now ...

Hugs xx


May 08, 2025

Weaving Hessian

 Hi Everybody,

Here is another idea for using any hessian/burlap that you may have and the results are very effective on your cards.

You will need to adjust the size according to the size of card you are making but that is not hard to do.

Both of these cards have got a woven panel added to them and one is a 1cm strip the other is 2cms.

Yours can be any size that you prefer to suit your own personal design. 


You can buy hessian in different colours but you can always colour your own of you cannot get the shade you require.

I am sure that some of you have ben pleasantly surprised at the effects you can get from using this material and I hope you will give it a try.

There is much more to come 

Bye for now ...

Hugs xx


May 01, 2025

Another style of flower ...

 Hi Everybody,

This is another new material along the lines of Hessian that I am trying to make flowers from and it may be something else you have not considered either..

This is the Jute Cord that I bought to restring my roller blind and it comes in very handy for these flowers  too.

It is very cheap to buy and it goes a long way. It is also very strong as I can vouch for it and my roller blind is going strong still.

This is just one of the ways in which I share with you how to make more flowers for your cards and these are not too deep .

They can be made in various sizes just by plating more of the cord if you need it, and you can dress up the centre of the flower with anything that you already have.. 


Bye for now ...

Hugs xx

April 28, 2025

Making Flowers with Hessian / Burlap

 Hi Everybody,

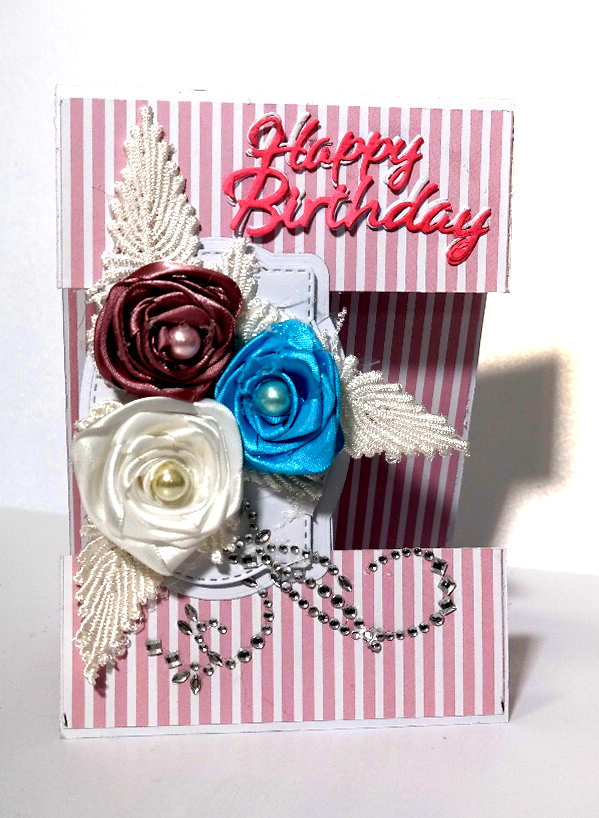
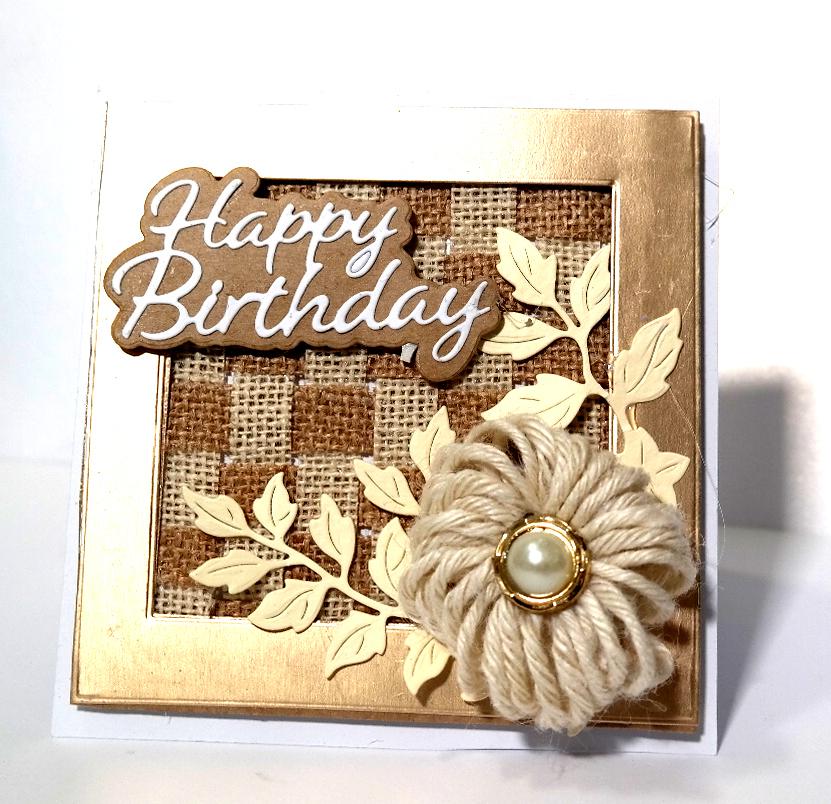
This card is the one made in the video on using a Hessian  sheet for flowers, and it is very pretty in the hand.

Hessian is a thicker material that is not often used in card making ... but I wanted to show you some variations that are out of the norm.

The best way to explain Hessian to you if you are not familiar with it is to think of sacks that can hold potatoes or grain. 

They are often made from Hessian as it is a very strong, pliable material that can be manipulated in various ways., and it is relatively cheap to buy.  It is also known as Burlap especially in the USA.

I have added glue to my sheets to make it stiffer and easier to die cut.

You will need a strong glue and I prefer hot glue, but be very careful with it if you use hot glue too as it gets very, very hot and will give you a nasty burn. 

Ask me how I know ???????? 

It comes in other colours than the ones I have shown you but you can colour it yourself.

I have coloured the petals and the leaves with Distress Oxides and a small brush and because they where stiff they where easier to bend into shape.

I did more in the video with dies and if you don't have dies then I show you how to make a little template that you can use to add to the Hessian and cut around.

But if you do have dies then just use any that you already have and the same for the leaves. .

Making Flowers with Hessian Sheets

Maybe you have tried this material before and not quite taken to it but it is easier to work with once it is stiffened up with the glue, and mine is just a cheap 5 litre bottle from the Range that will last me for years, and years ... and years !! ....

If you do try any of these ideas be sure to let me know as I would love to know how you got one with it.

Bye for now ...

Hugs xx

April 23, 2025

Making Flowers - Fun Foam

Hi Everybody,

As promised I am sharing a series of videos that will feature making flowers from a variety of materials, some may be new to you and others you may have already tried.

I am going to cover Felt, Hessian, Jute cord, Organza, Crepe paper, Foamiran and ribbon too. 

For this video I am using the thicker Fun Foam and this is a lot different to Foamiran.

It is thicker and is not as pliable as the thinner Foamiran but it is very essay to work with and it die cuts really well.

You can find a vast choice of colours in the Fun Foam and it is very cheap too. I got mine from Hobbycraft as there is a new store opened up near where I live.

I will be getting some more but in pastel shades next time and making more styles of flowers with it. which  I will share in a video when I do. 

Here is the video link to this one and I hope you enjoy.it and will come back for the rest in this series.


All the new flower making videos will be in a playlist on YouTube.

Bye for now ...

Hugs xx

April 03, 2025

Using Circles

 Hi Everybody,

Most of us have the basic shaped dies and this video is yet another way to make what you have work for you without the need to buy special dies.

In this one I am going to share how I created an umbrella and a flowers holder from just circle dies.

You don't need to have the same dies as me, just use any circle or border dies that you have, and the same applies to flowers and leaf dies as they all create the same thing.

And making your own backing papers is another good way to save you the bother of buying patterned paper packs.

 Most of the packs have papers that you don't like and will never use or the colours are not the ones you need. so why pay for them in the first place.

Making your own to blend with what you have in mind is a much better way to put your time to good use, and far more satisfying than buying them.

Using Circles Again

I hope you enjoy the video and please don't forget to leave me a comment and give me the thumbs up, and if you aren't already a subscriber then please consider joining my channel and help the numbers to grow.

I have recently  been asked about the ink smoosher that I have been using to create my backgrounds  and I got the idea from another YouTuber.  I am adding the link to NBCards and Natalie shows you how to make you own

INK SMOOSHER 

Thank You

Bye for now ...

Hugs xx

March 31, 2025

Shabby Chic Gatefold Video

 Hi Everybody,

Today I am adding a video that will show you how I made the Gatefold card from last Tuesday. 

This is not as hard as it looks and you can try this with any die that you have in your own collection, you certainly don't ned the same one I have used.

It was a die that I designed years ago and I doubt very much if it will still be available to purchase.

The colour scheme was inspired by a shirt I was wearing and I really like the end result. Try this with any colours that take your eye and see what you get. 

Here is the video and I hope you enjoy it ...

Shabby Chic Gatefold Card

This is the card from last week and I have modified it just a little and changed the colour scheme too,  but the flowers are still the Mulberry flowers that I use a lot of.

If there is something that you would particularly like to see then let me know and if I have the dies , or something similar, then I will give it a go.

Thank you for the lovely comments I am getting both here and  on YouTube, it is much appreciated.

Bye for now ...

Hugs xx


March 27, 2025

Shabby Chic Heart Video

Facing to the right
Hi Everybody, 

Today I am adding the video to share with you how I made this beautiful card.

I have used the really old 6x6 Heart Box Die Set that I designed as Card Making Magic a long time ago but if you have the die set then now is the time to get it out again.

For this I have added in some cheesecloth and a white die cut panel along with some blue flowers and the little cherub on the left side.

It is a really pretty card and the edges have been decorated with lace and although it looks fussy it is  not hard to do at all.

Facing to the left
You will notice that each card faces a different way and that depends on which way round you use the base as you make it.

This peach card is my favourite as it is so vibrant and the background colour way is created with inks by hand.

They can be for any occasion and any colour that you want but they all look really good once they are done and shabby chic is a style that  never seems to go out of date.

Enjoy the video


Bye for now ...

Hugs xx 

March 20, 2025

Shabby Chic Cards

 Hi Everybody,

Shabby Chic is a beautiful arrangement and it is not as hard or as fussy as it looks.

These pictures are of some that I have done in the past and they are in different sizes and even the box.

I have made many of these cards and tags in lovely colour combinations and had lost of fun while making them.

I will make  more and film them as I do so and then add them to the blog.

 But until I have some time to make one I am adding older videos of the process to help you to get the look for your self.

The fist one is a beautiful colour scheme of lilac and lemon and they team so well together.

The second one is in blue and beige and again another lovely combination.

So I hope you will join me next week when I add another Shabby Chic Video to the blog pages


For the video I will be using items that I already have for example hand made papers that have been created using inks and stamps, homemade texture paste for more texture, cardboard left over from packaging to give height to the card.

Lots of flowers and leaves, some lace that I already have as well older dies and other bit and pieces that are in my stash that you may have too.

Bye For Now ...

Hugs xx

March 13, 2025

Making use of your Nesting Dies

 Hi Everybody,

Nesting dies are such a useful addition to anybody's crafting collection as they and do so much, and many die sets have a lot of dies in them.

 You can create mats of different dimensions to fit the front of your design and lots of frames of lots to ad to your stamped images.

I have used a really old Pennant die set from Spellbinders simply because it is an unusual shape and will illustrate my point perfectly.

So from this set I have chosen the dies that will create the basic pennant and there are four that I need.


Will show you how these four dies will make twelve pieces that I can add to my cards in different ways by increasing or decreasing the size of the die cut.

I have made four cards but each one uses the pennants with subtle changes and you can do this with ANY nesting dies that you may have.

I have used squares, ovals and circles as well as odd shapes in the past and they have all turned out really well.

Here is another video using the same technique and this video is eleven years old.


I hope you will enjoy both videos and will also give this a try for your self. It will help you to give a completely different look to your cads,

Bye for now  ...

Hugs xx 

March 11, 2025

Handmade Roses

Hi Everybody,

For this card I have used a really old die that produces spiral roses,  and they are a beautiful finishing touch to my cards.

I cut these from two shades of red card and then inked the inside portion of the die cut with a darker red before I rolled it up.

Once I had it glued down I went over the petals with some gold gilding wax and that added a lovely sparkle to the blooms.

I used another old die to give me the leaves I needed and I coloured them with Brushos,  they too have the addition of gold wax.

The background paper is hand made and for that I used Candied Apple and Gathered Twigs and then splattered the paper with gold paint.

I added a gold leaf sprig  from the Rose Flourishes die set to the display and I am really pleased with the look of this card.

Making your own flowers can save a lot of money as the shop bought ones can work out quite costly and there are many many videos on YouTube on how to make them from myself and other creators.

Bye for now ...

Hugs xx
 

March 06, 2025

Gilding Flakes

 Hi Everybody,

Gilding flakes can certainly add that touch of luxury to your cards and it is not expensive. 

A small tub goes such a long way,  but I would advise you to decant it into a larger container as the flakes tend to swell once they get to the air. 

Plus they also fly everywhere so don't have your windows open or the fan on when you are adding them.

There are lots of different ways they can be used and double sided sheets are just one of them.

The flakes come in lots of different colours and mixes too, some with red flakes, or how about green ones, or blue ??

You can also get them in copper and pewter as well as gold and silver. and so you can have a really good play and see which you prefer.

Because there are so many in a pot it is a good idea to get together with another crafty friend and buy two different colour ways and then swap some over so you get some of each.

Here is the video ...

Adding Gilding Flakes

This video has been added to a playlist on YouTube about adding flakes to your card and will be shown at the end of the video,  but it also includes glitter and foil to the design as well. 


Bye for now ...

Hugs xx

February 25, 2025

Shaker Card

 Hi Everybody,

I have been asked to show how I make Shaker cards and here are some videos that I did a while ago.
I will do a more up to date one but these will keep you going for some time hopefully, and this one uses parchment for the shaker pocket.


This second on is another variation of how to create the look and I hope it helps you to see the different materials that can be used for shaker cards.


Don't worry about not having the same dies as me just use what you have, and you can use a cellophane bag or a CD case as well as acetate or parchment to create the pocket. 

And you can fill it with a variety if things to make the shaker portion, even the bits that fall out of other die cuts as waste. 

Enjoy as these are such fun cards to make and especially for a child's birthday.
There are more ideas in the Shaker Card Playlist on YouTube 

Bye for now ...

Hugs xx

February 18, 2025

Cards from the Videos

 Hi Everybody,

I am so happy to read the comments that the videos have gone down quite well and that some of the ideas have been taken on board and used for your own designs

These are some of the cards that are in the videos and it is good to know that some of you have the dies too.

I have so many Spellbinders from my time on their DT and many more that I designed for Craft Stash and it is time they got an airing again.

The card to the right is from the rectangles video and the one below is from the squares and I still have lots of ideas on how to use just one set of dies to make different cards.
I have incorporated all the videos into one playlist on YouTube and titled it


and it has other vidoes in the list that you may find useful, plus I will be adding more to it as I go along.

I have some really old sets of matching Spellbinders that I would like to video and you may have them as well.

Plus I am open to suggestions if there is something you would like to see and if I have the dies, or something similar, then I will oblige

Thank you for the comments that you have left for me it gives me a lot of pleasure to read them.

Bye for now ...

Hugs xx


February 17, 2025

Time for Rectangles

 Hi Everybody,

I have worked my way through some Squares and Circles and the last video was with Ovals but for todays video I thought I would use some Rectangles.

I was going to name the video 5x7's but rectangles come in many sizes from A5 down to the smaller A6 and you can of course cut these down to any size you want.

In todays video I am using a really old set from my own range of Card Making Magic but they are no longer available to purchase

So as I always advise you,  look at what you have and make them work for you and maybe you already have this set

These two cards are both 5x7 but one has the die cut added to the card base front and the other has used the shape die cut to create the full card.

I hope you have enjoyed the little series and have now started to use the dies that you have more in your card making.

I make seven cards and hopefully they have given you some ideas of your own to build on.


I have added the links at the top of the page to all the videos in this series just in case you missed them and by clicking the link you will open a new window to view them.

I would love it if you would give me the "Thumbs Up" leave me a comment as that really does help my YouTube Channel to grow, and then YouTube will recommend my videos to other like minded crafters.

And it you became a subscriber both here and on YouTube that would be fantastic.

The flowers I have used are from Wild Orchid Crafts and they no longer ship to the UK , 
but you can get the same flowers at a similar price from Carroway Cottage the the link is below if you need to get some more

Bye for now ...

Hugs xx

February 13, 2025

Oval Variations

Shaped card
 Hi Everybody,

Today I am using oval dies that I have in my collections and I have chosen some dies from Spellbinders that are at the very least ten years old

It was a set that I very much loved and used loads when it was first introduced but like everything else it got pushed to one side as new items came on to the market.

I am sure that lots of other people have the same dies and have neglected them for so long.

But now I am on a revival kick and digging out all my old dies again and breathing new life into them 

Shaker card


Here are three of the cards from the video and you can do the same styles with any of the die shapes I have covered so far.


Once you start to play and experiment with the shapes I know you will be able to come up with so many more and have fun in the process.

This shaker card is lovely and I have linked to the parchment and mirror card that I have used below.

They are easy to make and the results are stunning

DL Card base

The card to the right is a DL and I often get asked
what is a DL card. 

All it means is that the card is double the length of its width so for example my card is a 8 x 4" base.

But it could be a 6 x 3" card or any size you choose.

In the next video I will be covering my favourite size which is the 5x7 and showing you several ways in which I have used mine. I hope you will join me for that.

Bye for now ...

Hugs xx