Beautiful Card Designs Made Easy

February 18, 2017

Todays Winner ...

Hi Everybody,

Not too bad a day here and I have lots to to do this afternoon.  Mainly prepping for videos over the weekend to bring you lots of new ones in the next week or two.

But this morning the draw has been done and the name  chosen at random was yours ...

Maria Illsley
so if you could email me please
christina@card-making-magic.com
with your postal address the card will be on its way to you 

You have 72 hours in which to claim it and please let me know that you have it safely once it arrives.

Have a good weekend 

More tomorrow ...

Hugs xx

February 17, 2017

Friday Freebie 006/17 - Pink Floral

Hi Everybody,

A really pretty pink and white floral card is on offer today and this is prettier in the hand than the photo shows.

It is in my favorite colour and with all the things I like to add especially the flowers.

So here is another card on offer for you and if this is one that you would like to have then you know what to do

Just leave me a comment at the end of the blog post and then from those comments a name will be chosen as the winner

You will need to come back in the morning to see if it is you and then you have 72 hours to claim it.

Please leave your full name as there are lots of people with the same first name and I won't know which one you are.

Good Luck everybody. Please scroll back for yesterday's post as it was a late addition ....sorry!

More tomorrow ...

Hugs xx

February 16, 2017

New Card Kit

Hi Everybody,

Today I wanted to tell you about a new card kit that is in the shops and this is from Hunkydory.

It is the Design Collection and this is the very first Issue for you to see.

In the kit there is a magazine that will take you step by step on how to use all the various elements that you will find in the pack  and there is something there for every level of card maker

The card pack is fill of things for the new card maker and you can make many designs from this in no time at all.

There are foiled cards and beautiful backing papers as well as inserts for many of them

I have also created a video to show you some of my ideas on using this versatile kit that is on sale in the shops right now.

Design Collection Issue I  is sure to please you and give you lots of scope whatever level you are at in your craft.

Open it up and have fun and see what you can come up with

More tomorrow ...

Hugs xx


February 15, 2017

Two Posts in One ...

Hi Everybody,

Because of the change in my Tuesday Tutorial and the Water Colour Wednesday this week I thought it may be a good idea to combine the two and create a card with some water coloured flowers. 
I have used Spellbinders dies for my design and the flowers are bright and cheerful.
Spellbinders Supplies:
Other Supplies:
  • Rose pink and white card from Papermill Direct
  • Gansai Tambi water Colours
  • Water Colour Card
  • Wink of Stella Clear Glitter pen
  • Foam pads of varying thicknesses
Instructions:

With the largest die #8 from the Matting Basics cut two panels and create a hinged card
Hand cut a slightly smaller layer in rose pink to leave a thin border around the edges
Cut another layer in white, again leaving a small border,  and emboss in the folder.
(The card will be wider than the folder so emboss most of it and then move the card along to emboss the remainder.
 Partially cover the folder with the embossing plate and run through the machine. 
The pattern is busy enough not to notice any discrepancies in it )
Glue the two layers together and add to the base card with foam tape between to give dimension
With the solid die to Medallions Three cut one piece in rose pink and then with both parts together cut a filigree layer in white
Add these two together with foam pads between the layers and then more foam on the back of the pink card
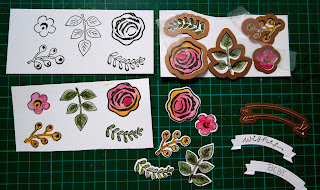
Stamp, colour and cut as many flowers and leaves as you would like for your card
I stamped the sentiment twice and then used the banner die to cut each word separately 

Add the Medallions layer to the card and place a pearl in each corner
Arrange the flowers in the centre panel as you like them and use foam pads of varying thicknesses under them and the leaves.
 Keep two of the smaller flowers to one side
Add foam to the banners and arrange on the flowers then add the smaller flowers so that they just overlap the banners.
Add a little shading to the banners to make them look curved
Lightly add the glitter pen to the flowers for a little sparkle

More tomorrow ...

Hugs xx


February 14, 2017

International Ambassadors Informal Blog Hop

Hi Everybody,


We, some of the International Ambassadors for Spellbinders,  have been doing this informal blog hop for over two years now and between us we have covered many subjects and themes.

This month we are doing Valentines Day and using some of the newer dies that are there for you to buy.

For my card I chose the  Bowlicious  die set is in three parts and one of the cutting edges can be moved to extend the depth of the bow
You can use it to add a separate bow to the edge of your card or you can layer it up to create a more full look.

Change the colour scheme and alter the sentiment and it can be used all year round

Now why not pop over to my colleagues and see what they have in store for you this month.

Linda Lucas    Australia
Yvonne van de Grijp   Netherlands
Christine Emberson    UK

Leave them a comment to say you have been.

Thank you so much for your continuing support

More tomorrow ...

Hugs xx