Beautiful Card Designs Made Easy

Showing posts with label Embellishments. Show all posts

August 31, 2014

Craft show "Goodies" ...

Hi Everybody,

What a lovely day I have had out in the sunshine and going to the craft show.

I bought quite a few items  but mostly essential stuff like card and glues.

But some of the pretty things that you can see in the photo are some lovely  strings of pearls   from Anna Marie Designs and they are going to look fabulous on my cards.

I bought lots of card from AnnaMarie too and also some from Limetree Craft and they have a really good display of card in all different weights and colors.

My favorite ribbon was there too and I bought loads of satin ribbon in white to color myself from Mei Flower

I bought some new craft knives and blades and tweezers too ... along with scissors as they are always needed in the craft room.

And from the ever useful Pound stall I bought lots of magnetic sheets to store my Spellbinders on and at £1 they are an absolute bargain ... and the deal was buy 12 and pay for 10 so I bought lots of them.

I also got some really pretty embellishments to add to cards for a truly luxury finish from   Chloes Creative Cards  but do price these into your cards carefully if you sell them.

I also met some lovely ladies who recognised me from my visit to Create and Craft TV ... and that was a very strange feeling ... but very nice.

So after a really lovely day out and a wonderful roast beef Sunday Lunch I am home again ... tired,  happy and full.

More tomorrow ...

Hugs xx


June 24, 2014

Fun Card ...

Hi Everybody,

This is not a new technique it has been around for many many years.

It is one way of adding a marble effect to your card but a lot cheaper than the marbling kits that are on the market

I have done tutorials on using it in the past but this is bringing it up to date with some added extras

I have not used any special card either just the  White Linen effect one I use all the time for my bases from the Papermill Direct


It looks very effective and is one way to get your background to match the rest of your card ... ideal when you are searching for a paper that will go with your design


I have added in a pearly hat pin to this card and the diamanté "Bling" is from Want2Scrap

So this is the shaving foam technique in a short video format and I hope you will enjoy it as much as you have told me you are enjoying the others that I have added.

Thank you for the many comments,  emails and Facebook messages I get it is much appreciated and I hope you will give this fun technique a try ... even if it is messy

More tomorrow ...

Hugs xx


June 23, 2014

Adding the Pearl Sprays to Cards

Hi Everybody,

So yesterdays  video was how to create the pearl sprays for yourself and todays is showing how I added one of them to my card.

It is an easy but effective  way to make these little embellishments
and then I have added them with a hot glue gun.

I have simply pushed them into a flower display and the effect is very pretty ... but to buy these sprays in the shops can set you back a pretty penny.

You can add three or five beads ... or as many as you want to create your spray.

The card is created in the Hinged Card style and the filigree die is the Sue Wilson Seville from  JGD Crafts 


The close up shows you how it looks and I will certainly be adding them as an alternative decoration to some of my cards

I hope you enjoy the video and will give this idea a whirl and I will be back with more ideas soon

Yesterday I explained to you about why it is important to add the watermark to your creations and  Sue's Scrapping Memories asked me about it.

It is from Whimsy Stamps and the link will take you straight to the Watermarks   

 You can choose the style, font, color,size add your name and website to the mark.

They cost $5 (about £3.50 GBP)  and for that you get the watermark that is seen on my cards AND the signature that can be seen at the bottom of my web pages  (Not the blog signature)

So a real bargain and the choices are beautiful

More tomorrow ...

Hugs

May 01, 2014

Spot the difference ...

Hi Everybody,

There is  something about this card that I wanted to show you.

This card is only a 6 1/2 inch square but I wanted it to  be subtly  patterned and contain a gift.

I have layered it with wide blue ribbon and tied a single bow with a large blue centre to it

And then there is the addition of  ... the simple hatpin

I used beads that would compliment the color scheme and then just added it to the ribbon.

But I think it turns a "pretty"  card in to something special.

And of course it makes a lovely gift for your recipient.


I have used the Spanish Collection die Seville  by Sue Wilson  from JGD Crafts

The flowers are from Wild Orchid Crafts  with the sparkle provided by Glitter Magic

The pearls are from Want2Scrap  and they are Mother of Pearl

The background is created from the Regency Swirls folder from Crafters Companion

Once embossed I have rubbed  Pearl Moon  metallic gilding wax from   Creative-studios    over the top to enhance the pattern


More tomorrow ...

Hugs xx


March 09, 2014

New Hatpins

Hi Everybody,

So this is what I have been doing over the weekend.

 I ordered some new beads, diamante roundels, glass beads and other items to create some new designs for the Hatpins

They are very pretty and they have been added to Etsy  in packs of five assorted designs.
I have more stuff on the way and will get busy making other designs  when it arrives.

I have bough the items from various places ... mainly China and so will need to wait now for the  postman to deliver them all.


But the Hatpins and end protectors are from the  Sparkles Group   

They can be found on Ebay at the moment until their website is up and running again.

If you add the code CG05  at the checkout then a discount will be applied automatically for you.

Here are just a couple of close up ideas and I will show more next week.

Back to cards soon and some new videos too.

More tomorrow ...

Hugs xx

February 15, 2013

Thinking of You ...

Hi Everybody,

It is very late in the day to be doing a Blog post but never the less here I am....

This is another Spellbinder card and this one us using the Labels 20 in the centre with the sentiment layered on top.

The other dies used are the Floral Doily Accents and Motifs.

I have used the border and created a central panel with Centura Pearl card which has been embossed.

Then I have double layered white satin and organza ribbon and wrapped it around the panel, and along that I have added in a line of pearls.  Pushed through the bow is a beautiful glass beaded Hatpin with a pink Rose in the centre of the glass.

The Labels 20 has the addition of matching pearl   "Bling" from Want2Scrap   and large pearls have been added to the centre of the bow and each of the corner pieces.

I have used foam pads to separate the layered the sentiment and the Labels 20 onto other parts of the floral Doily shapes to create the large panel that they all sit on.   The floral  paper is in a lovely shade of turquoise 

It has been matted and layered with white and turquoise card and an "A" frame created to display it... and it is an 8" card ... and have you noticed ... not a flower in sight !!

Hugs xx

September 11, 2012

Not A Christmas Card ....


Click to Enlarge
I thought I would have a change from Christmas cards with this one and I brought out the Spellbinders.

I have  mixed and  matched many  of the ones that I have and I really like the  look of this card.

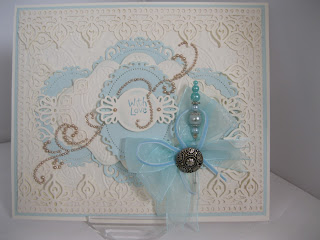
The colour is a soft teal  and cream and the oragnza  ribbon matches the card  perfectly.

In the  centre of the bow  I have added a  Vintage button  and the  Decorative Hatpin  is pushed throught  the centre  of the knot.

The Spellbinders  are in BOLD  to highlight the ones I have used for this card.
 
The background has been run through  the  Paisley M-Bossabilities folder  and then edged with the Persian Accents borders on each side.

I have cut Floral Ovals three times using the largest and the second largest dies and added them in Teal at the back ... with the two smallest on either side and the largest in the centre.

Labels 20 has been cut and embossed and raised on foam pads to the centre of the card.  Perisan Accents corners have been placed on either side of the label.

Another Floral Oval has been added in Teal to the back of the sentiment, which is cut in cream from the Persian Accents.

The Pearly Swirl is Le Creme Finesse from Want2Scrap  and I have curled it down the side of the card and around the "With Love" sentiment.

And the  reason it is  curled around  the sentiment is  because ...  I slipped with the  wording  and added  a  mark  (idiot!) .... so  covered it up with  the Swirl.

Hugs xx


August 26, 2012

Oh! Christmas Tree...

This  card was  created using  the 2010 Holiday Tree that I got from Save On Hobbies  and it makes a very pretty card for that special time of year.

It uses the  Baby  Blue and  Dark Blue Pearls  from  Want2Scrap  to stud the  tree.

I have used the different sizes around the middle shape and added it to the the largest shape with Pinflair Glue Gel to give it height.

The largest and smallest shapes in the dies have been sparkled with Glamour Dust.... and the background has been run through a Snowflake embossing folder.

To the Floral Ovals I have add a  Cloud Effect  as a backdrop to the trees. The ribbon ia Navy Blue and the two stars are wooden ones that have been dabbed in glue and then sparkled with the Glamour Dust. 

This is going in my pile of cards ready to send at Christmas.

Hugs xx

May 04, 2012

Pink Flowered Tag Card

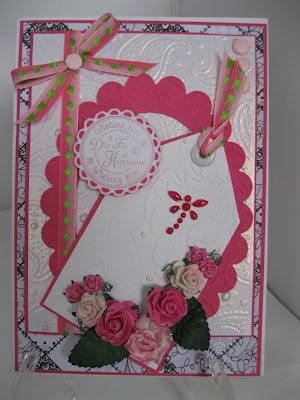
Adding tags to your cards can create a very pretty embellishment and they are so easy to cut yourself and so save  you the cost of buying them ready made.

For this one I have embossed white Centura Pearl Card and matted it onto some hot pink and added ribbon from   Fantastic Ribbons   around the panel.

The knot in the bow is covered with Card Candi from  Craftwork Cards

This is then matted that onto pink patchwork paper and again onto the hot pink.

The whole lot has then been glued to a white card base.

The close up shows the detail in the tag which has been embossed to add texture and dotted with Cosmic Shimmer   Pearls  in the flower centres

Layering onto some hot pink card and an eyelet added to the top enables me to thread the ribbon through.

The flowers are from Wild Orchid Crafts  and the sentiment is from  Lili of the Valley

An easy make that would be suitable for any girly occasion.


Hugs  xx

May 03, 2012

Pink Scraps

Making cards can be as cheap or as expensive as you want it to be and there are many ways to conserve your cash without making a poor standard card. 

And by "cheap" I don't mean the quality but the cost as there should be no compromise on the quailty.

From the card you use to the embellishments that you add ...  it always pays to buy the best that you can get in your price range. 

My mum always used to say ....."Buy cheap you buy twice..." and there is a lot of truth in that statement.  

So having bought this card and paper we  need to make it go as far as we can and that is using every last inch of it to full advantage.

These paper strips are some that have been left over from other projects and because the papers are so pretty it was a shame to throw them away.

So what I did here was to find three pieces that would match and blend with each other and I cut them into strips about 5 x 15 cms and glued them together onto a piece of Centura Pearl card from    Crafters Companion

I left a small border around the edge and covered each of the joins in the papers with white ribbon from    Fantastic Ribbons.  

Then the whole panel was embossed to add texture.

I added borders in Centura Pearl  using the Spellbinders   Ironworks Accents and Motifs  and I added a pearl in each corner to hide the joins.... then fitted in the centre panel with foam pads to raise it up.

A pearl has been added to the top of the sentiment and the same ribbon has created a bow. In the centre of the bow to hide the knot I have threaded a button with Bakers Twine  from the   The Hobby House   and glued it in place.

The finished card is  21cms square (8") and it looks much prettier in real life.

Hugs xx


April 15, 2012

Double Easel Card

The previous days have been about getting the look of Easel Cards and twisitng them as you go along.

So today is the turn of the Double Easel Card  ...  which is just as easy but a little more interesting.
,
I have used a large die cut Butterfly from Marianne Createables and some hot pink ribbon with butterflies in it to match.
Self adhesive pearls create the butterfly trail and a template from Bassill Basics was used to get it correct

Using a template  to get the effect will help you to place the pearls or gems neatly in the position that you want them.

The Easel stops have been created from the sentiments to suit the occasion and thay are raised onto foam pads so that they will keep the easel open.

Tomorrow the same card will be Twisted for yet another look.

Hugs xx


April 13, 2012

Easel Card

This week I thought I would go back to basics with a card fold that is very popular,  and one that is very easy for those new to cardmaking. 

Then over the week I will show all the ways  to make this card ... right up to the four variation.

The image is from  the Back to Nature CD from  Polka Doodles  and it has been decoupaged on to the front of the easel.


So this is the Easel Card in it's simplest form.  It can be made to any size you like by just folding the card in half and then folding one of those halves in half again.   The link is to a short video tutorial. 

If you are a seasoned cardmaker then you will know exactly what to do to get this look, so I apologise if it seems I am being too basic.

But there are new starters to this hobby everyday and they don't know where to start.

I get emails from lots of people asking me to start at the begining and that is what I try to do, and they can find many many projects and card folds at   Card Making Magic

The flowers on this card are from my "Stash" but the metal spacer centres are from The Hobby House   and they have been attached with Pearl Brads.

The Twisted Easel will be tomorrows card ...

Hugs xx

March 30, 2012

Word Books

Another easy to create book that can be for lots of occasions.  These are some that I have made for my family and friends over the years and they are all made from CD's from Funky Hand

This is one that has proved to be extemely popular and I have been asked to make this several times.

They are very easy to create and as long as the word you want is not too long then you will have no trouble with them at all.
The video instructions to make them can be found  Here  ... but you will also find full instructions on the CD's and the downloads.


A very pretty project to do and you can add all the embellishments that you have from your "Stash"

Hugs Christina xx

March 21, 2012

Cream and Gold

Cream and Gold is such a winning combination for any card,  but really suits the wedding theme which is getting into full swing at this time of the year.

You could add any embellishments that you have in your "Stash" ... but for mine I have added the pearly Nestabling  swirls tucked under the Floral Ovals from Spellbinders.

I have added cream ribbon that is edged in gold and tied into a large bow for the top of the oval.

The sentiment has been stamped onto the oval with Versamark and heat embossed in a fine Gold detail powder.

The flowers are from Wild Orchid Crafts  and they have the addition of Glamour Dust along the edge of the petals. 

I created the Decorative Hatpin which is removable and will make a small  a gift for the recipient.

The Hatpins come complete with end protectors from the Sparkles Group  ... and if you add the code CGDIS5  then a 5% discount off your order will be applied automatically at the checkout.

Hugs Christina xx


March 20, 2012

Spellbinders and Polka Doodles...

These Spellbinders  are some of the ones I bought at the Craft show and they are the Persian Accents, and the Floral Ovals layered over the top of the Romantic Rectangles.

The background has been embossed with the Buttefly Garden Impressabilities and the pink oval with the Crackle embossing folder.

What a great combination it is with the image from the "Pretty Sweet" CD from Polka Doodles.


I have cut small slits along side the childs knees and threaded the ribbon through to make it look as if she is sat on the ribbon, and attached a large bow to the side.... with the Hatpin  added as a small gift.

The pink gemstone swirl is from Want2Scrap and is one of many beautiful designs.


The flowers are from  Wild Orchid Crafts  and are a mixture of Roses and Carnations, with the Foliage at the back.


They have had a sprinkle of Glamour Dust as the finishing touch.

Hugs Christina xx

March 14, 2012

Here's the card...

This is the card I have been making and filming over the last weekend and I am so happy to share it with you.

This is the Pleated Centre Card with Spellbinders.

Again I have used the Labels 20 shape as it really is one of my favourite dies.  I have used all the left over bits from other cards of the Nestabling along the top edge and the effect is quite pleasing


The finished card is so pretty and the photogrpah does not do it full justice ... but I hope you like it and will enjoy the video on how to put it together for yourself.

The second card is done in shades of pink and is very girly. The flowers and leaves are all made form the same papers I used for the pleat and the frame.


The pale pink gemstone Nestabling  from  Want2Scrap   completes  my look,  along with the organza ribbon.

If you try this effect for your self then please let me know what you think.

And maybe you would like to add your photos to the Gallery Page on the website so that we can share your creations.

Hugs Christina xx

March 13, 2012

My first 100 followers ....

Have you noticed the box at the top of the page that says I now have 100 followers.... YaaaY!

Well thank you to everybody that has joined this Blog ... I am very honoured and amazed at the response.

Both of these cards are 8" squares ...  as I am in a Big Cards phase at present.

I hope you like this card using the Nestabling again and the more I use it ... the more I like it.

This is a clear Diamante swirl that I have cut to the size I needed,  and I have tucked it just under the sentiment,  to emerge from both sides.

There is also a Diamante circle around the edge of the sentiment.

Spellbinders Spiral Blossom die has once again come up trumps with the flowers and the backing paper is from the Floriography CD.


This very pink card has a gorgeous piece of lace along the bottom.


Now I know that lace is expensive to be adding to a card ... but I used such a small piece of it.

The rest will do about three more cards so it works out not too bad cost wise... and it looks so pretty.

I am just waiting for my film crew (Griff)  to do some editing on a new video and the featured card is just fabulous and I can't wait to share it with you. 

So please watch this space and come back to visit soon as the video will be added in the next few days.

Hugs Christina xx

March 04, 2012

Diamonds are a girls best friend...

This card looks far more dificult than it is and it can all be made from one piece af A4 card.

The back and the front can be decorated to match and there is plenty of space on the inside of the card for a verse or a sentiment.

The panels have been embossed and the butterfly is a die cut  from Marianne Creatables  and is cut from Glitter card with a pearly buttefly trail.


The ideal way to send this would be to create your own box and that too could be decorated to fit in with the scheme of your card.

Add flowers, ribbons and pearls from your "Stash" and make the card as pretty as you would like.


There is a video on the website to help you create this Diamond Top Card

The large Paper Rose  is also in a video and these are such a pleasure to make.

That way you will always have flowers to match your projects ... all you need now are the ribbons and pearls to go with them.

Now just before I go can I add a reminder that the winner of the Blog Hop Candi was Suzanne and as yet she still has not claimed the prize.

Can you let me have your shipping address please Suzanne and then I can post the stamps out to you.

But if they have not been claimed by the end of this week then I will draw another number for a new winner.


Hugs Christina xx

March 02, 2012

Blog Hop Prize Winner is ....

The Blog Hop winner has been chosen and the prize of the three clear stamps will go to ....Suzanne !!

If you would like to email  me  with your snail mail address then I will get your prize in the post to you straight away.

And congratulations I hope you enjoy the stamps.

Are you getting ready for Mothers' Day?    Here in England it is on the 18th March so not long to go.

This is a card that would be perfect  for that occasion and I love the colours of it.


The hearts are layered with lace in between each one and the swirly Gemstone embellishment is just gorgeous.

It came on a sheet in large swirls,  but I just cut it into the size that I needed for my project. This is one of three cards that I have been commisioned to make for the day.

The next one is going to be featured in a video on using the same set of dies that have been used in  all the Spellbinder Tutorials  and it is so pretty.

The flowers are from Wild Orchid Crafts  in a lovely shade of lilac and white and I have sprayed them with Perfect Pearls to make them look .... er Pearly!!

I am off to a craft show this weekend and I have no doubt I will be buying some stuff. The weather forecast is quite good too and so it should be a really enjoyable time. I will show you what I buy on Monday.

The show is one of many organised by  Sincerely Yours  that are held around the country... aaaand if you buy your tickets on line then not only do you save money ... you also get FREE tea or coffee all day.

 Have a look there may be one coming near you somewhere in the UK.

Hugs Christina xx


February 24, 2012

Decorative Hatpins

Adding embellishments to my cards is one of the things that I really enjoy doing and I openly admit to being a "More is More" kind of cardmaker.  I just love all the pretty things that go to making a truly feminine card .... not much good with male cards!!

Yesterday I covered felt flowers created with Spellbinders and today I would like to show you some beautiful Hatpins.


These are always a luxury touch and they are not hard to do.  There is a video on the website about   Decorating Hatpins


The Hatpins that I use are 3" long and come complete with end protectors as a safety feature ... and that way the recipient cannot hurt herself on the sharp point.

I buy mine from the Sparkles Group and they are offering you a  5% discount  on your purchases.

Make your choice ... and at the checkout add the code CGDIS5 and the discount will be automatically applied. 

You will find the pins in gold and silver and in different lengths in "Specialist Findings"


Add the pins to the card ... threaded through ribbons or flowers ... but don't forget to tell the recipient that the pins can be removed and used as a lapel pin for her jacket. 

Maybe another idea for Mothers Days eh??

Hugs Christina xx