Beautiful Card Designs Made Easy

Showing posts with label Tutorials. Show all posts

March 02, 2018

Friday Freebie - All Occasions Stamps

Hi Everybody,

On offer today is another A4 stamp set and this it the  All Occasions Stamps

There are some beautiful stamps and sentiments here to grace any of your designs and you are sure to have fun playing with it.

The video to show this set is All Occasions Stamps  and it is not long so I hope you will take a look to remind you of the tutorial.

Now if you would like to win this ever useful set then all you need to do is leave me a comment at the end of the post.

 From those comments one name will be drawn and the winner announced to tomorrows blog. Be sure to come back tomorrow to check if you are the winner.

  Craft Room Sale Day 
and the date is going to be the 18th March 2018
If you emailed me about this then I will send you the address and for others that are interested then please email me 
christina@card-making-magic.com

More tomorrow ...

Hugs xx

February 13, 2013

Mothers Day Card

HI Everybody,

Do you remember the little flower display from Mondays post ??

Well here it is made up into a card for Mothers Day which is on the 10th March here in the UK

I have layered up a turquoise panel cut with the  Romantic Rectangles and white layers with the scalloped and plain oblongs which I have embossed.

Then the largest from the Floral Ovals is layered with the second size and the centre piece was shown  in Small Flower Corsage.

I have wrapped ribbon around these layers before adding them to the white base.... which is Tri Fold Card

I have added a bow with a beaded button centre and some turquoise trim along the middle of the ribbon.

The same trim has been used to accentuate the letters for MUM.

The Alphabet set  is  from the  Save on Hobbies 


Alphabet and Numbers are really good basic sets to keep in your crafting "Stash"  so that you can can add any name, age or date  that you wish to any of your cards cards.

Hugs xx

January 29, 2013

Jewel Box Saga ...Pt 4

Hi Everybody,

In the last stage I added all the patterns that I wanted on my jewel box and left it to dry.

Although not shown in the photo I have repeated the process on the two side doors and the lid.

Today I have been back to it and given everything a coat of clear satin finish varnish  and then left it to dry again.

That will protect everything from some wear and tear.

Tomorrow I will put it all back together and add all the "Bling" that I want to add.

So while I am waiting for it to dry I have been busy making some butterflies from flower petals, lace and beads.

They are about 7cms long but they are much prettier in real life than they look on the photo.

I can add these to cards or any project where a butterfly is needed.

This one has white feather added to the back of it and one small rosebud in the centre.

I have curled the antennae from some silver wire, and cut up a small piece of lace that I had in my stash.

It is a good way to use up all your odds and ends and here is a tutorial on how I got the look.

Making Butterflies  is the written instructions but I will have a video out soon.

Click to Enlarge all the photos
This one has the addition of a little sparkle to the wings and i think they look very pretty.

More on the jewel box saga tomorrow.

Hugs xx

August 26, 2012

Oh! Christmas Tree...

This  card was  created using  the 2010 Holiday Tree that I got from Save On Hobbies  and it makes a very pretty card for that special time of year.

It uses the  Baby  Blue and  Dark Blue Pearls  from  Want2Scrap  to stud the  tree.

I have used the different sizes around the middle shape and added it to the the largest shape with Pinflair Glue Gel to give it height.

The largest and smallest shapes in the dies have been sparkled with Glamour Dust.... and the background has been run through a Snowflake embossing folder.

To the Floral Ovals I have add a  Cloud Effect  as a backdrop to the trees. The ribbon ia Navy Blue and the two stars are wooden ones that have been dabbed in glue and then sparkled with the Glamour Dust. 

This is going in my pile of cards ready to send at Christmas.

Hugs xx

May 26, 2012

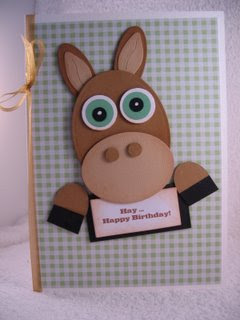
Horse Card

This is the last of the cards with a fun theme and the last day of my holiday and I will be home and posting "live" as usual next time.

I hope you have enjoyed the last few days and there are many more   Novelty Cards   on the website.

This   Horse Card  is made from punched or die cut ovals and is another one that is easy to make.

His eyes and nostrils  have been created from coloured circles and the sentiment is just from the PC.

A little ribbon around the spine and  any extras that you want to add will finish it off as you want.

But because all these cards have been added for children I have kept them reasonably simple and easy to do.

My kids used to love doing things like this when they were little ... but then I had to cut the shapes with scissors  as there was no such thing as die cuts or shaped punches.

Which just goes to show how far crafting has come since those early days.... and it shows my age too .... and computers didn't exist  then either.

Oh my .....

Hugs xx

May 25, 2012

Piglet Card

I really love this little   Piglet Card   as it seems so cheerful to me and I made it for a neighbours birthday as she adores and collects Pigs... and she loved it.

The sentiment was computer generated and inked around the fancy edge and added to the card with foam pads.

Googly eyes are always a fun element to add to this novelty type of card and they are so cheap to buy.

The curly tail has been created by wrapping some pink coated wire around a BBQ stick and glued to the back of the piglet.

Stand him in some mud to wallow in and he will feel right at home.

Hugs xx

May 24, 2012

Cat Card...

Another easy and fun card to make especially for the cat people that you know.  Add any sentiment into the banner box that suits the occasion and the recipient and send it with love.


Decorate the card with as much or as little embellishment as you have in your "Stash"

There are lots of fun and novelty cards to make on the website  and  this  Cat Card  is just one of many.

The link will take you to the page and they are easy enough for children to follow on their own.

They may use up all your craft space,  but if it uses up  some of  the scraps that you have lying around ... aaaaaand it keeps them occupied for  two or three hours then I am sure you won't mind.

Hugs xx

May 23, 2012

Birdie Card

Continuing the theme of fun cards here is one for any occasion. Again just punched or die cut shapes have been put to good use to crreate this    Bird Card  and it is an excellent way to use up all your odd scraps.

The beautiful pink  backing paper is from the Love and Cherish CD from   PolkaDoodles 
The cards have been kept very simple and easy to do so that children ... who love to craft ... can make these for them selves.
Making cards with kids is an excellent way to keep them occupied in the summer holidays when you have that rainy day and they are bored .... and driving you crazy!!

Get out those punches or die cut shapes and let them and their imagination loose and see what they come up with for themselves.

Hugs xx

May 22, 2012

Car Card...

Do you know someone about to take their driving test?   And are you looking for a card that will bring a smile to their face.?

If you do then it's time to get out those punched shapes again and get to work.

The different sized circles have been cut to make  this   Car Card  and the sentiment can be about any occasion you wish.

How about this for celebrating someones "Milestone" birthday ... you know the ones I mean the ones you would rather forget !!

Choose your recipient carefully though so as not to cause offence ... but I am sure that you will know who will take it in the manner it was intended.

Add some small red, amber and green circles for traffic lights and find a verse for the inside that also suits your intended victim .... er!  recipient.

Hugs xx

May 21, 2012

Apple Card ...

Here is another fun card that would suit many occasions and from the   Novelty Cards   that are on the website.

This   Apple Card     would be sure to cheer up someone  who is feeling under the weather and all it takes are some circle punched shapes and a little imagination.

Or how about this one at the end of term ... and at least the apple won't go bad  and that worm wouldn't frighten anybody.... no matter how much they hate the wriggly things

Hugs xx

May 20, 2012

Un Frogetable ...

I have scheduled lots of posts to go out automatically for the next week as I will be having a short break in Scotland.

My film crew  (Griff)  and I are having a little holiday in Edinburgh as it is somewhere we have wanted to visit for quite some time.

So over the next few days I would like to share some cards that  all  have an element of fun in them.

They are just a few of the ones that are in the   Novelty Cards  section at Card Making Magic.

They are all made from  simple  punched or die cut shapes and children love them.

Why not show them how to make some for their friends and let them give them out for a party or trip somewhere that you have planned for them.

 Mr Frog   is created from oval and circle shapes,  and  has eyes that have been formed from some smaller  punched circles and he is sat in a pool  of water  that is created with Glossy Accents. The mouth is just hand drawn.

You could add any sentiment you have or computer generate some for your use and add them to the card. 

"Couldn't froget your Birthday" .... "Just Hopping by to wish you .... "  ..."Kiss me !"... are some ideas of things to add to bring a smile to the recpients face.... and then they won't   froget  you either !

And I am keeping my fingers crossed that these post all go out as planned ... Back on the 27th

Hugs xx

May 19, 2012

21st Birthday Card

I made  this card  a  while ago for my  Grand daughter to give to her friend  for that very special birthday.

She wanted it to be pink and flowery so that was easy for me as I love both.

I made this as the  Bow Front Card  and added the instructions to the website. 

The pearly swirl is created  using  a  Bazzill  Basics template and I  bought  mine from The Hobby House

The card was well recieved and of course I had to make a box to go with it.
The flowers on the box and the inside of the Acetate front are from   Wild Orchid Crafts

Hugs xx

May 06, 2012

Blending Tools

Many of us like to apply Distress Inks to our projects and they can create a very pretty and subtle effect.

But it is something that many of us are afraid to do because we can't get it right and the result is a smudged mess on our cards. 

One of the best ways to apply these inks is with some kind of  Blending Tool  but these can be quite expensive .... especially if like me you are greedy and want one blender for each ink pad .... Yep that's me!

So this is what I did to make my own and the link will take you to the page to show you how to make your own   Blending Tool

You will find all the step by step instructions and then you can have as many as you like.

All I did then was by the foam pads and attach them to the velcro and these can be removed and washed or replaced whenever the need is there.

I store all mine in a large plastic box so that they are always on hand and I have one for every colour ink I use.

And any that I don't use for Inks I utilise by gluing small sentiment stamps to them and store them in the same way.

They are then ready to use whenever I need one quickly. 

Write the sentiment on the handle so that you can see instantly what  it is.

They are so cheap and easy to make and the more you have the more you can use.

It doesn't cost a lot to get them cut and drilled ... or maybe you know some kind person with a saw and a drill that will do them for you.... even cheaper then!

Hope you enjoy making and using your blending tools and get the results that you want.

This card has had the edges of the  sentiment inked with Aged Mahohany while still in the die.

The embossed background has also been lightly inked using these handy little blenders.

Happy Crafting ....

Hugs xx

April 18, 2012

Triple Twisted Easel

Now that's a bit of a tongue twister on the quiet but the card isn't .... it's very easy to do and there are full instructions if you are new to this kind of fold.

The Triple Twisted Easel Card   has step by step instructions and you can add the twist in whichever way you want.
Have them all going one way,  or one of the easels straight while the others are turned.  But whatever you do the card will look different each time. 

I have used Mirror card on my base and some lovely turquoise paper that was free with a magazine, and there is a mixture of flowers on one of the easels and some silk ribbon on the other side.

Spellbinder ovals have been used as the stop on this card and gemstones dotted aound the shape.  You can just make out the small organza butterfly resting on the base.

Another version tomorrow

Hugs xx


April 17, 2012

Triple Easel Card

Now after a few days of creating Easel cards in several different variations we are starting to get a little more daring.

This one is the Triple Easel Card  and now we are getting adventurous.

This one is very pretty in pink and the flowers on this are from   Wild Orchid Crafts  and they are trailed down the card to act as a stop for the easel.

The leaves are from the Ash Branch punch from  L-Em

A lovely wide organza organza ribbon is tied in a bow.

Once again I have featured the Butterfly from Marianne Creatables, with a large oval gemstone for the body

The lovely sentiment is from     ClarityStamp  and is one of many that are on the website.

Another variation tomorrow.

Hugs xx


April 16, 2012

Double Twisted Easel

To continue with the making of Easel cards this one is the   Double Twisted Easel 

Again if you are a seasoned cardmaker then my apologies for the basics, but not everybody knows how to create these different folds and it is for those folk that I add these steps.

 These cards were made quite a long time ago and it is interesting for me to see how I have progressed in card making.

I don't make them quite the same anymore and my flowers are much more elaborate these days.

But the Spellbinders are still in use although now I have learned how to make them work harder too.

But the method to making the card is the same whatever standard you are at.

I really don't remember where the flowers are from but I tell you what.... I am glad I have none left as they seem so flat and boring.

The image though is still in use and is one of the adorable Tilda characters and she  has been coloured in with Promarkers.

More tomorrow with the Triple Easel Card

Hugs xx

April 09, 2012

Mini - Envelopes

This mini-envelope is a really cute addition to your cards and will use up those odd bits of paper that you have left over.

It is created from different folds so it is best not to use a paper that is too thick or you will find it hard to fold as it is so small.

I have inked all the edges with Distress Inks and added a small velvet brad to the opening.... it doesn't actually keep it closed but it looks pretty.

Use the same papers as the rest of the card for a coordinated look.


And if you wanted too you could add a small message to pop inside the envelope for the recipient.
The small Roses in the centre of the flat flowers are from  Wild Orchid Crafts  and they just add that extra touch.

Hugs Christina xx

April 08, 2012

Paper Weaving

This little technique will use up all your left over strips of paper and as long as the colours blend then you can use any patterns that you have in your "Can't throw away" box .... Yep I have one of those too.

And although it says Paper Weaving  this can also work well with ribbons for a really pretty effect.

These papers and the Owl are from the  Papercraft Factory CD from Funky Hand and I have added
some Googly eyes to the character.


There are several collections of papers on the CD and they are suitable for any kind of card that you want to make.

You will also find downloads available on their website ... so they are yours instantly you have gone through the checkout.

Hugs Christina xx

April 07, 2012

Paper Pleating

This lovely technique has been around for years and another I learned as a child. I really don't remember where I got it from it's that long ago.

Paper Pleating  is easy to do and yet can look so pretty on a card, especailly if flowers are added too.

The flower centres are from Wild Orchid Crafts  and they have been added to some silk ones that I had in my "Stash" and had forgotten about.

Amazing what you find when you have a clear out!!

The Trellis edge is a Martha Stewart punch and the butterflies are peel offs.

This a card I made quite some time ago ... long before the Spellbinder days!!

Hugs Christina xx


April 05, 2012

Paper Folded Shirt

This is an excellent addition to all your male themed cards and is very easy to make.

You can jazz up the   Paper Shirt any way you want and use it for lots of occasion.

The card open up and any sentiment or invitation can be added to the centre


One of the things I did was to make it into an dress shirt and put a dinner party invitation inside it.

You will find lots more ways to make use of this and it is one of the things I was taught as a child and have never forgotten.

Little did I know I would ever be adding it to some cards in the future.


Make them into Father Christmas outfits and let the kids use them as their cards for their school chums... and teach them how to make them too... it will keep them quiet for a while !

Hugs Christina xx