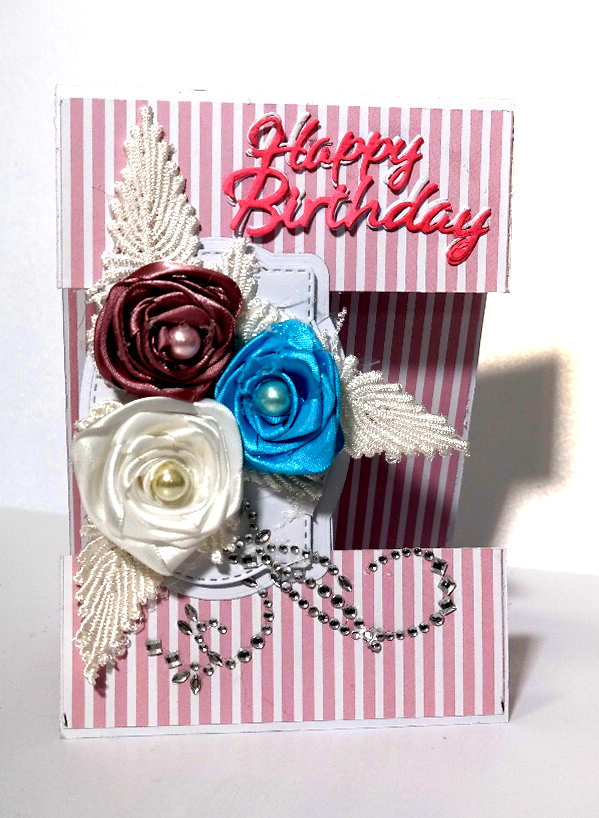
Beautiful Card Designs Made Easy

Showing posts with label Making Flowers. Show all posts

June 09, 2025

Large Ribbon Rose

Hi Everybody,

This large flowers rose is created in exactly the same way as the smaller ones shared with you in the video last week.

It has been done using the ruler method and separating out each overlapped petal as I twist it togehter  to create this really large flower.

This is obviously too big to go on a card and so for this one I have added it to a box instead, and the box is big enough to add  a gift to if needed.

The only difference is the width of the ribbon used to create the rose and you can try any size ribbon that you may have to give your different effects for your designs. 

I have added mine to the box top with some silver leaves underneath to complete the look

This rose has ben created with a silver threaded, wired ribbon that is 2" wide.

In the video coming this week I will show you how to create a smaller flower for your cards using a different way to use the ribbon.

I hope you will join me for that video.

You will have to excuse the lack of videos and blog posts for the next few weeks  as everything just looks grey to me until  I can get my eye seen to.

Bye for now ...

Hugs xx


June 05, 2025

Yesterdays Roses

Hi Everybody

In yesterdays video I made two cards with different flowers on them and the photo to the right shows the second one with the two pink ribbon roses attached to it.

Now although it was a pretty card once it was done I really didn't like it when I looked back at it later.

There was too much of the ribbon flower visible around the base and it showed up really well when the card was titled to the side view.

So I got out some  Mulberry flowers and with the glue gun I filled all the gaps around the bottom, and I liked it much better once I had done that.

The photo below gives you some idea of what I did to the design and once the other flowers are in place I glittered the whole lot
It may be too much for some of my readers but I know there are those of you out there who like the embellishments that I add to a card.

And as I always say ..."I never know when to stop"

Maybe you will think differently when you see  the next photo which shows the same card  from the same angle but with the added extras and let me now what you really think of it.
The floral display has spread quite a lot over the card from two flowers tucked into the corner, to lots of them  cascading out on each side.

Nothing else has changed, the colours are the same. the layout, background, diamante flourish, the bow and leaves and the size of the card

I like it so much better now. ... more my style of make

Bye for now ...

Hugs xx


June 04, 2025

Flowers with Ribbons

 Hi Everybody,

Ribbon roses are something that I have covered in the past and I added a video to YouTube about 14 years ago so its a bit old fashioned now but still gets the idea across for you to follow

It does have a little tip in it about storing the flowers you make in an ole egg carton so I will add the link in case you wanted to view it.

Old video ... Ribbon Rose

Today I am adding in the new video and this will show you two ways in which to get the flowers. 

I would warn you though that they will need boxes and if your ribbons is wider than mine then your flowers will be a different size.

They are a lot of fun to make though and so here is the link to the 

new video  ...    Making Flowers with Ribbons

I hope you will enjoy the videos ... both of them if you watch them and I thank you for your support.

Bye for now ...

Hugs xx

June 03, 2025

Inked Flowers & Gilding Flakes

Hi Everybody,

Todays card is using ink smooshing with Distress Oxides and adding extra shine with Gilding Flakes.

 It is one I intend doing in the Making Flowers series and so this is a sneaky peak of what one of the cards will look like..

I have also stencilled the background but it is very light and I have used a homemade stencil with flowers and leaves. It is just visible in the photo but in real life it does show up really well.

I have edged the card, leaves and flowers with a black fine liner pen and the finished size is a 5x7. As there is not too much depth to the flowers it will fit into an envelope.

Tomorrow I will be adding some flowers made from ribbon and I have found some lace leaves in my stash and so they will be added to the blooms also.

It is a lovely day here today and so now I am going to take Ruby and Dougal for a walk. He is with me for day care as Vickie mow goes out to work 

Bye for now ...

Hugs xx

May 30, 2025

Yellow & Orange Brusho Rose

Hi Everybody,

I was particularly happy with the way this Rose turned out using the red and yellow Brushos. The colours have gone together really well .

I didn't use water colour card but you can if that is what you have. I found that the ordinary 300 gsm card worked just as well.

I am glad that these videos have prompted some of you about the Brushos that you already have and are preparing to get them out and use them again for your flowers.

It is amazing how much stuff we buy and then put away in a cupboard and forget about it, and maybe go and buy more of a similar item.

Shop your own stash and use what you already have .... it is far more satisfying than buying more items that you will forget to make use of..

This is the other card in the video from yesterday and I think both cards are really pretty.
The only problem is I now have a kat of boxes to make !! 

Bye for now ...

Hugs xx

May 29, 2025

Making Flowers - Spiral Roses

 Hi Everybody,


Todays card is complete with video and once again I am using the Brushos.

They are such and easy way to colour your card and they last for ever. 

In this video I have used the Spiral Blossom Die Set and this is such a versatlie die and can be used with lots of different materials.

Here is the new video ...

Making Flowers Spiral Blossom Roses

I hope you enjoy this video and next week I will be looking at ways to make flowers with ribbons so I hope you will join me for those and perhaps send me photos of the ones you make.

Bye for now ...

Hugs xx.

May 26, 2025

Making Flowers 2-4-1

 Hi Everybody,

Today we are staying with making flowers but using the simple material of Brushos.

This is the powder that bursts into life once the water has been added to it and one small pot can last you for years as you need so little of it

It comes in many different colours and it is fabulous to work with, and there are other brand names too that will give you the same result

Here I have created two cards from one die cut session and I am so pleased with all of them..

They will fit into a standard envelope too so no extra bulk for the postman to carry..and no extra postage costs to pay either.

This is an extra video this week and there will be another one on Thursday though I don't know what I will use for that, but it will still be a flowers of some sort.

I have more ways to make flowers that I want to cover yet suing different materials so I hope you will stay with me for those.

Making Flowers with Brushos

Bye for now 

Hugs xx

May 21, 2025

Making Flowers - Felt

 Hi Everybody, 

It is time to get out the felt that has ben sat in your cupboard for such a long time and also the flower dies that haven't been used for ages. and make some really pretty textural flowers for your cards.

This video will show you the cards that I have made and each one is different.


Use your dies to give you different shaped cards  to add interest to your designs.

I used white felt and coloured it myself with Distress Oxides and I am very pleased with the results., but you can buy it in many colours to suit your needs.

I got mine by the metre and it will last me a long time and as well as flowers it can be used for other things also.

Try your local hobby shop to see if they sell it. I know that Hobbycraft in the UK do and there are some lovely colour.

Bye for now ...

Hugs xx

May 15, 2025

Two More Hessian Flowers

Hi Everybody
Flower One

Today I am adding two more ways in which you can create hessian flowers and these are so pretty once they are made..

You can make both of these styles to any size you prefer but I have made mine a little smaller this time around.

The one to the right is added to an A6 card and the background is stencilled for added texture,

I have used the hessian in the original colour and added diamante to each petal for decoration.


Flower Two
They are quick and easy to make and are a real focal point on the card front.

The card to the left is using another stiffened and die cut oval and the flowers on both cards are made in the video


I hope I have covered lots of different ideas for you to use this inexpensive material in your flowers and that you have enjoyed the process.

It certainly makes a change from Mulberry flowers though you will need to make boxes for the finished cards,

Bye for now ...

Hugs xx

May 14, 2025

Using Leftovers ...

 HI Everybody,

This card is created using all the left over bits and pieces from other projects that I could find on my desktop. 

The blue die cut is one I used ages ago but the hessian oval is one I cut in the last videos and said I would use in the next video.

The making of the flowers is also covered in the next vidoe which will be with you tomorrow. 

I hope you enjoy it and next week we will move on to making flowers from something else and see what we can come up with for that.

Bye for now ...

Hugs xx

May 13, 2025

Mixing Flowers

 Hi Everybody,

With todays card I have created a different background with my Jute Cord and made alternate stripes in the fabric.

 I added them to another white panel and then trimmed it to fit a 5x7 card blank.

For the flowers I have die cut my petals from the stiffened Hessian and added some Abandoned Coral ink to colour them.

They have then been shaped so that the petals curl back and I glued three layers together. The centre of the flower is an orange Mulberry Carnation.

I die cut some leaves in Kraft and cream card and added them to the top of the panel and then arranged my flowers around the base.

 I ticked in some small roses and three tulips and they have all have been glittered for effect.

The sentiment has been die cut three times ... twice in Kraft and once in gold, and layered together onto some parchment..

So there is yet another way to make your Hessian/ Burlap/ Jute work for you to make sure you get your monies worth from the fabric you have.

Bye for now ...

Hugs xx


May 12, 2025

Making Flowers Stamping Hessian

Hi Everybody

In todays video I am sharing how I stamped text onto my stiffened Hessian flowers to give them an individual look for my cards.

They have been die cut and layered together with a pearl centre and because they are stiffened the petals have been pinched into shape.

I have used a stencilled background for each of my designs and used a simple hole punch for added decoration .

I am quite pleased with both of these cards and the colour scheme is bright and cheerful  when combined with the white.

You don't need to buy anything special just use what you already have in your stash and I know you will be delighted with it.. 

Here is the video
Stamping On Hessian 

I have one more video to add with two more ways to make the flowers from Hessian /Burlap / Jute and then I will  move onto another fabric and share how I make those flowers

Flowers are such a popular addition to cards and as well as making your cards look pretty they can also hide a multitude of sins.
 Know what I mean !!

And notice I didn't say mistakes there....

Bye for now ...

Hugs xx


May 08, 2025

Weaving Hessian

 Hi Everybody,

Here is another idea for using any hessian/burlap that you may have and the results are very effective on your cards.

You will need to adjust the size according to the size of card you are making but that is not hard to do.

Both of these cards have got a woven panel added to them and one is a 1cm strip the other is 2cms.

Yours can be any size that you prefer to suit your own personal design. 


You can buy hessian in different colours but you can always colour your own of you cannot get the shade you require.

I am sure that some of you have ben pleasantly surprised at the effects you can get from using this material and I hope you will give it a try.

There is much more to come 

Bye for now ...

Hugs xx


May 07, 2025

Hessian Backgrounds.

 Hi Everybody,

The card to the right is a mixture of items that I had lying on my desktop..

It is a 5x7 white base with a turquoise embossed panel added to the top. Then I have added in some of my handmade inky papers in s panel strip down the right hand side.

To the top ow that I have added in one of my own handmade hessian panels instead of using the die that I have  from Amazon called Fish Net.

I think my own rendition is far more effective on the card and this one has has glue added to the dewing to keep everything in place.

It also means it will store better and not fray, if I don't need to use it straight away.

The butterfly is cut from silver mirror card and added to some thicker parchment and glued in place. I also added some pearls down the butterfly's body.

Bye for now ...

Hugs xx

May 05, 2025

Creating a background with Hessian

 Hi Everybody,

Real Hessian .................... Die Cut Kraft Card

Last week I promised to show you the difference between the die cut hessian look and the real Mccoy.

And as you can see there is a vast amount of difference between the two. You may have a preference but I personally like the real hessian on the left better.
 
It looks more rustic and more tactile then the die cut version and for me it adds a lot to the design.

Here's the video ... 

Having said that I will use the die whenever I need a quick card and I don't have any real hessian ready to use.

To show you what it looks like on a finished card here they are ....

This is the real stuff and I have added the flowers that have been made in the other videos.

I have used any leaf dies that I have and of course my favourite one is my own design "Rose Flourish" which is sadly no longer available 

The other card has the die cut on it and although it is still a good looking card it lacks the authentic look of the real hessian, 

Both the flowers have been cut from the stiffened hessian and I have used the same die.

I used Seedless Preserves to colour one and used a similar centre peice on both and yet they look so different.

I hope you like the cards and let me know which you prefer 

Now before I go I also wanted to share with you another idea that came to me and that was to cut the stiffened Hessian into 1cm strips and weave the two different colours together.

The end result was very pleasing and if you would like a longer video on this technique then let me know in the comments and I will do one.

It would look different again if I had used just one colour but as I had the two sitting here I thought I would give it a try and see what happened

It is very textural and I do like it but I would do it bigger the next time I try it and in just one colour too.

Bye for now ...

Hugs xx


April 23, 2025

Making Flowers - Fun Foam

Hi Everybody,

As promised I am sharing a series of videos that will feature making flowers from a variety of materials, some may be new to you and others you may have already tried.

I am going to cover Felt, Hessian, Jute cord, Organza, Crepe paper, Foamiran and ribbon too. 

For this video I am using the thicker Fun Foam and this is a lot different to Foamiran.

It is thicker and is not as pliable as the thinner Foamiran but it is very essay to work with and it die cuts really well.

You can find a vast choice of colours in the Fun Foam and it is very cheap too. I got mine from Hobbycraft as there is a new store opened up near where I live.

I will be getting some more but in pastel shades next time and making more styles of flowers with it. which  I will share in a video when I do. 

Here is the video link to this one and I hope you enjoy.it and will come back for the rest in this series.


All the new flower making videos will be in a playlist on YouTube.

Bye for now ...

Hugs xx

December 30, 2024

Making Flowers

 Hi Everybody,

Now that Christmas is over and we have the new year and some spring warmth to look forward to and I thought it would be a good time to add some flowers to our cards.

So  today I am adding a video that shows how I make some of the flowers that I like to add to my deigns.

For me they make a card look so pretty and they ca save money on the mulberry paper flowers that are for sale, and they are so satisfying to make.

Here I have used up the left over pieces from the inky panels I did for the cards I made before Christmas 

Again this was very rewarding and each finished panel was different from the others.

 It used up the Distress Inks that I already had and so I saved my money there too.

Click the link and it will take you to another page where you can watch the video ... and please leave me a comment to say you have visited.

I hope you enjoy

Bye for now ..

Hugs xx


December 14, 2022

Non Traditional Christmas Card

Hi Everybody,

Here is the other card with handmade flowers attached and these are made from Foamiran with large stamens in the centre.

They are so much better in the hand and this one is my favourite. I have also added some silver twine to this card and two lace flowers. on either side of the foamiran ones.

The leaves are a mixture of foamiran, card and lace and they are added to an embossed background. 

I have added glue and glitter to the petals. Once again I have added the sentiment verse to the inside and the orientation of this card means it will stand on its own no problem at all.

I like coloured cards for Christmas, just to be different from the normal red and green. 

What's your choice ??

More tomorrow ... 

Hugs xx

December 13, 2022

Making Flowers

Hi Everybody,  

Over the weekend I have ben making some flowers with paper, card and foamiran. Just to see what I come up with and to practice making them for my cards.

This Poinsettia is created from card and I have used a little frame behind it for  shabby chic look. There is also some gold twine and tiny little snowballs that I got from AnnaMarie Designs a long time ago. 

I have added the Christmas Greeting to the inside of this card for a change and I have had to line the inside also to counter balance the front and stop it falling over.

This is one of the reasons I prefer to have my fold at the top of the card as that prevents it from constantly falling flat.

I have another tone to add tomorrow and that is also a Christmas card but not in traditional colours. I hope you like them both but I must admit to liking tomorrows card the best.

More tomorrow ...

Hugs xx