Beautiful Card Designs Made Easy

July 10, 2025

Spiral Blooms

Hi Everybody,

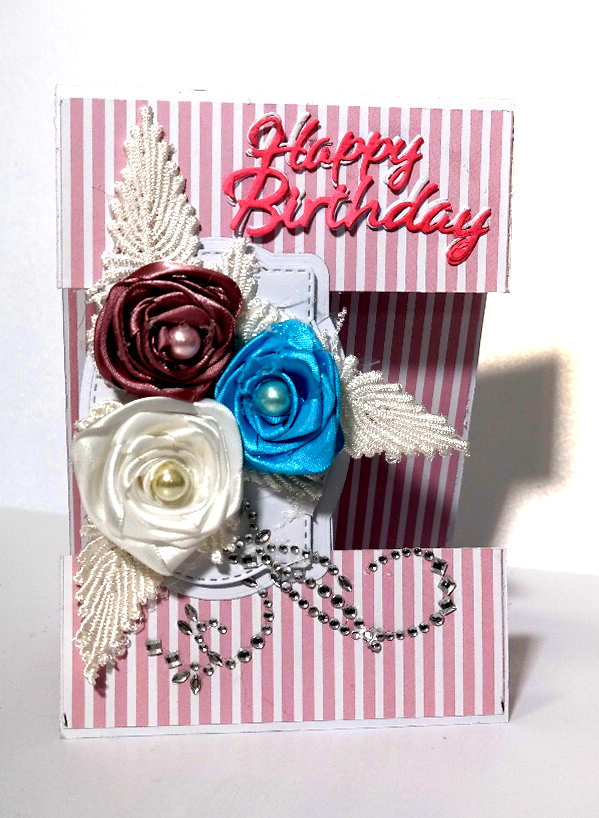
Here is another card made with some spiral blossoms on it and they are created from some double sided thinner card.

I have added them to a die cut Oval and the background to the card has been inked very lightly in pink and blue.

I have also added some pearls to the front to accentuate the design and then dotted some more around.

The leaves are cut from any leaf die  and I have used an older sentiment die that I have in my collection.

I have had to have my eyes retested since the laser treatment and they will be ready next week for me to collect so well the truly back to normal when I get them.

If you need laser treatment for your vision, after having cataract surgery, I can say from experience it is painless and the difference is amazing. So if it is offered to you don’t be scared …. Go for it … and I assure you will not regret it.

Bye for now …

Hugs xx


July 09, 2025

More Flowers ...

 HI Everybody,

Today I am adding the first video for a little while but it stays with the flower making theme and once again I have used ribbon.

These flowers are so easy to make and all you ned is a needle and thread to gather the ribbon up

You can use nay width of ribbon that you have and any colour to make your flowers but they always make such a difference to your designs.

Have a flower making session while watching TV one night and keep them all in a box until you are ready to add them to your cards. 

Gathered Flowers 

These are just A6 sized cards and they will fit into an envelope. I use a larger size to accommodate the flowers so for these I would use a 5x7.
Or alternatively make them a box.

I have used odd die cuts that I found on my desk and any leaf dies that I have, I also used and old aperture die to cut the pattern into my card.

I hope you like the cards and the video is not long either.

Bye for now ...

Hugs xx


July 08, 2025

Out of the box ...

 Hi Everybody,

It is taking me some time to get back to crafting as I have become so lazy and can't seem to get going at all.

It is good to be able to see the computer screen though now that my eyes have been lasered,  and that make  things a lot easier for me. 

For this little project I have used some flowers that I made and I have added them to a head band for a child.

I have also added some lace along the side to hide the head band and here ....

... it is beautifully modelled by my lovely Ruby.

She is the one that is guilty of all the snoring that goes on in my videos and I love her to bits. 

She was not too happy about this situation and couldn't wait to shake it off.
But you get the idea anyway.

Tomorrow I am adding in a new video that continues with the theme of making flowers and I am using ribbon again to making some small flowers to add to cards.

They are very quick and easy to do but you will need a needle and some cotton.

I hope you like them and the cards they are added too. 

Bye for now ...

Hugs xx

July 07, 2025

I'm Back ....

Hi Everybody,

Thank you for your patience over the past few weeks but I am happy to say that I am back and I can      SEE!!

My Laser treatment went very well with no complications and it is absolutely painless. It takes literally minutes to complete and there is no down time needed.

I was not allowed to drive until the day after and then it was ok for me to get back in my car.
The downside to all this is that with my cloudy vision it was impossible to see all the dust and bits that have accumulated around the house.

But once I got home again I could see them all sitting there just staring at me, and daring me to clean them up.

In the past I have spent all day cleaning and getting my house spotless again ...but not a day long task anymore.

So for the past week I have gone around each room and cleaned till it shines and now my house is back to normal again.

And over the weekend I have tried a little bit of crafting and I came up with this from the pieces I could find lying around.

It is not a card but a canvas that measures 11" x 14" and I will hang it on the wall in my craft room.

All the flowers on one wing have been sparkled with glitter and the other wing is covered in silver mesh. I promise you it looks really pretty in real life.

I will get back to crafting on a regular basis now and create some more videos to ad to the blog and YouTube. Thanks again for your patience,

Bye for now 

Hugs xx
 

June 20, 2025

Update ….

 Hi Everybody,

Just a quick line to tell you where I am up to with my vision.

At present it is too stressful to try and  keep the blog up to date as I cannot see the keyboards properly. Or the screen as everything is cloudy. It is like looking through dirty windows and everything is shrouded in a mist.

It is so frustrating and I make so many mistakes that it rakes me hours to type anything. So rather than put myself though this stress I am taking time off until my laser treatment which is scheduled for the 26th June.

Once that is done I am hoping to be back to normal again and can get back to filming and making cards.  Myyoungest daughter has been so helpful and has done things like reading my mail to aas I cannot see the words that are written on the paper.

Thank you for you concern and please be patient with me until I am back to normal again

Bye for now ….

Christina xx

June 11, 2025

Small Flower

 Hi Everybody,

Todays video is using the ribbon in another way to create small flowers for your cards, and that of course depends on the width of ribbon that you use.

I have used a wired ribbon for mine but you don't have to use that type. It is just some that I already have and it was really cheap in the bargain bucket at B&M

The roses re really easy to make and they will fit neicely onto a card front. But they will need boxes to send them as the flowers are quite deep.


The video is not long but it will give you another string to your bow when it comes to alternative materials to create flowers.

I have made this one to an A5 size and used the Complete Card & Box Die Set to make it, and the frames that I have added to the inside and front of the design. 

It has taken me hours to do this one video because of my vision so I will try and do another for next week.

But I now have my Laser Appointment for the 26th and so I am hoping that everything will be more or less back to clear vison again then.and get rid of the mist that is permanently clogging up my eyes.

Bye for now ...

Hugs xx

June 09, 2025

Large Ribbon Rose

Hi Everybody,

This large flowers rose is created in exactly the same way as the smaller ones shared with you in the video last week.

It has been done using the ruler method and separating out each overlapped petal as I twist it togehter  to create this really large flower.

This is obviously too big to go on a card and so for this one I have added it to a box instead, and the box is big enough to add  a gift to if needed.

The only difference is the width of the ribbon used to create the rose and you can try any size ribbon that you may have to give your different effects for your designs. 

I have added mine to the box top with some silver leaves underneath to complete the look

This rose has ben created with a silver threaded, wired ribbon that is 2" wide.

In the video coming this week I will show you how to create a smaller flower for your cards using a different way to use the ribbon.

I hope you will join me for that video.

You will have to excuse the lack of videos and blog posts for the next few weeks  as everything just looks grey to me until  I can get my eye seen to.

Bye for now ...

Hugs xx


June 05, 2025

Yesterdays Roses

Hi Everybody

In yesterdays video I made two cards with different flowers on them and the photo to the right shows the second one with the two pink ribbon roses attached to it.

Now although it was a pretty card once it was done I really didn't like it when I looked back at it later.

There was too much of the ribbon flower visible around the base and it showed up really well when the card was titled to the side view.

So I got out some  Mulberry flowers and with the glue gun I filled all the gaps around the bottom, and I liked it much better once I had done that.

The photo below gives you some idea of what I did to the design and once the other flowers are in place I glittered the whole lot
It may be too much for some of my readers but I know there are those of you out there who like the embellishments that I add to a card.

And as I always say ..."I never know when to stop"

Maybe you will think differently when you see  the next photo which shows the same card  from the same angle but with the added extras and let me now what you really think of it.
The floral display has spread quite a lot over the card from two flowers tucked into the corner, to lots of them  cascading out on each side.

Nothing else has changed, the colours are the same. the layout, background, diamante flourish, the bow and leaves and the size of the card

I like it so much better now. ... more my style of make

Bye for now ...

Hugs xx


June 04, 2025

Flowers with Ribbons

 Hi Everybody,

Ribbon roses are something that I have covered in the past and I added a video to YouTube about 14 years ago so its a bit old fashioned now but still gets the idea across for you to follow

It does have a little tip in it about storing the flowers you make in an ole egg carton so I will add the link in case you wanted to view it.

Old video ... Ribbon Rose

Today I am adding in the new video and this will show you two ways in which to get the flowers. 

I would warn you though that they will need boxes and if your ribbons is wider than mine then your flowers will be a different size.

They are a lot of fun to make though and so here is the link to the 

new video  ...    Making Flowers with Ribbons

I hope you will enjoy the videos ... both of them if you watch them and I thank you for your support.

Bye for now ...

Hugs xx

June 03, 2025

Inked Flowers & Gilding Flakes

Hi Everybody,

Todays card is using ink smooshing with Distress Oxides and adding extra shine with Gilding Flakes.

 It is one I intend doing in the Making Flowers series and so this is a sneaky peak of what one of the cards will look like..

I have also stencilled the background but it is very light and I have used a homemade stencil with flowers and leaves. It is just visible in the photo but in real life it does show up really well.

I have edged the card, leaves and flowers with a black fine liner pen and the finished size is a 5x7. As there is not too much depth to the flowers it will fit into an envelope.

Tomorrow I will be adding some flowers made from ribbon and I have found some lace leaves in my stash and so they will be added to the blooms also.

It is a lovely day here today and so now I am going to take Ruby and Dougal for a walk. He is with me for day care as Vickie mow goes out to work 

Bye for now ...

Hugs xx

June 02, 2025

Playtime

 Hi Everybody,

Here is another card from my scraps and things left over on my desktop. 

I always find it a good idea to cut more than I need and save them in a bit box so that when I need to make a card in a hurry I always have something on hand than will do just that. .

So this one uses some die cuts in white card and some flowers that have been added to parchment.

For the background I have used coloured card cut into strips and added onto some  silver mirror card with a double sided sheet, which has then been embossed and trimmed down to fit the base card.

I have added some silver mirror card leaves and some chrome dots to the flowers centres and around the base as a finishing touch.and the end result is an A6 card.

The birthday sentiment has been added with foam tape to raise it up a little. and the card is now ready to send. 

Bye for now ...

Hugs xx

May 30, 2025

Yellow & Orange Brusho Rose

Hi Everybody,

I was particularly happy with the way this Rose turned out using the red and yellow Brushos. The colours have gone together really well .

I didn't use water colour card but you can if that is what you have. I found that the ordinary 300 gsm card worked just as well.

I am glad that these videos have prompted some of you about the Brushos that you already have and are preparing to get them out and use them again for your flowers.

It is amazing how much stuff we buy and then put away in a cupboard and forget about it, and maybe go and buy more of a similar item.

Shop your own stash and use what you already have .... it is far more satisfying than buying more items that you will forget to make use of..

This is the other card in the video from yesterday and I think both cards are really pretty.
The only problem is I now have a kat of boxes to make !! 

Bye for now ...

Hugs xx

May 29, 2025

Making Flowers - Spiral Roses

 Hi Everybody,


Todays card is complete with video and once again I am using the Brushos.

They are such and easy way to colour your card and they last for ever. 

In this video I have used the Spiral Blossom Die Set and this is such a versatlie die and can be used with lots of different materials.

Here is the new video ...

Making Flowers Spiral Blossom Roses

I hope you enjoy this video and next week I will be looking at ways to make flowers with ribbons so I hope you will join me for those and perhaps send me photos of the ones you make.

Bye for now ...

Hugs xx.

May 27, 2025

Playtime Cards

 Hi Everybody,

This card is created with left over white flowers and leaves that have been glued to a spare piece of card.

I have stacked the flowers and leaves in three layers to make them stand proud on the base and then inked each one with a small brush and Distress Oxides very lightly.

I have used Spun Sugar for the flowers and Shabby Shutters for the leaves

In between each flower and leaf I have brushed the base card with Blueprint Sketch ink and it is barely visible, just a shadow of the colour.

To the centre of each flower I have added a pearl and it has been trimmed down to fit a 5x7 card blank.

t was quick and easy and has used up all the bits and pieces that I have left over and it looks very pretty on the process.

A good way to tidy up my working area with no waste.

Bye for now ...

Hugs xx

May 26, 2025

Making Flowers 2-4-1

 Hi Everybody,

Today we are staying with making flowers but using the simple material of Brushos.

This is the powder that bursts into life once the water has been added to it and one small pot can last you for years as you need so little of it

It comes in many different colours and it is fabulous to work with, and there are other brand names too that will give you the same result

Here I have created two cards from one die cut session and I am so pleased with all of them..

They will fit into a standard envelope too so no extra bulk for the postman to carry..and no extra postage costs to pay either.

This is an extra video this week and there will be another one on Thursday though I don't know what I will use for that, but it will still be a flowers of some sort.

I have more ways to make flowers that I want to cover yet suing different materials so I hope you will stay with me for those.

Making Flowers with Brushos

Bye for now 

Hugs xx