Beautiful Card Designs Made Easy

April 27, 2012

Frugal Crafting ...

Did you enjoy a chocolate egg over the Easter holiday? 
And did you then throw away all the acetate  packaging that the egg was in ????
 Big mistake.      I can't throw anything away and this is what I did with mine.

My husband says that I am a hoarder ... I prefer to say I am being cautious... as you never know when you may need it.     But this is how your "Stash" grows larger and larger !!

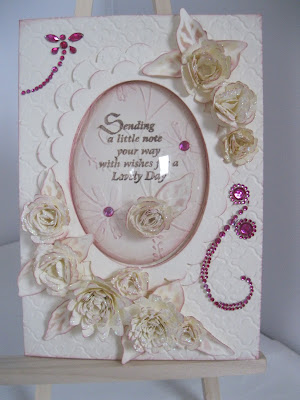
I made full use of the M-Bossablity folders that I have to decorate the backgrounds... and if you click the photo it will enlarge for you so that you can see the detail that these folders give. 

I have added another video to the Spellbinder Series of tutorials and this one is  Spellbinders Oval Frames

The link will take you to the page but I will also add it to the Tutorials on this Blog for future reference.

The dies used for the frames are the Classic Ovals and the Scalloped Classic Ovals

Both of these are very pretty cards that would be ideal as a Wedding card.

 Just add the Bride and Grooms names and the Wedding Date ... make a stunning box to put them in and away you go. 

I hope you enjoy the video ... it's only short so you won't have time to go to sleep.


Hugs  xx
Spellbinder Blossoms...

I have had lots of emails asking me about the flowers that have been added to my cards over the last few days and I promised several ladies that I would do a video on how I get the look.

There are many ways to create these beautiful blooms,  but this works for me and many people seem to like the result .... maybe it could work for you too.


So here is the link to the video and I hope you enjoy it.  Spellbinder Blossoms 
I will also add it to the Tutorials page for future reference.

Some of the previous cards show these sprays of flowers and the Altered Notebook from yesterday has a long trail of them along the notebooks cover.

I am sure that I will be adding more to my cards in the future as they certainly make an impact when they are added.

The added "Bling" is from  Want2Scrap  and this a self adhesive pearl in the flowers centre and a piece of the flourish for the butterfly trail.

Hugs xx

April 26, 2012

Altered Notebook

Sometimes when we want to give a small gift it is hard thinking of something suitable.

This Altered Notebook with Spellbinders is  something that could be decorated as you like and given to anyone.

The flowers are all created from Spellbinders and because I have had so many emails asking me about them I have done a complete video on the subject which I will add later.

For this project you will need a spiral bound notebook but they are so cheap to buy I bought a whole pack of them and decorated them up in different ways.

And  they were well received  by those I gave them to as a stocking filler at Christmas.

The "Bling" on both of the books is from Want2Scrap and they are self adhesive pearls in long flourishes.

I have cut them down to use as they were too big for what I needed.

But by doing this I get a lot more for my money from each piece.

The Pink one has lace, silver net and diamante on the front cover, and it looks so much prettier in real life.


This Black and White one is full of my favorite things ... Flowers, Ribbons and Pearls ... so it's no wonder that I named my Blog the same way...


Hugs xx

April 25, 2012

Belle Rose...


This is a new Spellbinder die that I bought a few weeks ago and I know it is back to flowers again ... but for me they make such a beautiful focal point that I find very hard to resist.
This one is the Belle Rose and it is from Heartfelt Creations, a company that Spellbinders make dies for.
There is a lovely stamp set that accompanies the die and with them you can create the most gorgeous roses for your cards,  that you can colour in yourself.

I used an M-Bossablilty folder to create the background panel and this one is the So Trendy.
I embossed the top part of the card first and then the lower, so that I had the plain space in which to add my sentiment.
 I stamped that with ink that matched my colour scheme and then matted it onto the same card used for the flower and flourish.

The glitter strips have been done with double sided tape and sprinkled with Glamour dust.
But the die produces the most gorgeous flourish and it is quite large and I sat it under the blossom.
The card itself is an A5 so that will give you some idea of how large the die is, as it almost covers the bottom part of the card.

A large white pearl for the centre of the flower and some Glamour Dust around the edges and there you are... a quick and easy card to create and only one flower...

Hugs xx


April 24, 2012

Look No Flowers ...

I am adding these cards to day just to prove to myself that I can make a card with out the aid of some flowers and I now need to go and  lie down in a darkened room to get over it....

I couldn't make one though without  using my much loved Spellbinders.

They always have such a dramtaic effect on any card and they never let me down.

As always the name of the Spellbinders used will be BOLD to help you with any purchase you may have as you add to your collection
Both of these cards have been created with the Layered Scalloped Posy from Heartfelt Creations.
The central border is mixing two sets of Edgeabilites,  Classic Postage Stamp Insert  with theTriple Scallop cutting edge.

The sentiment is onto  two sizes of Lacy Circles.  Both have embossed backgrounds from the M-Bossabilities folders

This is one of my favorite ones and is the SoTrendy folder which is double sided ... with a unique pattern on each side.
So twice the value and twice the fun. And  there we are  ... cards with clean and simple lines, for any occasion ... and not a flower in sight.  (Sigh!)

Hugs xx