Beautiful Card Designs Made Easy

May 07, 2012

Pennant Card


I was playing around with some card today and this is what I came up with.   Now I know it is not a new idea but this is my interpretation of it and I think it looks very pretty.

It was very easy to do and nothing except a punched border edgefrom Martha Stewart,  was used to get the pattern along the top and bottom.

The paper is from a stack that I have had for some time and it was free with a magazine.

The flowers are a mixture of large and small Roses, as well as rosebuds, in red and white and some Cherry Blossoms added to the spray.  A few sprigs of Ivy leaves and some smaller leaf shapes complete the look.

They are all from  Wild Orchid Crafts

The ribbon is from my "Stash" and the knot is covered with Card Candi from Craftwork Cards
Card Candi comes in many patterns and colours and can be a really useful addition to your crafting goodies.  Use it to add names or ages to personalise your designs.

Hugs xx


May 06, 2012

Blending Tools

Many of us like to apply Distress Inks to our projects and they can create a very pretty and subtle effect.

But it is something that many of us are afraid to do because we can't get it right and the result is a smudged mess on our cards. 

One of the best ways to apply these inks is with some kind of  Blending Tool  but these can be quite expensive .... especially if like me you are greedy and want one blender for each ink pad .... Yep that's me!

So this is what I did to make my own and the link will take you to the page to show you how to make your own   Blending Tool

You will find all the step by step instructions and then you can have as many as you like.

All I did then was by the foam pads and attach them to the velcro and these can be removed and washed or replaced whenever the need is there.

I store all mine in a large plastic box so that they are always on hand and I have one for every colour ink I use.

And any that I don't use for Inks I utilise by gluing small sentiment stamps to them and store them in the same way.

They are then ready to use whenever I need one quickly. 

Write the sentiment on the handle so that you can see instantly what  it is.

They are so cheap and easy to make and the more you have the more you can use.

It doesn't cost a lot to get them cut and drilled ... or maybe you know some kind person with a saw and a drill that will do them for you.... even cheaper then!

Hope you enjoy making and using your blending tools and get the results that you want.

This card has had the edges of the  sentiment inked with Aged Mahohany while still in the die.

The embossed background has also been lightly inked using these handy little blenders.

Happy Crafting ....

Hugs xx

May 05, 2012

More ways with flowers

Adding flowers to cards always gives a very girly effect but can cost quite a bit of money if you have to buy them every time.

Over the last few months I have started to make my own ...  but not everybody has lots of different dies or punches to make them.

But even if you don't have a vast choice there is no reason why these beautiful embellishments can't be added to your cards.

The flowers on these cards have all been created from the smallest part of the Anenome Flower Topper from Spellbinders.   
It is the bit that would create the flowers centre ... but it makes lovely Daisy like blooms for this card.

All I did was to use different coloured papers and card to cut them out and this alone will give them a varied look.

I shaped the petals to the flowers just as I did with the Bitty Blossoms and I have added a video to show the process of   making flowers  

Whichever way you choose to make flowers just spending a little time curling the petals will give your flowers a softer look and to me is well worth the efffort.

The first card is made with various shades of pink but the one on the left I created from greens and biege for a softer look.

For the centres I have added pearls on this and gemstones on the first card.

And the "Bling" is the finishing touch for both cards.

Both backgrounds have been created with an inked up embossing folder for a Faux Letterpress effect.

And I am quite pleased with the end result on both of them

Hugs xx

May 04, 2012

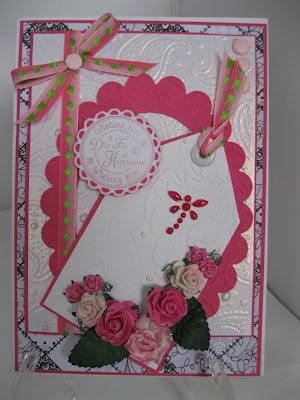
Pink Flowered Tag Card

Adding tags to your cards can create a very pretty embellishment and they are so easy to cut yourself and so save  you the cost of buying them ready made.

For this one I have embossed white Centura Pearl Card and matted it onto some hot pink and added ribbon from   Fantastic Ribbons   around the panel.

The knot in the bow is covered with Card Candi from  Craftwork Cards

This is then matted that onto pink patchwork paper and again onto the hot pink.

The whole lot has then been glued to a white card base.

The close up shows the detail in the tag which has been embossed to add texture and dotted with Cosmic Shimmer   Pearls  in the flower centres

Layering onto some hot pink card and an eyelet added to the top enables me to thread the ribbon through.

The flowers are from Wild Orchid Crafts  and the sentiment is from  Lili of the Valley

An easy make that would be suitable for any girly occasion.


Hugs  xx

May 03, 2012

Pink Scraps

Making cards can be as cheap or as expensive as you want it to be and there are many ways to conserve your cash without making a poor standard card. 

And by "cheap" I don't mean the quality but the cost as there should be no compromise on the quailty.

From the card you use to the embellishments that you add ...  it always pays to buy the best that you can get in your price range. 

My mum always used to say ....."Buy cheap you buy twice..." and there is a lot of truth in that statement.  

So having bought this card and paper we  need to make it go as far as we can and that is using every last inch of it to full advantage.

These paper strips are some that have been left over from other projects and because the papers are so pretty it was a shame to throw them away.

So what I did here was to find three pieces that would match and blend with each other and I cut them into strips about 5 x 15 cms and glued them together onto a piece of Centura Pearl card from    Crafters Companion

I left a small border around the edge and covered each of the joins in the papers with white ribbon from    Fantastic Ribbons.  

Then the whole panel was embossed to add texture.

I added borders in Centura Pearl  using the Spellbinders   Ironworks Accents and Motifs  and I added a pearl in each corner to hide the joins.... then fitted in the centre panel with foam pads to raise it up.

A pearl has been added to the top of the sentiment and the same ribbon has created a bow. In the centre of the bow to hide the knot I have threaded a button with Bakers Twine  from the   The Hobby House   and glued it in place.

The finished card is  21cms square (8") and it looks much prettier in real life.

Hugs xx