Beautiful Card Designs Made Easy

June 16, 2012

Braided Ribbon

This ribbon technique is one I learned years ago but it now seems to be coming back in fashion... especially on cards.
The only drawback to this feature is that it takes a lot of ribbon to get the look.   This wreath took about 4mtrs of 1cm wide gingham ribbon to create and the card is an A5 size.

It has been added to some glitter card and the gold corner piece is metal.   The Spellbinder shape has the sentiment heat embossed in gold and is  raised on foam pads.

I featured a PolkaDoodle card earleir in the year with the same  Braided Ribbon   and I added a video to show how to create the look.

This pretty baby card has some really pale pink ribbon and the flowers on both cards are fromWild Orchid Crafts   and they have been sparkled up with Glamour Dust. 
The pearls in the corner just add that little extra and I always like to add that extra bit to all my cards.
The Teddy Bear image is from HunkyDory  and the edge is foiled in silver.

 Hugs xx

June 15, 2012

Brown Haired Baby Fairy

I am so delighted with these images from  Mo's Digital Pencil that  I have been colouring them in for days.
This one has normal coloured hair ... but then fairies can have whatever they want... well the ones at the bottom of my garden can. 

I have coloured this one with Spectrum Noirs from Crafters Companion and I am getting quite a lot of emails on this colouring system.    Many are asking me to compare them to Promarkers and Copics.
To be fair to any of the mentioned pens it is not about comparison as each brand has it's own merits ... and each perform well in their own individual ways.  I have pens from all and I enjoy working with each just as much as the other.

So if you are wondering which to buy then I would suggest that you buy a small sample of  each brand,  say some of the skin tone sets,  and see which is your prefered choice is,  for the budget that is available to you.

For this card I have double layered the ribbons, and the flowers are from Wild Orchid Crafts and the added "Bling" is from Want2Scrap   The image has been layered onto a Spellbinder Oval and then the Scalloped Oval

The very pretty papers are some that I found on my computor and I have no idea where I got them from ... so if you recognise them then please tell me... they have been matted and layered with some pale lilac card.

Hugs xx


June 14, 2012

Another Baby ...

This beautiful image is another from the magic pencil  of  Mo Manning  and you will find many, many more at
     Mo's Digital Pencil

This is called  "Walker"  and can be found in the Kids section on the website.

I think it is adorable ... and it would make a lovely gift for my Great Grand-daughter.

And here is some exciting news ...
 I have written to Mo Manning and asked her permission to feature her images in a series of videos, that I would like to do on colouring in,  and she has very kindly given me that permission.

I don't profess for one minute to be an artist ... but they will be based on what works for me and maybe it can help you too.

And I think these images would be perfect to be used for various aspects using alcohol marker pens and covering areas like skin, hair and clothes.

And maybe wings on the Baby Fairy images like the one featured a few days ago.

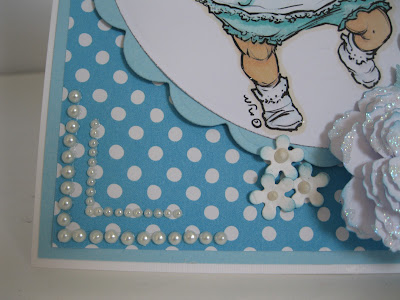
The  self adhesive Pearls in the corner are as always from Want2Scrap  and I have used two different sizes to decorate the corner.
The large white flower is one of the  Bauble Blossoms  from Spellbinders.

I really like this card and I will be using the images on many cards and buying more from such a talented artist.

Hugs xx

June 13, 2012

A Personal Story

Card Making Magic is now just over three years old and this has been the most extraordinary journey I have ever made.  I knew absolutely nothing about websites  and ...apart from sending the odd email  ... nothing about the internet either.

But I went ahead and dived in and, with a lot of hard work over those years,  it has gone from strength to strength. And then I had the idea  to add videos to the pages ... and that took it into another dimension... and the response from those tutorials has amazed me.

Through  YouTube  I started to get "followers" and some of the comments they leave me are wonderful.... some of them have been following me for a few years now.  They spur me on to do more and many many of my followers email me with questions and stories of their own.  I now have requests to do tutorials on things that people want and I do my best to accomodate them. 

One follower in particular asked if we could communicate more privately away from  YouTube and we started to email each other. We have built up quite a friendship and it was Naomi who encouraged me to start Blogging. She helped me every step of the way and I will always be grateful for that help. We went one step further and started to chat regularly on Skype.

And then she asked  if  I ... and my film crew  ... would like to visit her  in Canada.  Of course we debated this for a while and then we said "YES" and so then the planning started from both sides of the pond.

Last week we booked our flights to Nova Scotia and I am so excited to be going to Prince Edward Island.  It has come around so quickly and now it is just over one week away and I will get to meet Naomi.

She is like a kid in a candy shop and is planning all sorts for us to do in the two weeks we will be with her and her family.  On the 22nd  June we will fly from Heathrow and I can hardly wait, it is going to be such an adventure for us all.

In the meantime I have scheduled posts to go out for my Blog and I will be adding more to the pages from Canada ... and maybe show you a project or two that Naomi and I have created together.

Wish me Bon Voyage for the 22nd ....

Hugs xx


June 12, 2012

Spellbinders Bauble Blossoms

A little while ago I had an email from a lady who had bought this  Bauble Blossom die  and  was very disappointed with the result.

She said she didn't like the look and all the petals where bunched together instead  of flared out  form the centre.

So as a picture paint a thousand words I thought the best way to explain how I use the die was to .....
    make a video!

Spellbinders Bauble Blossoms  is a short tutorial on how to get a really good look for the flowers that you want to enhance your designs.

This is another of those Baby Fairies from Mo's Digital Pencil  and I hope you have taken the time to have a look around some of the cutest images there are.

I have used Spectrum Noir pens to colour the image and this has started off a whole new set of emails asking about the colouring of these.

So gues what I will be doing soon ....... more videos!!

The "Bling" as always is fromWant2Scrap  and the flattened look with the pearls was a happy accident I made a while ago.

But the mistake looked OK and so I have used it several times on other cards and decided to share the idea with you.... you may like it too.

Hugs xx