Beautiful Card Designs Made Easy

April 10, 2013

Made For Me...

Hi Everybody,

Usually I show you cards that I have made but this one is an exception as this is a card that was made for me.

Let me tell you the story ...

When I started Card Making Magic four years ago one of the options was for me to add a Gallery  and ask people to add their designs to the page.

That way they could showcase  their own designs and so create a page for themselves on my website that they could add to as they made more cards.

I was understandably nervous about this process .... Why would anybody want to add cards to my website in the first place ? Would anybody take advantage  and  create their own page ?Would they want to show off what they can do ?


But within hours of that invitation going live I had my first submission.

It was from a lady in Ireland who told me her name was Cepta and she added her project which was the Ordination of a Catholic Priest.

From that first submission we have grown an online friendship that continues to this day.  So over the Easter break Cepta made this very pretty blue card for me. It has been decoupaged with fabric flowers at the bottom and it has a lovely verse written inside.

And I thought that you would like to see what she made  and although Easter is now finished the card still sits on top of my cabinet and I will add it to my treasures box later.  Thank you Cepta for a beautiful card.

Hugs xx

April 09, 2013

Lovely in Lilac ...

Hi Everybody,

Todays card is the style I really enjoy making and I could do this all day given the chance.  It measures almost 8 1/2 x 6 1/2 inches and will just about fit on the card stand.

I have started the base card in white then added a layer of lilac.  The next layer of white has been embossed and all the corners have been rounded.

The panel on the left has been made with the Fancy  Lattice and then cut down to the size I wanted and matted to the lilac card.... then glued in place.

The next layers are from the 5 x 7 Matting Basics and the Detailed Scallops which is turning out to be one of my favorites dies.

I then cut the second die from the Scalloped set in white and added it with foam pads to the centre of the front.  The sentiment has been stamped and embossed and then placed behind a frame made from Labels 20.

I have added in the matching Diamante frame from  Want2Scrap  and this has been added with foam pads.

The lilac trim has been added under the sentiment and I have created a a bow and used a Diamante buckle from The Hobby House

The flowers are from Wild Orchid Crafts  and are a mixture of Tulips, Roses, and Carnations ... and they have all been glittered with Glamour Dust ... and this one I like

Hugs xx

April 08, 2013

Cream Card

Hi Everybody,

With this card I thought I would stay away from the pink .... just for a change  .... and not for long either I might add !!!

Click to Enlarge
We all like to see the white on white cards that are so popular and this one is created using just cream on cream with a hint of gold.

The very base card has been embossed with the Dainty Dots A4 folder from Spellbinders and the corners rounded.  It also has the A Frame back for the card to be displayed.

This has then been layered with Gold Mirror card.

Then from the third layer I have used the largest  5 x 7 Matting Basics B and cut it in cream

Now I hear many people saying that to buy dies that just create a plain square or rectangles is a waste of money .... but not so.

Using the Spellbinder gives  the distinctive embossed edge around  the  card to give them that classy look that I really like.

So layered onto these base layers I have used all three of the dies in the 5 x 7 Detailed Scallops and the sentiment has been stamped and then embossed in gold to the smallest panel.

The sentiment is from the Good Friends Labels 29 from JustRite  and I bought both of these from the craft show.

Around the edge I have added in some La Creme pearls from Want2Scrap as a finishing touch.

The only other adornment is a little ribbon from The Ribbon Room    and a button from my jar and that is the card completed.

Simple, quick and easy and would suit any occasion.

April 07, 2013

OooH Look ... Pink !

Hi Everybody,

Well would you believe it .... pink again !!  I don't know how it keeps creeping back in ... but I like it.

This card is using some backing paper from the Floriography CD layered onto white card and into the corner I have used Gold Elements One for effect.

The centre panel is largest Radiant Rectangles with the next size down cut from white card.

Onto this I have cut a pink panel that I created for myself using white embossing powder and Distress ink.

The sentiment has been stamped and embossed  onto one of the Fancy Tags Three along with the matching "Bling" from Want2Scrap 

A big Pink Satin Bow has been added and there is now a tutorial on  Tying A Bow 

Here is another card and this one has Micro Beads on the backing paper for a different texture.

The centre panel is Timeless Rectangles with the sentiment added to the small label from Locking Loops

The sentiment itself is one that came in a box full of wood mounted ones from Keepsake Card Craft. .. but I don't know if they are still available as I bought them  many years ago.

This card uses   Asters and Poppies  from Spellbinders and is one of the new Die D-Lites

This pack has two dies  that can be cut and used separately and here I have cut them in Black card.

The centre panel is the 5 x 7 Enchanted Labels 28

The Decorative Oval Window has been cut  in half and twined around Labels 30  which has been embossed.

One of the Fancy Tags Three with matching Diamante has been stamped with the sentiment and added to this panel.

The bow has been added around the stem of the flowers and they have been embossed.

Maybe ... just maybe... I will try another colour tomorrow ... who knows !!

Hugs xx

April 06, 2013

More Kraft Card ...

Hi Everybody,

The Kraft Card that I am using is from  Papermill  Direct and can now only be bought online.  I used to love going to their shop in Freeport and buying all the lovely colours they make. When the shops closed down well over a year ago now ... well that little trip out was gone.

But once they announced that the shops were to close ...  and had their sale to get rid of all the card ... I had a field day and bought absolutely tons of the stuff.   The Kraft card was not in the shops though so I ordered some online and it arrived yesterday.
Click to Enlarge

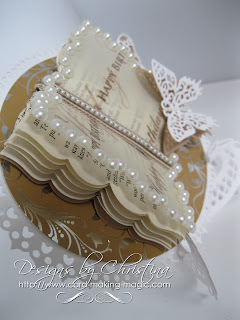
This card has again used the neutral palette of Ivory and Kraft and I have cut the base of Ivory from the Grand Decorative Ovals

The second size down is the right size to fit on the Card Stand from   Joy Crafts.

I  cut a plain oval from some lovely caramel coloured foiled card form Cardcraft Plus

The book has been cut from old book pages using the largest die from  Labels 23 and I have add the matching pearly "Bling" from Want2Scrap

The pages have all been glued along the spine only and foam pads used to separate each page.

The top page is cut from some "Happy Birthday" Vellum and decorative cord has been added to the centre.

The Butterflies are Les Papillion  and they have pearls along the body line.

A rather masculine card but one I like never the less.

I can feel an urge for pink coming on ... so watch this space ....

Hugs xx