The other week I asked if there was any particular die that you would like to see in a tutorial or video and the most requested one was for the Parisian Accents and Motifs. This die is no longer available on the Spellbinders website but I know that many of you have this set and still love and use it often.
I have used a soft cream and Kraft card today for this really pretty floral card
Spellbinders Supplies:- S6-001 5x7 Matting Basics A
- S6-002 5x7 Matting Basics B
- Parisian Accents and Motifs
- S4-564 Phrases Two
- EL-002 Regal Embossing folder
Other Supplies:
- Flowers from Wild Orchid Crafts
- Card from Papermill Direct
- Pearl Frilly Flourish from Want2Scrap
- Micro Beaded Berries from AnnaMarie Designs
- Glitter from Glitter Magic
Instructions:
With die #7 from Matting basics A cut two and Create a Hinged Card from cream card
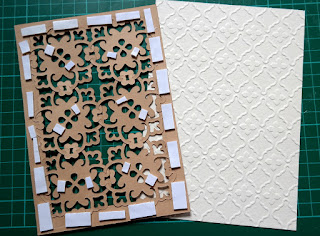
With the small square die from Parisian Accents cut the shape six times from Kraft card and link them together on two sides using the little knobbly areas on each piece.
With Matting Basics B take dies #5 6 & 7 to create the frames ...
Using #7 and #5 will create the wider frame
Using #6 and #5 will create the thinner frame
Once you have cut the wider frame you can add the linked squares to it by gluing just around the edges and then adding foam pads to strategic areas to raise the patterned panel.
Hand cut and emboss another cream panel making it slightly larger than your patterned frame work
Make sure that this is leaving a small border around the base card and and it in place
Add foam pads to the thinner frame and add this to the top of the wider one to give you a double frame around the filigree panel
Cut your word several times and glue them together to make a sturdy sentiment and with foam pads add it to the front of your card.
I decorated my card with a large pearl flourish and then added the word over the top.
Have a dry run with your flowers to see where you would like them before gluing them permanently in place. Dot with glue and sprinkle on the glitter for a sparkly effect.
And here is another idea using the same colour combination but other dies from the Parisian Accents and Motifs.
Next Week: Persian Accents and Motifs
Next Week: Persian Accents and Motifs
More tomorrow ...
Hugs xx


