Beautiful Card Designs Made Easy

Showing posts with label Tutorial. Show all posts

September 24, 2015

What's Cooking ?

Hi Everybody,

The other day I had a trip to Ikea  and while I was there I spotted these big tubs in the childrens department and they are filled with lots of bright plastic beads

It cot me £5 and there are literally hundreds of these beads in this tub.

So what am I going to do with them?
 I'm going to bake them !!

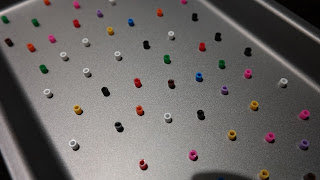
Pre heat your oven to 200 degrees (It needs to be hot) and while you wait you can space out the beads onto a non stick baking tray.


 They need to be separate with enough space between them because they are going to melt and you don't want them to run together.

Put them in the oven for ten minutes and then take a look at them. As they melt they sink into a doughnut shape.
 If yours are like that then they need to be left for a little longer until all the centre has run together and formed a dome.

Once they are ready take them out of your oven and allow them to cool down for a few minutes
I eased mine from the non stick baking tray with a wooden spatula
And there you have a whole bunch of flat backed dots ready to add to your cards.

There are ten different colours of beads in the tub and I think it is a bargain

If you like to add enamel dots to your cards then these are so cheap you can add loads of them

And when you eventually use up all the beads ... in the year dot ... keep the container for storage

Happy cooking !!

More tomorrow ...

Hugs xx

January 07, 2015

Spellbinders Labels Forty Tutorial

Hi Everybody,


As part of my commitment to Spellbinders as their UK Ambassador I write a short tutorial for their blog once a month.

It was my turn at the end of December and I created a pretty card in yellow  titled   Labels Forty - Happy Birthday Card

But I thought it would be a good idea to show another way to use the same set of dies and so ensuring that you get your monies worth from the dies that you buy.

For this card we are going to use the largest die from Labels Forty to create the base
You will need to cut two of the largest #5 and fold one of them over by about half an inch, glue them together and that creates your base.


Then with the same large die I added in the #3 from the Decorative Elements  and this made a frame in white

Using some low tack tape will stop the dies from slipping as you put them through your die cutting machine

The next step is to create the decorative frame the will sit on top of the white one you have just made.

I used the largest decorative one and added in the next size down #3 and cut this in turquoise.

Glue them both together for a really pretty frame

Both of these can then be added to the base card with foam pads and the pads  won't show through because of the white layer to the frame.

Create more layers using #2 from the Decorative Elements in turquoise and another layer in white using #2 from Labels forty.

Using foam pads between these layers will give dimension to your card and make it much more interesting

The pearl flourish is from Want2Scrap

I used flowers from Wild Orchid Crafts  and for those new to my blog they are a UK company but they will ship abroad

I hope you enjoy this tutorial and will visit again,  and it will be my turn  again to be add another to tutorial to the  Spellbinders Blog  towards the end of this month

I will be sure to let you know when it is due.

More tomorrow ...

Hugs xx