Beautiful Card Designs Made Easy

April 25, 2012

Belle Rose...


This is a new Spellbinder die that I bought a few weeks ago and I know it is back to flowers again ... but for me they make such a beautiful focal point that I find very hard to resist.
This one is the Belle Rose and it is from Heartfelt Creations, a company that Spellbinders make dies for.
There is a lovely stamp set that accompanies the die and with them you can create the most gorgeous roses for your cards,  that you can colour in yourself.

I used an M-Bossablilty folder to create the background panel and this one is the So Trendy.
I embossed the top part of the card first and then the lower, so that I had the plain space in which to add my sentiment.
 I stamped that with ink that matched my colour scheme and then matted it onto the same card used for the flower and flourish.

The glitter strips have been done with double sided tape and sprinkled with Glamour dust.
But the die produces the most gorgeous flourish and it is quite large and I sat it under the blossom.
The card itself is an A5 so that will give you some idea of how large the die is, as it almost covers the bottom part of the card.

A large white pearl for the centre of the flower and some Glamour Dust around the edges and there you are... a quick and easy card to create and only one flower...

Hugs xx


April 24, 2012

Look No Flowers ...

I am adding these cards to day just to prove to myself that I can make a card with out the aid of some flowers and I now need to go and  lie down in a darkened room to get over it....

I couldn't make one though without  using my much loved Spellbinders.

They always have such a dramtaic effect on any card and they never let me down.

As always the name of the Spellbinders used will be BOLD to help you with any purchase you may have as you add to your collection
Both of these cards have been created with the Layered Scalloped Posy from Heartfelt Creations.
The central border is mixing two sets of Edgeabilites,  Classic Postage Stamp Insert  with theTriple Scallop cutting edge.

The sentiment is onto  two sizes of Lacy Circles.  Both have embossed backgrounds from the M-Bossabilities folders

This is one of my favorite ones and is the SoTrendy folder which is double sided ... with a unique pattern on each side.
So twice the value and twice the fun. And  there we are  ... cards with clean and simple lines, for any occasion ... and not a flower in sight.  (Sigh!)

Hugs xx


April 23, 2012

More Flowers...

The names to all the Spellbinders dies that I have used will be  BOLD  so that you will know what has been used should you wish to add them to your collection.


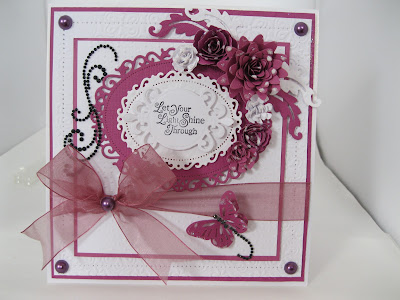
Here are those Bitty Blossoms again and they have been combined with the Damask Motifs  from Spellbinders.
I have layered them over the Romantic Rectangles with one of the Fancy Tags 3 at the front, and the leaf shapes tucked behind the flowers are from the Damask Accents. 

The buckle on the ribbon is from the Ribbon Buckles and there are lots in that set for you to use.

This card is going to be for a wedding and so the name and date have been left off and will be added later.

The pearly flourish is fromWant2Scrap and I have coloured them,  the butterlfy and the pearl flower centres with Promarkers to match my colour scheme.
I have added Cosmic Shimmer around the edge to create the look of pearls

Hope you like....

Hugs xx


April 22, 2012

Playing with Spellbinders...

I love, love, love my Spellbinders and I use one set or another on almost every card I make.

I will add the names of the Spellbinders that I use BOLD so that you will know which sets they are should you wish to purchase them to build up  your own collections.

It is also no secret that I like to add flowers to my cards too.

I just love the effect they give to a card and I openly admit to being a "More is more...." kind of a card maker.

I know it is not to everyones taste and I do love the elegant looks to a more simple card ... I make them that way too ..... but if I can make a card were I can add the "Bling" then I am happy to add it.

I have bought a lot of my flowers from Wild Orchid Crafts   in the past, and the look they give is so beautiful.

But my latest love is the Bitty Blossoms and the Spiral Blossom 3   from Spellbinders

When combined together they make the most beautiful floral spray to grace any card.

On this card I have added the Floral Flourishes behind the flowers and the blue background  is glitter card.

I have also added some Nestabling around the sentiment
The purple colour with pure white make these flowers really pretty and I have sprinkled them with Glamour Dust.

The organza ribbon and the flourish set off the Lacy Ovals and the trail from the butterfly is a left over piece of the pearly swirl.


The Nestabling is from  Want2Scrap and always makes a card look special what ever the style. 

Here I have used them with the Spiral Blossom 1 ... which makes the most gorgeous roses ... and the Floral Flourishes again.     The lovely sentiment is from                                   Clarity Stamp     

The Hatpin is tucked into the flower spray and can be removed by the recipient so don't forget to tell them.

It makes a lovely lapel pin for them to wear.

      
Hugs xx

April 21, 2012

A Fun Card

This is the latest addition to the tutorials and there are both written and video instructions for this fun card.

It is one that kids really enjoy ... and hopefully you will too.

The  Magic Slider Card is very easy to create but because of the way it is designed it will have children fascinated with how it works.... but  keep  'em guessing!

This is how the card will look when it is given and it can fit into a standard envelope if you keep the height of the flowers low.  
 I have added Poppies to the front to match the theme of the card and they are from Wild Orchid Crafts  I have mixed them with some Ivy leaves and  red gingham ribbon.

The Poppy stamp is from Clarity Stamp and I have coloured it in with Spectrum Noir Pens  from Crafters Companion

As the card is pulled from the sleeve this is what will be seen and the result is quite amazing.
So I hope you will take a look at the short video tutorial on how to get this look and if you are new to cardmaking don't be put off and think it is too hard to do,  it really isn't.

And you will be pleased with the result especially when the children that receive it plead with you to tell them how you did the magic.

Hugs xx