Beautiful Card Designs Made Easy

Showing posts with label Clarity stamp. Show all posts

March 28, 2017

Tuesday Tutorial - Intertwined Spirals

Hi Everybody,

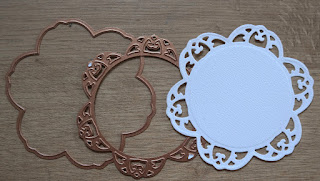
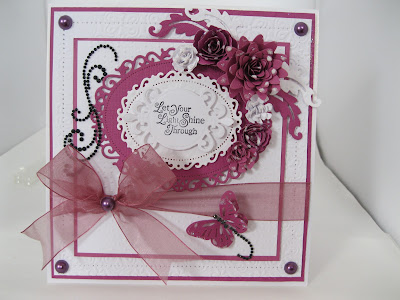
For todays tutorial I am using one of the newer dies from Spellbinders and this is the Intertwined Spirals designed by Becca Feeken.  It is delicate and intricate and makes the most beautiful cards for you with just the one die set.
Spellbinders Supplies:

Other Supplies:
Instructions:
With the outer frame cut two layers to create the base card
With frame and insert one cut a layer in the pale pink
Add foam pads to the back of this and wrap with ribbon before adding it to the base card
With the two solid parts cut one of each in the pale pink and add foam pads between.
The foam pads are only 1 mm but give a pleasing depth to the overall look
With the shaped solid and the matching insert cut this in white
Stamp and heat emboss the sentiment onto some white card and either die cut or punch it into a circle to fit the front
Select pink and white flowers. 
I have used from the left:
Rosebuds, Sweetheart Blossoms, Cosmos Daisies, 20 mm Green leaves and Roses in three different sizes 10 mm 15 mm 20 mm 
Add a small bow to the front and one small rose to cover the knot.
Arrange the flowers along the left side and dot with glue then sprinkle with glitter to make them sparkle.
Add some small pieces of pearl flourish around the flowers and three small pink ones to the sentiment circle

More tomorrow ...

Hugs xx

October 07, 2015

Peach and White

Hi Everybody,

I love the deep shade of peach with this card and it goes so well with the white. of the ribbon.

I chose lovely peach, white  and orange flowers to go with it and they are a mixture of Roses, Rose buds,  Carnations and Lilies and they are from Wild Orchid Crafts

I have used a fine glitter on all the petals to sparkle them up and I use the Iridescent Chameleon from Glitter Magic

The white satin ribbon is from Mei Flower and it is tied into a single bow. The diamante centre is from WOC

I have made a peach pearl Hat pin to push into the bow and they are from the Sparkles Group and come complete with end protector

The dies I have used are from Spellbinders and the white panel is #3 from  Labels 47 Decorative Elements

I have layered this with Oval Majesty  and used dies #3 and 4 and the card I have used is from  Papermill Direct  and is about 240 gsm

All the layers are separated with foam pads to give dimension to the card. The verse is from Clarity Stamp

More tomorrow ...

Hugs xx


December 21, 2014

It's not Pink ...

Hi Everybody,

Todays card is a million miles away from pink but I like it just the same

I made a card in my favorite style with the Hinge   at the top and it is a 5x7 which is a lovely sized card to create.

Not small but not too big to be posted and will take a nice flower display too boot.

I layered this with cream card and a designer paper from Anna Griffin.

But the shade of green was a little too bright for me once I had added it and so I diffused it by adding a piece of embossed parchment over the top

I added large pearls to each corner to hide the glue dots holding the parchment in place.

I wrapped the blue ribbon around the layers from top to bottom for a change.

The large oval was cut from the cream and this beautiful die is the Fleur de Elegance   from Spellbinders Classic Collection .. and is one of my favorite sets to use.

I used the flowers from Wild Orchid Crafts  and they are a mixture of Roses, Cherry Blossom, Rose buds, Tulips  and Sweetheart blossom

The lovely verse is from  Clarity Stamp  and it has been stamped in green and clear embossed.

I have added in HatPin to complete the look and pushed it through the bow.

More tomorrow...

Hugs xx


February 13, 2014

A Card for children ....

Hi Everybody,

I thought I would delve back into past videos for todays post.

This card has been on YouTube for almost two years ... and I was using  flowers from Wild Orchid Crafts  even then.

But it seems to be having a new lease of life as it has had lots of views in the last few weeks... and some lovely comments

So here to fascinate your children is the Magic Slider Card

I know on first glance it seems very plain but the fun starts when it is pulled open via the tag at the top.

Children love it and want to know how you did .... but don't tell 'em ... it's your secret.

The stamped Teddy Bear is from Crafters Companion  but it is such an old stamp that I don't know if it is still available.  The poppy stamp in the video is from Clarity Stamp


The video is not long but I sure hope you enjoy it and will give it a try.  

Then stand back and watch children use it, especially the younger ones,   and see the look on their little faces

More tomorrow ...

Hugs xx

October 26, 2013

Christmas Make ...

Hi Everybody,

Last year I made lots of these for the children in our family and they were so popular that even the adults wanted them for keepsake afterwards.

I made a video of the process and it was very well received.

So I thought I would add this in plenty of time in case you wanted to make some for your family  and add to the boxes what ever you fancy.

Chocolates, sweeties, soaps, jewelry,   Diamonds .... er we ll maybe not !!

The video shows the Advent Calender being made for a child, in fact I made it for Isabella,  but the picture shows a more grown up version that was made for a teenager.


The box die is the Bracket Edged Box and it is very easy to make the whole calender.

But it will take you some time to create 25 boxes and so I am giving you plenty of it to get busy making this lovely Advent Calender.

More tomorrow ...

Hugs xx


October 23, 2013

Turquoise Voile...

Hi Everybody,

Today I have used the turquoise Voile and the sheets are so fine and pretty.

The background I have used behind the voile is Centura Pearl Snow White and it looks lovely.

You can just see the sparkle in the flowers in the voile and placed on top are the flowers from  Wild  Orchid Crafts

The verse is from Clarity Stamp  and it has been heat embossed in silver.  And the pearl around it is matching Bling for Labels 23 from Want2Scrap

The panel along the left has been created with the Edgeabilities and this one is the Classic Triple Scallop

I have cut it three times in alternating colors and the turquoise is Centura Pearl from Crafters Companion

I bought die  from   Save On Hobbies   because the price is so good.

And I know that some of you wanted the Donnas Alpha when you saw me use it on a card a while ago and it was sold out .... well it will be back in this month and is a very versatile alphabet set to have.

More tomorrow ...

Hugs xx


September 07, 2013

Crisscross Pattern ...

Hi Everybody,

This is one of the newest  patterns from Spellbinders and it is the Crisscross Pattern.

It makes really neat backgrounds and I bought mine from Sunrise Crafts

This is a  UK company  but they have the most up to date Spellbinders and the delivery is quick.

Mine arrived this week and so I had to play and see what it looked like and this is the card I came up with ....
I have created the design as a Hinged Card  and used lots of layers.

The pattern  has been layered with Mirror card and created in the same way as the instructions in the Creating A Frame with Spellbinders.

The other dies I have used are listed below.

The sentiment is from Clarity Stamp and it has been heat embossed in silver

The single flower is from Wild Orchid Crafts

 The inside of the card has been decorated to match the front and the ribbon is from Reasonable Ribbon and is part of their ribbon club.

Now I know that the list of dies below says Pre Order ... but these dies are all available now .. and have been for some time.

So please shop around and find them at the best price in your part of the world.  

The list below is there simply to show you what I have used and what  the dies  look like so that you know what you are looking for should you wish to get them.

More tomorrow ...

Hugs xx


August 11, 2013

New embossing folder ...

Hi Everybody,

This card took no time at all to make and is good for those "Have you got a card for ....."   moments that we all get.

The main feature of this one is the embossed panel.

It is  one of the new 8 x 8 folders called Elegance and it is from Crafters Companion. 

The folder embosses with two different patterns at the top and bottom of the card and gives you the ideal spot to add your ribbon

I have used some pale blue Glitter card between the layers

The sentiment here is from Clarity Stamp   and I have stamped it in the Blue and  embossed it with a clear powder onto Labels 20

The matching Pearls "Bling" is from  Want2Scrap


So a very simple easy card to keep for those unexpected moments

More tomorrow ...

hugs xx


May 19, 2013

Plain to Pretty ...

HI Everybody,
Click to Enlarge

Well that was a very successful draw yesterday and the "Wishes and Kisses" CD is an excellent prize to win.

So if you didn't  win you can still get a copy if you pop over to Funky Hand   and  treat yourself.

Todays card is on another note altogether and I know I said that flowers make the difference but  there's not even a flower on this one.

What I wanted to do was show how a pretty card can be transformed into something special without them or a lot of embellishments.

This is a 5 x 7 Hinged Card    and the background has been embossed with the Regal M-Bossabilities  folder.

Then 20 small pearls from Want2Scrap  are  all it took to make it look so much better.

I have kept to an all white theme and this could suit many occasions.

The  pretty white ribbon has embroidered hearts and is from The Ribbon Room

The sentiment is from Clarity Stamp which is another UK based company for beautiful quality stamps.


More tomorrow ...

Hugs xx


March 16, 2013

Paper Creators 6th Challenge

Hi Everybody,

I can't believe how quickly time is going and once again it is challenge time over at Paper Creators 

The theme this time is Spring and as part of the Design Team  this is my card.

I have used one of the Sassy Sally Images and it is a pre-coloured image from the Paper Creators shop  that you can download and use as much as you like

If you enter your card into the challenge you could win a £10 voucher to spend in the shop on any items that take your fancy... and there are many cute characters to tempt you.

I have made this card to a 6" tent fold  and I have added in some pink ribbon and a bow along the right hand side.

The flowers are from Wild Orchid Crafts   and they are a mixture of roses in different sizes and some small pink daisies.

The letters are from the Alphabet set from Clarity Stamp  and they come complete with matching tile stamps for you to create the blocks.  You can make any word you want  and you will never be short of adding in some ones name to your designs.

As you read this I will be at the GNPE craft show in Harogate ... spending my pennies but if you still haven't entered your name for the chance to win some ...  
  then do it now.... the draw will end next Tuesday.


Hugs xx

October 31, 2012

Green and White

I don't know if I have shared this card with you before ...  so if I have apoplogies and if I haven't then here it is and it is well worth reading the verse on the front of it.

The verse is from Clarity Stamp and it is really lovely and could be sent to many different people for many different occasions.

Send it to your mum for Mothers Day.  To your husbands/boyfriends for Valentines Day or a Birthday.

Send it to your daughter or son for any reason  ...  the posibilities are endless.

The background for this card is from an Embossing folder from Couture Creations and it called Seedling Nouveau ... and it is very pretty.  The fancy edge to the card is created with Spellbinders Classic Triple Scallop.

The centre piece is cut from the Layered Scallopd Posy with the largest die from the  Persian Motifs layered on top.

The ribbon has been threaded through a border created from the Classic Postage Stamp  and the knot covered with a Vintage button.  I love the metal corner piece at the top of the card.

I would also like to share with you a Blog post from Naomi over at  Creative Bug on the Loose  as she has opened a Digital Shop and has some really cute images there for you to buy.... as well as giving away a free image each week .....oh!  I love a "freebie" .... and I bet you do too.

Hugs xx


August 09, 2012

More time to win ...

You still have time to enter the  Want2Scrap  draw to win $100 worth of glorious  "Bling"  for all you card and  scrapbook  projects as it is on until the..... 15th of August.

All you need to do is click the above link ... click  Want2Scrap "Like" button and leave a comment saying that Christina sent you ... and your name will be entered into the draw for this fabulous prize.

Just the addition of the Swirl along the right hand side can make all the difference to a card and make it look really special.... which is something that we all strive for.

These flowers are created from the smallest part to the Anemone Flower set from Spellbinders and I have studded each of  the centres with a little gemstone.

The Diamante along the right hand side is from     Want2Scrap  and it comes in many colours and styles.


I have cut mine up to give me the effect I wanted on my card and I think that the finished result is lovely.  

The verse on the front of the card is from  Clarity Stamp and is a very sincere verse.  The background is a faux letterpress effect using an embossing folder.

I hope you will have a go at winning the "Bling" it is well worth it and will go a long long way.

Hugs xx


August 01, 2012

Loved You ....

For todays card I have had a return to Spellbinders and the colour scheme is a lovely sage green and white with a green and white Polka dot ribbon around the centre.

The backgound has been embossed with a folder and this one is called  "Seedling Nouveau" from Couture Creations.   It is available from   Country View Crafts  and there are lots of different patterns for you to choose.
The Spellbinders used will be BOLD so that you will know what has been used to create the card

I have used an A4 card and the cutting edge from Classic Triple Scallop with the insert from Classic Scallop and together this gives the detail to the bottom of the card.

The centre panel is the largest die in the  Layered Scallop Posy and has been cut twice.

The centre strip is made from the Postage Stamp cutting edge and  Insert B and the ribbon has been threaded through the holes. 

The sentiment is from Clarity Stamp and it has been stamped onto the largest Persian Motifs die with the edges inked very lightly in Antique Linen.

As a finishing touch I have added a silver metal corner and an antique button to the bow.

Hugs xx


June 26, 2012

Big'N Juicy...

I posted a while ago about  Water Colouring with Distress Inks  and I said that the "Big'N Juicy" inks could also give a good effect.  They are good value for your hard earned cash as there are about five different colurs in each pad.

But what ever you do  DO NOT  store them upside down .... or on their side ...  as all the colours will run into each other and you will just have one horrible mess.
Store them right side up and level ...

Because of the amoung of pigment in these pads you would need to take care,  and personally I feel that they are a little too vibrant to get a good skin look.

For this floral image I have used the inks to get the soft look in the petals  and I am quite happy with the result.... and I have used the Hydrangea ink pad. 

This beautiful Poppy stamp is from Clarity Stamp and who says poppies have to be red....

This is another style of flower and and is from  Inkylicous  and this has been coloured using the Waterfall  ink pad.
If you press the closed lid firmly down onto the inked pads then you will get some of the ink transferred to the inside of the lid and this can then be used as your palette.

Alternatively use a white tile so that you can see the true colours.

Hugs xx

April 22, 2012

Playing with Spellbinders...

I love, love, love my Spellbinders and I use one set or another on almost every card I make.

I will add the names of the Spellbinders that I use BOLD so that you will know which sets they are should you wish to purchase them to build up  your own collections.

It is also no secret that I like to add flowers to my cards too.

I just love the effect they give to a card and I openly admit to being a "More is more...." kind of a card maker.

I know it is not to everyones taste and I do love the elegant looks to a more simple card ... I make them that way too ..... but if I can make a card were I can add the "Bling" then I am happy to add it.

I have bought a lot of my flowers from Wild Orchid Crafts   in the past, and the look they give is so beautiful.

But my latest love is the Bitty Blossoms and the Spiral Blossom 3   from Spellbinders

When combined together they make the most beautiful floral spray to grace any card.

On this card I have added the Floral Flourishes behind the flowers and the blue background  is glitter card.

I have also added some Nestabling around the sentiment
The purple colour with pure white make these flowers really pretty and I have sprinkled them with Glamour Dust.

The organza ribbon and the flourish set off the Lacy Ovals and the trail from the butterfly is a left over piece of the pearly swirl.


The Nestabling is from  Want2Scrap and always makes a card look special what ever the style. 

Here I have used them with the Spiral Blossom 1 ... which makes the most gorgeous roses ... and the Floral Flourishes again.     The lovely sentiment is from                                   Clarity Stamp     

The Hatpin is tucked into the flower spray and can be removed by the recipient so don't forget to tell them.

It makes a lovely lapel pin for them to wear.

      
Hugs xx

April 21, 2012

A Fun Card

This is the latest addition to the tutorials and there are both written and video instructions for this fun card.

It is one that kids really enjoy ... and hopefully you will too.

The  Magic Slider Card is very easy to create but because of the way it is designed it will have children fascinated with how it works.... but  keep  'em guessing!

This is how the card will look when it is given and it can fit into a standard envelope if you keep the height of the flowers low.  
 I have added Poppies to the front to match the theme of the card and they are from Wild Orchid Crafts  I have mixed them with some Ivy leaves and  red gingham ribbon.

The Poppy stamp is from Clarity Stamp and I have coloured it in with Spectrum Noir Pens  from Crafters Companion

As the card is pulled from the sleeve this is what will be seen and the result is quite amazing.
So I hope you will take a look at the short video tutorial on how to get this look and if you are new to cardmaking don't be put off and think it is too hard to do,  it really isn't.

And you will be pleased with the result especially when the children that receive it plead with you to tell them how you did the magic.

Hugs xx