Beautiful Card Designs Made Easy

November 08, 2013

Parchment Front ...

 Hi Everybody,

Elements from three sets of dies have been used to produce this pretty card.

But the focal point to it has been cut from Parchment.

I have used Parchment Paper from AnnaMarie Designs  and it is a really good quality.

I added it to the A4 embossing folder Ornate Butterflies from Crafters Companion  

Once the base card was created with layers of white and lilac I cut the parchment in half, and cut the shaped panel for the front.
I used the other half and cut out just two of the butterflies and then decoupaged them onto the main panel

The verse is stamped and heat embossed in silver and add to Labels Thirty Three.

The butterfly has a pearly body and trail cut from "Bling" from Want2Scrap


A really pretty and easy to produce card

More tomorrow ...

Hugs xx


November 07, 2013

How about a Birthday card ...

Hi Everybody,

I thought I would move away from Christmas for a little while and add this pretty birthday card.

It is a 7" square and has lots of layers using the Grand Squares ... and I have added it to my Etsy Shop

The filigree panel is from Adorning Squares and the flower corsage ha been added to one of the ovals shapes and then added to the panel.

The ribbon is a beautiful satin and tied in a large bow with a pearl and silver centre to cover the knot.

The inside has been embossed with the new Ornate Butterflies Folder from Crafters Companion

It is an A4 folder and I really like these bigger folders.

The pearls have been added around the edge of the card and the inside and  they are from Want2Scrap 


The pretty organza butterflies I already had in my "Stash"  and the "Happy Birthday" sentiment, which has been heat embossed in silver,  is one that most of us have

The flowers are from Wild Orchid Crafts and they have been sparkled up with Glamour Dust.  I added a white feather to the display as well as a lovely pink pearl hatpin.

More tomorrow...

Hugs xx

November 06, 2013

Baby Cards ...

Hi Everybody,

I thought I would go back to making some baby cards this time.

I have Grand daughters in their twenties whose friends are now of that age where they think about starting a family.

So now I have cards ready for them to give when the time comes.


This image is Mulberry Wood from  Crafters Companion

I have made the puppy look different  each time by changing the colors.

The addition of the ribbon also alters the look of the card and of course it wouldn't be me if I didn't add in some "Bling"


Here I have taken just one of the pearl flourishes
from Want2Scrap and cut it up between the three cards.


A little goes a long way 

More tomorrow ...

Hugs xx

November 05, 2013

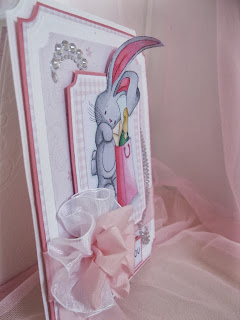
Look at those ears ...

Hi Everybody,

Todays card was one I made as a Design Team member for Spectrum Noir and of course the subject was coloring the soon to be released stamps of Bebunni.

Those stamps are now on sale  from Crafters Companion and they are delightful.

But because of this card I was asked to show how I got the ears outside of the frame as many people may not know how to get the look.


 And so a video was created to show the technique and it is now available to view on the Spectrum Noir Blog

It is very easy technique and yet can bring to life all the little characters that you may have in stamp or digital format.

If you are new to card making then please give it a try ... you will be delighted with your results.


And if you are a seasoned card maker and know all about how to do it .... then sorry I don't mean to teach you how to suck eggs... if you know what I mean.

More tomorrow ...

Hugs xx

November 04, 2013

Coloring Holly ...

Hi Everybody,

Todays card is another for Christmas  ( talk about stating the obvious ....) but the focal point is the subject of a video tutorial.

I was asked  if I would  show how to color in Holly especially with Christmas being well on it's way.

The Spectrum Noir colors used are ...
 DG2, DR4, DR6, IG7+Blender,  DG2, DG4, TN3, EB3, EB5

For this card I have colored and cut out the second image and decoupaged it onto the card.

The stripes in the ribbon are created with the blender pen.

The image is from the CD "The Next Big Thing" from Just Inklined ... but sadly it is no longer available ...unless you can find a  copy on Ebay.

So here it is and it will show you how to get the look that I have created here.


I hope you enjoy the tutorial and there are more on the way .... just as soon as my "Film Crew" has watched the Formula 1 ....

More tomorrow ...

Hugs xx