Beautiful Card Designs Made Easy

May 13, 2015

Some News to share ...

Hi Everybody,

A few weeks ago I was asked to join an On Line Design Team for a company called Craft Stash.  It is the companies aim to be the biggest craft supplier in the UK and their new website was launched very quietly last Friday.

I have sent them several cards made with products they stock

I also have a new badge in the right hand side bar that will take you to visit their website.

These cards are featured on their pages with the products used and I hope you will pop over and take a look as there may be something that catches your eye.

On these I am featuring the   Creative Dies Hearts   and the Memory Box Fairytale Flower Frame  and I will show you more as we progress

The flowers are from Wild Orchid Crafts   and the stamped sentiment was free with Simply Cards and Papercrafts Magazine.

The With Love sentiment is from Spellbinders and is Sentiments Three  and I use these a lot in my card making ... you wouldn't want to see my handwriting !!

And so I'm starting a new adventure and my cards are going to be more on line ... wish me luck!

More tomorrow ...

Hugs xx


May 12, 2015

Tuesday Tutorial - Floral Ribbon Threader

Hi Everybody,

This is one very pretty die from Spellbinders and its name if the A2 Floral Ribbon Threader.  The card it produces is not a large one but there is no reason why you couldn't add it to a larger base if you so wished.


Spellbinders Supplies:


Other Supplies:

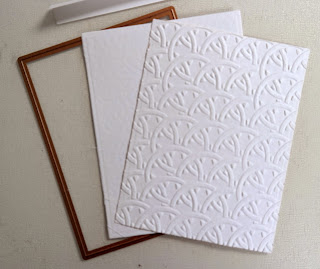
Create your card base with the #7 A2 Matting Basics A and emboss one panel with a pattern of your choice


(Please remember that #1 is always the smallest die in any Spellbinders sets)

With #8 cut a panel in your chosen color

With #8 and #7 placed together cut the detailed panel

Then place the #3 die from A2 Matting Basics into the centre and pass through your machine again

This will create a frame for you to match the white panel from the previous step

Thread some narrow ribbon that will pass through the holes all around the frame

Finish off in one corner and tape the ribbon ends together

Fix the solid panel to your card base with foam tape for dimension

Add foam pads to the back of the detailed panel and add it to the top of the solid one making sure that the curved edges marry up

You can see in the photo the shadow that this depth creates and adds more interest to your designs

Stamp and emboss your sentiment onto some blending card and with the smallest rectangle die cut it out

I added a ribbon bow to the bottom of the card and glued a pearl to the knot.

Then arranged my flowers to the top right corner and sprinkled them with glitter.

It may not be a very big card but it is a very pretty one that would suit many occasions

And if you struggle to get a pleasing look to your floral displays then maybe I can help you solve the problem in the form of a video .... Adding Flowers to Cards 

More tomorrow ...

Hugs xx

May 11, 2015

Arched Elegance

Hi Everybody,

This is one of the samples that I made  with Spellbinders for the Create and Craft shows

In the demos I showed you a few ways to use Arched  Elegance

It makes a very pretty card just as it is but there are lots of other ways to get your monies worth from this, and the others in the same collection

They are designed by Becca Feeken and she makes the most beautiful cards over at  Amazing Paper Grace

I have dressed my card with flowers from Wild Orchid Crafts  and around the flowers I have dotted pink pearls of various sizes from Want2Scrap

The buckle for the ribbon is from WOC too and the satin ribbon is from Mei Flower  and the sentiment is Sentiments Seven 

Altogether a really pretty card for any occasion

More tomorrow ...

Hugs xx


May 10, 2015

Gold and Black

Hi Everybody,

Todays card is a million miles away from pink but I wanted to try something with lots of drama in it for a change.

The whole card has been hand cut and not a die in sight and the Gold patterned card is from a  6x6" stack by My Minds Eye called Fancy That.

It is very dramatic and the gold is lovely and shines in the light. I had to position the card carefully so as not to get the glare

So to create this I took a piece of black A4 card and simply folded it in half and then trimmed it down to a square.

I layered up the gold piece sot hat it was slightly smaller then the base and added it with wet glue

The banners are cut to create a gold edge to each one with the striped card that is in the pack and each one is layered with more of the black card

Each banner is raised with foam tape for dimension.  The sentiment was stamped onto parchment and then heat embossed with gold powder. This is also hand cut to fit the card.

The large black pearls from   Want2Scrap    that I have placed in each corner are hiding the glue dots underneath the parchment which, no matter how hard you try, will show through.

More tomorrow ...

Hugs xx


May 09, 2015

Todays Winner

Hi Everybody,

It's a cold and windy day here in the North West and a really good day to stay warm and craft.  I am busy making samples for the Create and Craft shows next week.

The lovely Kim Hupke is coming over from the US and she will be launching a brand new machine and dies from Spellbinders on Thursday.

Then from Saturday onwards it will be yours truly showing you some pretty cards and demos with the new dies. I hope you will join me and send in your emails.

So lets get onto the winner of the pretty blue card and the name drawn this morning is you ...

Marianne Hammer ...

Please send me your postal address to 
christina@card-making-magic.com
and I will get the card in the post to you straight away.
Let me know when you get it and I hope you will like it.

Next Friday I will be travelling down to Peterborough to prepare for the shows but I have scheduled already the Friday Freebie and I am going to give away TEN cards to TEN winners and they are all pink !!

More tomorrow ...

Hugs xx