Beautiful Card Designs Made Easy

December 19, 2015

Card Winner ...

Hi Everybody,

Here we are on the run up to Christmas and I hope you are all ready for it.  I won't be doing a Friday Freebie next week but will be back in full swing in the week after.  
There is no blog post tomorrow either so I will be back on Monday with more to share.

I have a few last minute things I need to buy still but the day will be spent with family all enjoying the roast turkey. 

So the name for the orange card has been drawn and this weeks winner is ...

Amy Higgins 

please would you send me your postal address to 
christina@card-making-magic.com
and the card will be on it's way to you.

Let me know when it arrives with you and I hope you will like it.

More on Monday ...

Hugs xx


December 18, 2015

Friday Freebie 098

Hi Everybody,

Here is another card that is on offer this week and this one is in a lovely orange shade.

It has paper lace and pearls along the edges and is dotted with sequins.

The pearls are from Want2Scrap and are self adhesive

The flowers are from Wild Orchid Crafts and they are chosen to blend in with the colour scheme

If this is a card that you would like to have then all you need to do is leave me a comment at the bottom of the page

Then come back tomorrow and see if your name is in the blog post as the winner.

You will have 48 hours to claim the card by sending me your postal address if you are the winner

More tomorrow ...

Hugs xx

December 17, 2015

Greetings to you ...

Hi Everybody,

I will move away from Christmas cards shortly I promise,  and start with spring flowers and summer displays again ... definitely my favourite type of card.

But for now this Christmas flowery card has used some of the beautiful Poinsettias from  Wild Orchid crafts

Into this mix I have added Roses and a little Holly Sprig

The background is created with  Grate Effect   which has been layered over Antique Gold card and then I have added in  Fleur de Elegance  also in gold

The little die cut sentiment is from Craft Stash  and there are lots of different phrases for you to choose

The cheery red ribbon is tied into a single bow with a shiny dazzler in the centre to cover the knot.

Altogether a pretty and traditional type of card and if you swap out the sentiment it could be for any other occasion

More tomorrow ...

Hugs xx


December 16, 2015

International Ambassadors Informal Blog Hop

Hi Everybody,

Here we are again with another blog hop brought to you by the International Ambassadors and once again we hope you will join in with us

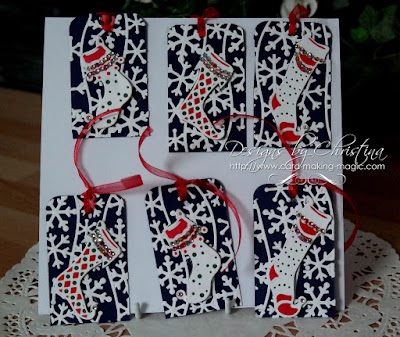
The theme for this month was Christmas Tags as we are so close to sending out all the lovely gifts for friends and family.

Here I have created a set of little tags that have used the same dies throughout. 

I used the plain edge to the Build a Tag  to create the base shape and then added the Snowflakes from the Flurries  set.

Each tag has one of the Fancy Trio  attached and decorated with gemstones,  then threaded with red ribbon, to make the attachment to your gift. Very quick and easy to do as the dies do all the work for you.

I am sure that the other Ambassadors will have some delights for you to see so pop along to each one and leave them a comment.

Yvonne Van der Grijp The Netherlands
Linda Lucas  Australia
Christina Emberson  UK
Christina Griffiths     (you are here)

This is our way of introducing you to each designers individual style and helping you to get to know us a little better.  Thank you for taking the time to visit and for all the comments you so graciously leave

More tomorrow ...

Hugs xx

December 15, 2015

Tuesday Tutorial - Pierced Rectangles

 Hi Everybody,

Adding some accent to the sides of your cards can make them really pretty and with dies that give you the pierced edges it is very easy to achieve. 

There are circles, squares, ovals and shapes that all have this look to them and today I am using the Pierced Rectangles from Spellbinders Celebrations Collection.
Spellbinders Supplies:

Other Supplies:
With die #6 and #5 placed one inside the other onto some white card,  cut and emboss the panel
This will create the pierced edge around the rectangle.
Repeat the process with #4 and #3 to make a smaller panel. 
Stamp your chosen sentiment in the position you want it on the smaller panel and then use any embossing folder you have to add texture.
 (Stamp first as it is harder to stamp on an uneven surface once you have embossed)
Create a base card in blue that is slightly larger than the largest pierced panel.
Create another mat in blue that is slightly larger than your embossed panel
Glue each of the white layers to the blue and then layer them together with foam pads in between
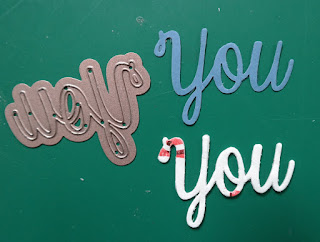
Cut the word "YOU" from some blue card and again from some double sided adhesive foam. remove the top backing sheet and layer the two together.
Remove the backing from the other side and add it to your card in the position you want it near your stamped sentiment.
The position will depend on which one you chose to use as there are many on the stamp sheet
Vary the  stamped sentiment and the colours and the flowers to suit the recipient for a new look each time you make the card ... and make a batch of them in one go so that you always have some ready for that unexpected request 

More tomorrow ...

Hugs xx