Beautiful Card Designs Made Easy

Showing posts with label Make The Day Special. Show all posts

December 15, 2015

Tuesday Tutorial - Pierced Rectangles

 Hi Everybody,

Adding some accent to the sides of your cards can make them really pretty and with dies that give you the pierced edges it is very easy to achieve. 

There are circles, squares, ovals and shapes that all have this look to them and today I am using the Pierced Rectangles from Spellbinders Celebrations Collection.
Spellbinders Supplies:

Other Supplies:
With die #6 and #5 placed one inside the other onto some white card,  cut and emboss the panel
This will create the pierced edge around the rectangle.
Repeat the process with #4 and #3 to make a smaller panel. 
Stamp your chosen sentiment in the position you want it on the smaller panel and then use any embossing folder you have to add texture.
 (Stamp first as it is harder to stamp on an uneven surface once you have embossed)
Create a base card in blue that is slightly larger than the largest pierced panel.
Create another mat in blue that is slightly larger than your embossed panel
Glue each of the white layers to the blue and then layer them together with foam pads in between
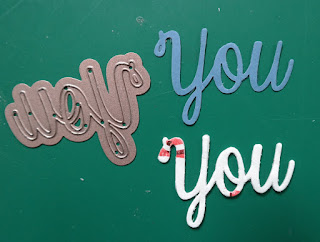
Cut the word "YOU" from some blue card and again from some double sided adhesive foam. remove the top backing sheet and layer the two together.
Remove the backing from the other side and add it to your card in the position you want it near your stamped sentiment.
The position will depend on which one you chose to use as there are many on the stamp sheet
Vary the  stamped sentiment and the colours and the flowers to suit the recipient for a new look each time you make the card ... and make a batch of them in one go so that you always have some ready for that unexpected request 

More tomorrow ...

Hugs xx


November 30, 2015

Using the "Misti" Stamping Tool (Video Tutorial)

Hi Everybody,

Today I am adding a new video tutorial and it is done with the  MISTI 

That stands for the Most Incredible Stamping Tool Invented and if you like to stamp and need some help with it then this is the tool for you.

It does not come cheap but it will aid you to improve your stamping in all different kinds of ways and over the next few weeks I will endeavour to show you some of the things that I have done with mine
For this tutorial I have started off with an Ombre Effect background using Momento Dye Ink in Angel Pink, Lulu Lavender and Summer Sky

The colours are very pale but give a lovely washed out look to my background.

I searched through my stamps to fine any small butterfly stamps that I had and they are from various sources.


But the sentiments are from Sheena Douglass range of stamps from  Crafters Companion

The Diamanté Flourish is called Finesse from Want2Scrap and I have cut it to give me the pieces that I needed on my card

This and other videos can be found permanently in the Video Tutorials  in the title bar and there are lots for you to view plus don't forget the Tuesday Tutorial as a new one is added each week

More tomorrow ...

Hugs xx

November 11, 2015

Thanks ...

Hi Everybody,

The background to this card is created from a two part stamp made by My Favorite Things

It is the Candy Stripe Background 

One stamp is the thicker stripes which I have done in pink and the other is the thinner triple stripes in black

It would look really good in other colours too, and it is the perfect  way to create your own backgrounds, to match your designs, when you don't have a suitable paper on hand.

Play with the stamp ...  use just one part of it for a simple look.

Stamp it one way and then turn it around to create some checks. Try it diagonally too for another look. I am sure that you can come up with many more ideas as you play.

The "Thanks"  word is a small die from  AlteNew  and it has the  matching stamp set  to go with it, and from that set I used the other part to the sentiment.

I cut the word twice from black card and black craft foam and layered the two together

Another that is not my usual style and I don't profess to be a stamper ... but never the less I enjoyed making this card and playing with some of the new and different items I have been buying

More tomorrow ...

Hugs xx


November 05, 2015

Friends ...

Hi Everybody,

This little A2 sized card has been stamped with the Vintage Flowers stamp set from Altenew and I got mine from Make the Day Special 

It has a  matching die set  for you to cut the flowers, leaves and branch out perfectly for you each time.

But for this card I stamped directly to card.

Once I had the flowers in place I stamped my sentiment, in black ink,  over the top of them,  and then heat embossed it in clear powder.

The stamped words are  Grand Sentiments by My Favorite Things also from MTDS

I inked around the edges of the card with Salty Ocean Distress Inks fading it in towards the centre for a Vignette look

The white satin ribbon is from Mei Flower  ribbon and a little acrylic flower from Wild Orchid Crafts to the bow are all I have added.

I know this is not my usual style but it does you good every so often to play with other ideas and keep your mind active and fresh.

More tomorrow ...

Hugs xx

October 01, 2015

Emerald card

Hi Everybody,

For this card I have used the Emerald Green from Brusho Crystal Colours and teamed it with Black and White

The Octagon die that I have used along with the Scalloped Octagons are now retired from the Spellbinders website.

To this I have added the "Hello" which is a matching die and stamp set from  Altenew.

I bought mine from Make The Day Special  and they have all the latest stamps and dies from many many companies.

I thought that this turned out to be quite a striking card and is just another way to use up all these playtime sheets I made with the Brushos and using dies that I already have in my "Stash"

More tomorrow...

Hugs xx


June 28, 2015

Batch Card Making

Hi Everybody,

Sometimes when you have a lot of cards to make it can be a good idea to make them in a batch

Here I have four card that are created in this way and it is a quick and easy way to work.

By that I mean do all the stamping ... all the die cutting ... all the embossing ... adding all the flowers from Wild Orchid Crafts  last and arranging them as you please

The first thing I did was stamp the sentiments on each of the cards.

They are part of a collection from  Make The Day Special 

MTDS is a UK based company but they have a lot the US stamps. This is where I have bought the stamps that I have been water coloring

Here is one of the new Avery Elle stamps called  Simply Said    and there all of these and more are on one sheet.  It matches the die that says  You   which I cut from Craft Foam and again in card.  I used double sided tape between the foam and card to glue them together.

I have created my base card and layers with  Pierced Rectangles from Spellbinders  and the smallest layer has been embossed with  Framed Canvas  and both are part of the  Celebrations Collection

Making cards in this way is excellent if you are making a batch of Thank You cards or invitations. Please click the links to view the products.

More tomorrow ...

Hugs xx