Beautiful Card Designs Made Easy

September 01, 2016

Two new Videos ...

Hi Everybody,

I have been busy once again producing new videos on YouTube

They highlight the free gifts coming with magazines from Practical Publishing this month

This one uses the Christmas Tree stamp that is on the stamp sheet and the video is called  Festive Fun

This gift will  be free with Septembers Creative Stamping 34

The second video is the called
Door Embossing Folder, Wreath Die and stamps

You can get your copy of this magazine direct from  this link SC&P 154

Both will be on sale on the 8th September in your selected supermarket or craft shops as well as WHSmiths.

There may be other hobbies or interests that you have and you can see the whole range of publications or to take out a subscription visit  Moremags  and your choice will be delivered to your door each month.

More tomorrow ...

Hugs xx


August 31, 2016

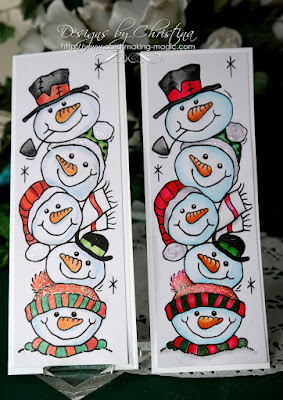
Water Colour Wednesday - Snow Buddies

Hi Everybody,

The stamp I have used for todays card is from Woodware and called Snow Buddies.

It is one that I bought at the craft show last weekend and it is about 3x7" in size so makes a really good card front.

I have added both onto a long card base that will fit neatly into a DL envelope.

The one on the left has been coloured with pencils and the one on the right is water coloured with Zig Clean Colour Real Brush Markers

I much prefer the vibrancy of the right hand card and I really enjoyed the water colouring too.  I have added extra sparkle to both cards with glitter on the bobble hats

This cute stamp set really caught my eye  as the characters are already stacked for you and so very easy to produce aaaannnddd  ... it was only £5.50 .. a real bargain !!

Which is your favorite from the two??

More tomorrow ...

Hugs xx

August 30, 2016

Tuesday Tutorial - Frames and Apertures

Hi Everybody,

For this card I am using a mixture of dies ... some old, some new to create this really charming card in subtle colours. It has several levels created with the frames and it is much better in the hand.
Spellbinders Supplies:
Other Supplies:
With die #7 from Matting basics A create a hinged card in white
(Die #1 is always the smallest)
With #7 from Matting basics B cut the layers as follows :
1 in plain peach
1 in patterned peach 
1 in parchment
1 in plain white
With the plain peach layer use the Grate Effect die to cut a pattern into it
With the white layer use another Matting basics die to create a frame to the thickness you would like and add foam pads to the back of the frame
From the circles dies take nos: 4,5 & 6
Use 4 and 6 to create another frame from white card and add foam pads to the back of the circle frame
Keeping the parchment and the Grate Effect panels together use #5 to cut a circle from the two layers. 
Keeping them together ensures that they will line up on your card
With a thin bead of glue around the edge glue these two together 
Still on the edge of the previous panels add narrow foam pads so that they cannot be seen from the front
Glue the patterned peach panel to the base card and then add these two layers on top
Add these two raised frames to the parchment panels neatly to cover the apertures
Cut the flowers and leaves from the Make A Wish die set and use Distress Inks to add some colours
I used Tattered Rose which is a lovely peachy pink and Crushed Olive with Bundled Sage 
Add some Wink of Stella clear glitter to all the shapes and allow to dry
Arrange the flowers and leaves as you like around the central aperture
Cut the word Blessed from the Botanical set three times in black card and glue them together for strength and glue them into the position you would like 
Dress the edges with pearls
The top card is peach and the bottom card is created in greens 

More tomorrow ...

Hugs xx


August 29, 2016

Shabby Chic Birthday

Hi Everybody,

This really pretty card is in very subtle shades of green and is one of the paper stacks available from AnnaMarie Designs

They are the Blissful Paper Pads and they come in several different colours and sizes so there is sure to be a size that suits your needs.

I have added lots of layers to the card and distressed the edges of some of them and I have lined the inside of the card to match

The leaves are cut from the papers with the Foliage die from Spellbinders and the paper is substantial enough to make into leaves

The wooden tiles are also from AMD and I have added them with hot glue to keep them in place

The flowers and the miniature picture frame, which I have filled with pearls,  are from Wild Orchid Crafts and they have a new range of flowers on their website that are simply gorgeous.

I have added the sparkle to the petals with Glitter Magic   and the pearls are from Want2Scrap

More tomorrow ...

Hugs xx


August 27, 2016

Card Winner Today ...

Hi Everybody,

Sorry for the late post but I have had a lovely day in Harrogate at the Great Create Craft Show buying lots of "goodies" to use on my cards.

I also had fun catching up with my crafty friend AnnaMarie and it is always a pleasure to see her.

In the background is AnnaMaries stand at the show and she has some beautiful items to make lots of wonderful creations ... and they are also on her website at AnnaMarie Designs 

But now that I am back home again I have finally done the draw for Fridays card and the winner this week is you ...

Margaret Corgi Owner
please email me your postal address to
christina@card-making-magic.com
and the card will be on its way to you

I hope you will like it and please let me know when it arrives with you.

More tomorrow ...

Hugs xx