Beautiful Card Designs Made Easy

May 03, 2017

I Know .. I Know ...

Hi Everybody,

I know it's not Christmas but this image is one that has been sitting on my desk and so I thought I would add a little water colour to her and make her into a card.

I have used some of the card stack that I bought from the £££shop as a layer on both of the base cards

The background to my image is created with a light water colour wash and then the stars added with a stencil and embossing paste
The bears have been coloured with Gansai Tambi water colours and then I added glue pen and glitter to the hats and stocking tops

The one on the left is slightly different colours for bear, mouse and background but the stars are done the same way.

On both of the card bases I rounded two opposite corners.

Both panels are cut with a stitched border die from the Stitched and Pierced Collection  from Craft Stash and there are lots of shapes for you to choose from


More tomorrow ...

Hugs xx

May 02, 2017

Tuesday Tutorial - Arched Diamonds

Hi Everybody,

As you build your collection of dies it is good idea to add one large statement piece, and with that one die there is so much variation that can be done
For todays card I have used such a die to show you different ways to alter your design.  
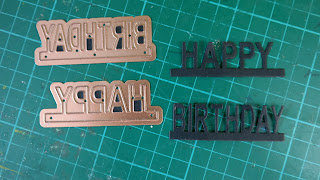
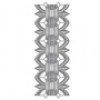
I have used the Arched Diamonds from Spellbinders along with the Border Sentiments for both cards and varied them in colour and style one for men and the other for women 
It is quite a large die and will make a perfect focal point for your creations
Spellbinders Supplies:
Other Supplies:
  • Card
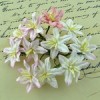
  • Flowers
  • Ribbons
  • Pearls
  • Glitter
  • Distress Ink
Instructions:
With white card create a top folded base that measures 5x7" in landscape
Cut a smaller mat in deep turquoise and another smaller one in white to leave narrow borders around each edge
Layer these panels onto the base
With the die cut the white card twice and ink through the die before removing the card.
Add foam pads to the back in strategic places so that they can not be seen from the front
Layer these two panel onto the base layers
Die cut the Happy Birthday from the border sentiments three times and glue together for strength
Add to the card front where you would like them
I have kept this version clear of flowers for a more masculine card.
For this version I have used the 5x7 in portrait and made the layers in pink and white and embossed the smallest white panel
I have used just one die cut and added it across the card with pink ribbon around it.
The triple bow has flowers in the centre and a pearl flourish adds the extra touch.
The addition of the flowers, ribbons and pearls give it a more feminine look

More tomorrow ...

Hugs xx


May 01, 2017

Spellbinders Water Lilies Strip

Hi Everybody,

Today I am going to show you three different cards made using the same die set and each is very intricate and pretty in its own right,  This is the Water Lilies Strip from Spellbinders and the die is in three pieces. One central patterned piece and two separate cutting edges

This means that you can choose to  leave the pattern in the card by omitting the cutting edges or choose one edge and cut that with the patterned piece or do as I have done for the this card

For the first card I have simply used all three pieces to remove the die cut from the card and then added them, with foam pads beneath, as separate panels to the front of a layered 5x7 base


For this second card I have create a tent fold card in 5x7 and then added one cutting edge and the patterned die to the outer part

From white and pink patterned paper I have created layers to add to the left of the card and lined the inside to match

I have tied ribbon around the left panels and add a pearl string, a bow and a centre piece for the knot

The words are layered up to give thickness and the top layer is in black

The last card has had the die placed into  the centre of the A4 card to add the pattern

I cut one extra die cut patterned layer to add to the top of this for strength

Then other blue panels have been cut for back and front and embossed and the sentiment added to the front of the card

So with just one die set you can have three totally different looking cards and I am sure that you will come up with many more ways to use this versatile die

More tomorrow ...

Hugs xx


April 29, 2017

Card Winner ...

Hi Everybody,

It's a bit cloudy here today but still pleasant enough to take Ruby into Witch Wood for a walk this morning along with Dougal and Vickie
The draw for yesterdays turquoise card has now been done and the name chosen this week is you ...

Sue MacFall 
could you email me your postal address please to:
christina@card-making-magic.com
and the card will be on its way to you straight away.

Please let me know when it arrives with you and I hope you will like it when it does.

Next week I have three cards to give away to three winners so be sure to pop back and see which they are and if you would like to have one of them

More tomorrow ...

Hugs xx
April 28, 2017

Friday Freebie 016 - Turquoise Thanks

Hi Everybody,

This turquoise Thank You card is on offer today and you can send it on or keep it for your self.

It has some wide satin ribbon around the centre with a lovely diamante dazzler over the knot.

If you would like to have this card then all you need to do is leave me a comment and from those comments a name will be drawn

I am happy to send the card wherever you are, even if you have won one before.

But please come back and check if it is your name that is shown in tomorrows blog post as the winner

More tomorrow ...

Hugs xx