Beautiful Card Designs Made Easy

March 31, 2025

Shabby Chic Gatefold Video

 Hi Everybody,

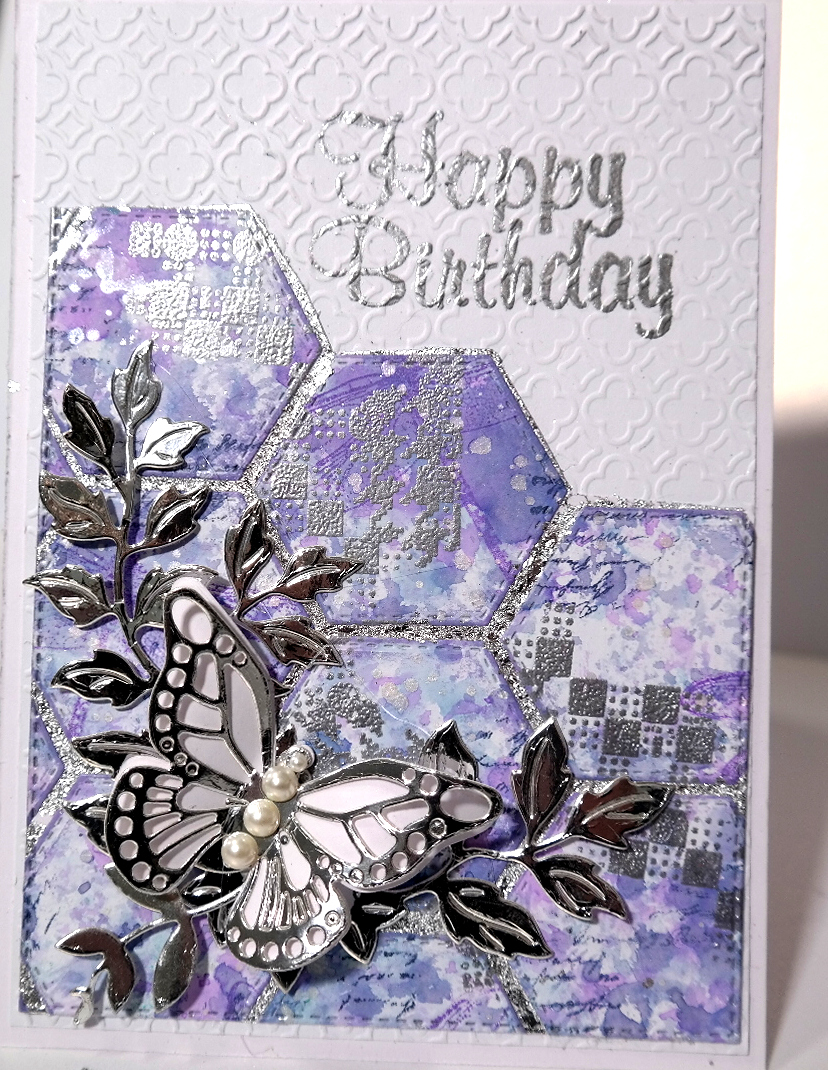
Today I am adding a video that will show you how I made the Gatefold card from last Tuesday. 

This is not as hard as it looks and you can try this with any die that you have in your own collection, you certainly don't ned the same one I have used.

It was a die that I designed years ago and I doubt very much if it will still be available to purchase.

The colour scheme was inspired by a shirt I was wearing and I really like the end result. Try this with any colours that take your eye and see what you get. 

Here is the video and I hope you enjoy it ...

Shabby Chic Gatefold Card

This is the card from last week and I have modified it just a little and changed the colour scheme too,  but the flowers are still the Mulberry flowers that I use a lot of.

If there is something that you would particularly like to see then let me know and if I have the dies , or something similar, then I will give it a go.

Thank you for the lovely comments I am getting both here and  on YouTube, it is much appreciated.

Bye for now ...

Hugs xx


March 30, 2025

Samantha Dawkins - Winner

 Hi Everybody,

Ruby and I set off for a walk in the woods yesterday, with Vickie and Dougal, and by the time we got halfway through it was raining. Needless to say we came back home to get dry and that was the end of our outing. But today it seems to be fine and sunny and so we will try again later and see how far we get.

There is a new video coming tomorrow and I am thinking I may change the way I do them. At the moment it is only my hands that are seen but YouTube advise that more followers can be gained if a face is shown to the viewers.

 I hate the way I sound and look on videos but if that is what is recommended then I will give it a go ... but I need to do some practice runs first before I feel confident enough to give it a try. So not for a little while yet !!

I have done the draw for the Positively Perfect stamp set from Friday and the winner this week is

Samantha Dawkins
Would you send me your postal address please to 
christina@card-making-magic.com
and I will post it to you straight away.

Please be sure to let me know that you have it safely and I hope you enjoy playing with it.

Happy Mothers' Day 

Bye for now ...

Hugs xx

March 28, 2025

Friday Freebie - Positively Perfect.

Hi Everybody,

Today there is a lovely set that is on offer along with the magazine Simply Cards & Papercraft that is always a really good read for you.

 The gift comprises of two stamp sets from the Colorado Craft Company.

One stamps set is an assortment of sentiments that will suit lots of occasions. 

The other stamps are flower and leaf combinations that can make your cards really special.

Thee is also the chance for you to download some papers and toppers that can be added to your designs.

Now if you would like this to be in your crafty stash then all you need to do is leave me a comment with your FULL NAME 

From those comments one name will be chosen at random and you need to have left comments on other pages and not just the Friday one. 

I am happy to send the pack to you wherever you are and it doesn't matter if you have won before.

Bye For Now ...

Hugs xx

March 27, 2025

Shabby Chic Heart Video

Facing to the right
Hi Everybody, 

Today I am adding the video to share with you how I made this beautiful card.

I have used the really old 6x6 Heart Box Die Set that I designed as Card Making Magic a long time ago but if you have the die set then now is the time to get it out again.

For this I have added in some cheesecloth and a white die cut panel along with some blue flowers and the little cherub on the left side.

It is a really pretty card and the edges have been decorated with lace and although it looks fussy it is  not hard to do at all.

Facing to the left
You will notice that each card faces a different way and that depends on which way round you use the base as you make it.

This peach card is my favourite as it is so vibrant and the background colour way is created with inks by hand.

They can be for any occasion and any colour that you want but they all look really good once they are done and shabby chic is a style that  never seems to go out of date.

Enjoy the video


Bye for now ...

Hugs xx 

March 26, 2025

Shabby Chic Heart Card

 Hi Everybody,

This lovely card has been created with the largest heart shaped die that I have and it is from the Heart Shaped 6x6 Box 

I have cut this card with the die just overhanging the edge so that it leaves part of the side joined an makes a complete card base.

Using the same die I have cut another panel to add to the front to complete the look.

Then with the next die down and I have cut some handmade paper to fit the front and to this I have added some homemade texture paste through a stencil.

Gold highlights have been added in the form of gold leaves and the little gold corner at the bottom of the heart.

The flowers and other pieces have been hot glued in place  and the dotted with glue. The glass glitter has been sprinkled over the top for extra shine and the finished card is really pretty.

Tomorrow I will be adding a video to share with you how I made this card and we will make the paper to go with it.

The flowers I have used are from Wild Orchid Crafts but they no longer ship to the UK.
 I have however found an alternative that is based in the UK and sells the same kind of flowers and embellishments and is well worth a look.

Carroway Cottage

Bye for now ...

Hugs xx

March 25, 2025

Shabby Chic Gatefold

Hi Everybody,

    For this card I have used a die to give me the shape   at the top of the gatefold and it makes for an unusual                               design to the card.

It has been created in peach shades and green leaves and they have been  added to the circle die cut to bridge the Gatefold.

I have used some homemade texture paste to stencil on some extra pattern and then sprinkled it with the glass glitter.  

I bought this glitter at a craft show and I must have had it about ten years ,,, and its still going strong.

This photo is from the front angle and you can see that I have stencilled the inside of the card also

This one is taken from a side angle and it shows the gatefold and the cetnre circle that bridges the gap.

I have use da 250gsm card from AnnaMarie Designs and again I have had this card for quite some time.

There was a lot in the pack when I bought it and it doesn't seem to go down at all.

I used patterns in the same shade of peach so that they would blend together, and the butterfly is a little sequinned one that is also ancient.

It has made a lovely card and I am pleased with it but it will need a box to give it to someone

Bye for now ...

Hugs xx 

March 24, 2025

Shabby Chic Lilac Card

 Hi Everybody,

When I used to make shabby chic cards on a regular basis they always  went down very well and I really enjoyed adding all the bits and pieces to them.

But then deadlines and concepts took over and I had to do other things which took time. and attention

But now that I have retired from all that I can go back to making this type of card again and I really hope you still like them as much.

This is one that I have filmed and it is the Lilac Card.

I have not added a sentiment to this card as it really could be for any reason at all, but I will add more shabby chic cards and add them for an occasion.

Shabby Chic Lilac Card 

I hope you enjoy the video and will leave me a comment and a thumbs up on YouTube.
And I hope you will come back and visit me again for another Shabby Chic Creation.

Bye for now ...

Hugs xx

March 23, 2025

Doris Shawcross - Winner

 Hi Everybody, 

It has been lovely here all week until today ….. and now it’s raining. Typical weekend weather !!

Thankfully we went for a long walk yesterday and so today it will be a little trip to the park in between the rain showers. Taking long walks doesn’t do my hips and knees any good though so I take them very carefully.

Oh the joys of getting older !!

The draw for the die sentiment has been done and the name today is …

Doris Shawcross

,would you please let me have your postal address to

christina@card-making-magic.com

and I will get the gift in the post to you straight away. Please be sure to let me know that it has arrived with you safely, and I hope you have fun with it on. Your designs in the future.

Bye for now …

Hugs xx

March 21, 2025

Friday Freebie - Sent with Love

 Hi Everybody, 

Today I have a really interesting sentiment die that will grace the front of your cards completely, and it is from the Textures range by Lou Collins

The sentiment reads "Sending Love and Hugs" and is quite a large die set, and there are several sized flowers as well for you to decorate it.

You can cut into the sentiment if you prefer to make a smaller one that will fit your cards better

There are also some papers and toppers for you to download and use on your projects.

So if this is something that you would like to have then all your ned to do is leave me a comment at the nd of this post with your FULL NAME

I need your full name to be able to identify the correct winner so if all you leave is your nickname of fist name then I will not enter it into the draw.

This prize comes complete with the Die Cutting Essentials magazine and so is well worth your entry, but you must be sure to come back over the weekend to see if it is your name that is listed as the winner.

I have no way to contact you if you don't claim the prize. 

Bye For Now ,,,

Hugs xx

March 20, 2025

Shabby Chic Cards

 Hi Everybody,

Shabby Chic is a beautiful arrangement and it is not as hard or as fussy as it looks.

These pictures are of some that I have done in the past and they are in different sizes and even the box.

I have made many of these cards and tags in lovely colour combinations and had lost of fun while making them.

I will make  more and film them as I do so and then add them to the blog.

 But until I have some time to make one I am adding older videos of the process to help you to get the look for your self.

The fist one is a beautiful colour scheme of lilac and lemon and they team so well together.

The second one is in blue and beige and again another lovely combination.

So I hope you will join me next week when I add another Shabby Chic Video to the blog pages


For the video I will be using items that I already have for example hand made papers that have been created using inks and stamps, homemade texture paste for more texture, cardboard left over from packaging to give height to the card.

Lots of flowers and leaves, some lace that I already have as well older dies and other bit and pieces that are in my stash that you may have too.

Bye For Now ...

Hugs xx

March 18, 2025

Cut Glass Frame

Hi Everybody,

Today I am sharing a large picture frame that I have embellished and it now sits in my craft room. I made this some time ago. 

The  side edges of the frame have been covered in tiny mirror tiles and the front has glass pieces glued to the front.

The little heart  is a mirror tile and  that and the gemstone are glued to the glass on the outside of the picture, and it sits in quite a deep frame.

For the inside of the picture I have used gold mirror card to create the base to the butterfly and the leaves and they are sitting on top of white leaves and purple ones cut with the same die.

The detailed layer of the butterfly is done in blue and lilac Distress Inked handmade paper with the butterfly image stamped in gold

The background is Distress Oxide inks that have been brushed on and then splattered with gold.

I have trimmed this into a smaller panel and mounted it onto some more white card to leave another border around the design.

I really am quite pleased with this piece.

What do you think ??  

Bye for now ...

Hugs xx


March 17, 2025

Using scraps


 Hi Everybody,

This little A6 card has been created using some handmade paper design and a small circle die.

I stamped, inked, and splattered the paper with gold then cut it into circles using several of the small dies to give me different sizes.

I drew a double black wavy line, with a fine liner pen, around each of the circles to make them stand out a little more.

They have then been added to another slightly smaller panel that has gold gilding wax around the edges, and has also been embossed in a folder for more texture.

I raised the circles up with foam pads  on the panel and then added it to my base card.

Quick easy and oh so simple and yet uses up your scraps and is a lovely card for any occasion.

The sentiment is one I have had in my stash for a while and it came in very handy for this card. 

Bye for now ...

Hugs xx

March 16, 2025

Connie Griffin - Winner

 Hi Everybody,

It is so nice when the sun shines and the weather has been really kind just lately.
Ruby (Cocker Spaniel) and I have had some good walks in the woods or on the beach and often with Dougal (Cockerpoo).
They love being together and they chase and play a lot. 

The draw for the Chloe's die set has been done and the name today is

Connie Griffin
would you please send me your postal address to 

christina@card-making-magic.com
and I will get it in the post for you.

Be sure to let me know when you get it and I hope you get a lot of use out of it in the future.

Bye for now ...

Hugs xx

March 14, 2025

Friday Freebie - Festive Florals

 Hi Everybody,

This beautiful stamp and die set will create flowers for your cards all year round if you make them in different colours, even if it is called Festive Florals

Add them to cards, boxes, picture frames or any other project you are making and they will look fabulous. 

It is from the range designed by Chloe Endean and there are some sentiment included in the A4 stamp set.

The magazine is full of ideas and inspiration that you may like to try for yourself  so it will be time for a cuppa and a biscuit or three once the gift arrives.

Would you like to have this in your crafting stash ???? 
Then all you need to do is leave me a comment at the end of the post with your FULL NAME

It has to be your full name in case there are two, or more, people with the same first name.
You will also need to come back and check if your name is shown as the winner over the weekend.
I will get it posted to you straight away if you are the winner and it doesn't matter where you live.

Bye for now ...

Hugs xx


March 13, 2025

Making use of your Nesting Dies

 Hi Everybody,

Nesting dies are such a useful addition to anybody's crafting collection as they and do so much, and many die sets have a lot of dies in them.

 You can create mats of different dimensions to fit the front of your design and lots of frames of lots to ad to your stamped images.

I have used a really old Pennant die set from Spellbinders simply because it is an unusual shape and will illustrate my point perfectly.

So from this set I have chosen the dies that will create the basic pennant and there are four that I need.


Will show you how these four dies will make twelve pieces that I can add to my cards in different ways by increasing or decreasing the size of the die cut.

I have made four cards but each one uses the pennants with subtle changes and you can do this with ANY nesting dies that you may have.

I have used squares, ovals and circles as well as odd shapes in the past and they have all turned out really well.

Here is another video using the same technique and this video is eleven years old.


I hope you will enjoy both videos and will also give this a try for your self. It will help you to give a completely different look to your cads,

Bye for now  ...

Hugs xx 

March 12, 2025

More Handmade Roses.

Hi Everybody,

This card has used the rolled flowers again but this time they are in a pale yellow. 

For the smaller flowers I inked with Spiced Marmalade and the edged them with the gold wax.

The larger Roses have been inked with Mustard Seed and  gold wax and to the centre of these flowers I have added a pearl .

The background paper has been created using the same colours as yesterdays card but for this I have added them in smooshing way with a sponge.

I once did the sponging technique in blues and turquoises in my bathroom and it was lovely.

 It was like sitting underwater when I as in the bath. It stayed like that for a couple of years until the next time I decorated and I loved it.

Anyway back to this card ... I have again added some of the large leaves, as well as some from the Rose Flourish die set but I also added some dried flowers and stems that I got from AnnaMarie Designs years ago.

There is also the addition of pine cones in the flowers but I don.t think you can fully pick them out.

It is a very pretty card and although made un a very similar way to yesterdays dosing it looks totally different.

Bye for now ...

Hugs xx  


March 11, 2025

Handmade Roses

Hi Everybody,

For this card I have used a really old die that produces spiral roses,  and they are a beautiful finishing touch to my cards.

I cut these from two shades of red card and then inked the inside portion of the die cut with a darker red before I rolled it up.

Once I had it glued down I went over the petals with some gold gilding wax and that added a lovely sparkle to the blooms.

I used another old die to give me the leaves I needed and I coloured them with Brushos,  they too have the addition of gold wax.

The background paper is hand made and for that I used Candied Apple and Gathered Twigs and then splattered the paper with gold paint.

I added a gold leaf sprig  from the Rose Flourishes die set to the display and I am really pleased with the look of this card.

Making your own flowers can save a lot of money as the shop bought ones can work out quite costly and there are many many videos on YouTube on how to make them from myself and other creators.

Bye for now ...

Hugs xx
 

March 10, 2025

Playtime Cards

 Hi Everybody

Both of these cards are A6 size with the fold at the top and both have flowers one them that are made from handmade paper design. using Distress Oxides.

I have used up any bit and pieces I could find on my desktop and they are items that are left over from other projects.

The leaves are cut from an old Creative Expressions die set and I hand coloured them also.

The sentiment strips have been sat in a tub just waiting to be used and I have added them with thin strips of foam tape to raise them up.

Both cards have been splattered in gold and the one to the right is added to a gold edged oval shape

The card to the left has an embossed panel underneath the flowers and that was an old folder called Hedgehog Maze from Couture Creations.

But it is so old that I don't know if it will be available anymore so just use any that you already have in your collections.

This is just an idea that you may like to try so that applies to any part of this card ... flowers, leaves, folders, sentiments or splatters simply use what you have already got, it doesn't have to be the same as mine

Bye for now ...

Hugs xx


March 09, 2025

Sue Cockerham - Winner

Hi Everybody, 

The weather has been so kind for the past few days and Vickie took me out to lunch on my actual birthday whcih was Thursday.

 We went to Lytham Hall and it is such a good walk for the dogs. It wasn't muddy and Ruby and Dougal had a really good time running around,  we really enjoyed it too.

Then it was off to the restaurant in there and we had lunch which was delicious.

So with all this food for lunch and dinner out on Friday plus we all met again at Griffs youngest daughters house for a chippy tea on Saturday, I have said good bye to the diet. 

But I have done the draw for the lovely Feathered Friends die set and the name this week is ...

Sue Cockerham

Would you let me have your postal address please so that I can get the pack posted to you.

christina@card-making-magic.com

Be sure to let me know that you have it safely and I hope you make some beautiful cards with it all year round.

Bye for now ...

Hugs xx

March 07, 2025

Friday Freebie - Feathered Friends

Hi Everybody,

First I want to say a really big Thank You to everybody who has left me Birthday Wishes here and on YouTube.

 They have made my day. My family are taking me out tonight for a meal where we can take the dogs so Ruby and Dougal will be able to join us.

And the sun is shining too so what more could I want. I keep being asked what I want for my birthday.
 But there is nothing that I need and I have more crafting stuff than I know what to do with.

Today I am offering you the chance to win this Feathered Friends die set from the RSPB.
It comes complete with the magazine Die Cutting Essentials and there is the chance for you to download some great papers to go with it. 

The bird is coloured as a Robin but you could make it any colour that you wanted and use it all year round.

So if you would like this die then all you need to do is leave me a comment at the end of this post with your FULL NAME

Then be sure to comeback and check if your name is shown as the winner over the weekend.

Bye for now 

Hugs xx  

March 06, 2025

Gilding Flakes

 Hi Everybody,

Gilding flakes can certainly add that touch of luxury to your cards and it is not expensive. 

A small tub goes such a long way,  but I would advise you to decant it into a larger container as the flakes tend to swell once they get to the air. 

Plus they also fly everywhere so don't have your windows open or the fan on when you are adding them.

There are lots of different ways they can be used and double sided sheets are just one of them.

The flakes come in lots of different colours and mixes too, some with red flakes, or how about green ones, or blue ??

You can also get them in copper and pewter as well as gold and silver. and so you can have a really good play and see which you prefer.

Because there are so many in a pot it is a good idea to get together with another crafty friend and buy two different colour ways and then swap some over so you get some of each.

Here is the video ...

Adding Gilding Flakes

This video has been added to a playlist on YouTube about adding flakes to your card and will be shown at the end of the video,  but it also includes glitter and foil to the design as well. 


Bye for now ...

Hugs xx

March 05, 2025

Made For Me

Made by Vicki L Phillips
 Hi Everybody,

Tomorrow is my birthday and I will be 77. 
I can't believe that and I really don't know where the years have gone.

It doesn't seem but a few years ago that my children were small and being taken to school. 

Now they have kids of their own and I have grandchildren and even great grandchildren.

I also can't believe that it is almost seven years since Griff died.  Time goes so quickly. 

I wanted to share this card with you that has been made for me by Vicki Phillips who is one of my regular readers and leaves me lovely comments too.

Vicki  has added a note to the inside of the card and it was a lovely surprise to receive it.

So THANK YOU very much Vicki for thinking of me and it stands proud in my lounge on top of my TV cabinet and I really hope you don't mind me sharing it here. 

Tomorrow I have a video for you and it is revisiting an old technique,  I shared years ago  on YouTube, so I hope you will enjoy it and maybe give it a try for yourself. Let me know your thoughts on the cards.

Bye for now ...

Hugs xx


March 04, 2025

More cards for Bob

 Hi Everybody,

Here are two more cards to add to the collection for Bobby
 and Carter and they have been water coloured by me for them
 to give to their friends at school through the year.

Both boys are well into football and so I need to come up with
 some that are football themed and they will be happy
 to give away.

These are more for their school friends which has boys
 and girls together.

The background to the top card is stencilled in pink and green 
and the oval layered onto a slightly larger green oval then added with foam pads underneath 


This card is also stencilled and because of the poinsettia it could double up as a Christmas card too.

I am sure they will like the cards that I make and it will save their mum a fortune in buying cards for them each week.

Bye for now ...

Hugs xx


March 03, 2025

Cards for children

 Hi Everybody,

Before Christmas I shared with you some cards that I had made for my Great Grandson Bobby

I promised him some birthday cards and now it is time to make some those cards for him to give to his friends throughout the year. 

This is the first batch I have made and these have been water coloured.

They are some rabbit images that I have had for years and I have water coloured them with my Arteza paints.

There are two male rabbits and one little girl rabbit and they have been added to different types of backgrounds, and cut out ovals from Nesting dies.

For this card I have stencilled the background and added some Washi Tape along the right hand side.

The little hearts have just been added with fine liner pen.

I have off set one oval on top of another lilac oval and added both with foam pads underneath

They have all had Happy Birthday sentiments stamped on them.

 I will give them to Bobby with an envelope then they will be ready for him to give to his friends.

I have many more to make yet for him and his brother Carter to use as they need.


I have coloured the two boy rabbits in different outfits and I have quite a few more of these images stamped out waiting to be coloured in.

I also have a lot of stamps that would be suitable for childrens cards and I will get busy with them also, and I will be sure to show them to you when they are done.

Bye for now ...

Hugs xx

March 02, 2025

Ita Tighe - Winner

Hi Everybody,

Well at least it is dry and fine here for now, if maybe a little cold and Ruby and I will be out later today.
We have had some good walks in the past few days and she loves going out in the fresh air.

I have done the draw earlier today and the name this week for the beautiful Altnew Die & Stamp set is 

Ita Tighe
would you email me your postal address please to
christina@card-making-magic.com
and I will get it posted to you straight away.

I hope you have fun with the set and be sure to let me know that you have it safely at the same email address.

Bye for now ...

Hugs xx