Beautiful Card Designs Made Easy

Showing posts with label Creative Studios. Show all posts

May 27, 2014

Birthday Card

Hi Everybody,

Here is a lovely birthday card in that wonderful shade of blue  teamed with the white and there are lots of layers to the card.

The sentiment was a free die from a Simply Cards and Papercrafts magazine that I subscribe to each month.

The ribbon is from my "Stash" and the large pearl centre is from Creative-Studios  ... and don't forget that these pearls can be altered to any color with your Spectrum Noir pens.
All the layers have been raised with foam pads to give depth to the card and the only other embellishments  are the self adhesive pearls in blue from  Want2Scrap

The inside is lined with a matching patterned card that is from AnnaMarie Designs

More tomorrow ...

Hugs xx


May 09, 2014

Friday Freebie 010

Hi Everybody,

This weeks Freebie is a  layered white on kraft card and the centre is the filigree pattern Botanical Swirls.

I have added creme pearls around the edge and they are from Want2Scrap

The ribbon is some lovely brown silky crush and it is from Creative-Studios

It has been tied in a triple bow and a large pearl embellishment added to the knot.   I have changed the color of this with Spectrum Noir.

The card is about 6 x 8 inches and it has a gold envelope with it.

So if you would like to win this card then all you have to do is leave me a comment.

Later this evening my "Film Crew" will draw a name out of the hat and the winner will be notified in the morning

Don't forget to come back and check if it is you and you will have 48 hours to claim it.

More tomorrow ...


Hugs xx


May 01, 2014

Spot the difference ...

Hi Everybody,

There is  something about this card that I wanted to show you.

This card is only a 6 1/2 inch square but I wanted it to  be subtly  patterned and contain a gift.

I have layered it with wide blue ribbon and tied a single bow with a large blue centre to it

And then there is the addition of  ... the simple hatpin

I used beads that would compliment the color scheme and then just added it to the ribbon.

But I think it turns a "pretty"  card in to something special.

And of course it makes a lovely gift for your recipient.


I have used the Spanish Collection die Seville  by Sue Wilson  from JGD Crafts

The flowers are from Wild Orchid Crafts  with the sparkle provided by Glitter Magic

The pearls are from Want2Scrap  and they are Mother of Pearl

The background is created from the Regency Swirls folder from Crafters Companion

Once embossed I have rubbed  Pearl Moon  metallic gilding wax from   Creative-studios    over the top to enhance the pattern


More tomorrow ...

Hugs xx


August 28, 2013

Spectrum Noir ...

Hi Everybody,

Todays card is using Spectrum Noir to color the image,   and this is Nevaeh from   Saturated Canary

Colors used ...
Skin            FS2, FS3, CR1,
Hair            GB1, GB8, GB11
Dress          CR1, CR5, CR6, CR7  with Gliter highlights
Frill/socks/shoes     IG1, IG5, IG7

The new Spectrum Noir class with The Art Studio is due to be added soon and I will let you know exactly when it is available.

The background panel is embossed with the A4 folder Interlocking Circles  from  Creative-Studios

The image has been curled with my fingers and added to the card with Pinflair Glue Gel to raise her up.

This is the glue that comes with a syringe to help you position it accurately.

The flowers are from Wild Orchid Crafts  and are a mixture of Roses, Carnations, lilies and Daisies.

I thought I would use the Venetian Accents and Motifs dies a little differently for this card and I added the mask to the images face ... adds an air of mystery to her. What do you think ??

If you are looking to add your name to the Give Away you will find it   HERE  and it is open until Saturday.

More tomorrow ...

Hugs xx


August 15, 2013

The Peacock ...

Hi Everybody,

Here is the Peacock from Tattered Lace and this is the first time I have used this die.

Cutting the die out gives you a really filigree look so I traced around the die and cut  it by hand to  produce the solid background piece to add the filigree too.

The white layer has been embossed  with the Basket Weave folder from Creative Studios and to this I added a panel of silver foiled lilac card.

The frame was created around this panel and added with foam pads to give the depth.

The flowers are from Wild Orchid Crafts and are a mixture of Tulips, Carnations  and Roses.

All have been glittered with Glamour Dust and some punched leaves tucked in behind them.  It makes a very pretty card and I will be using it again in the not too distant future.

More tomorrow...

Hugs xx


August 14, 2013

Tomorrow Holds ...

Hi Everybody,

This card uses the same Glitter card as yesterdays... but for this one I have stayed away from the Christmas theme

I have used a mixture of dies and layered them all together with foam pads for height.

The ribbon is from my "Stash" and the Dazzler covering the knot  is from Creative Studios

The sentiment is from Lili of the Valley and it has been heat embossed in silver

The pearly flourish is from Want2Scrap and is tucked just under the edge of the ribbon and centre panel.

I visited the Hobby Craft  shop in Preston yesterday and  bought my self the gorgeous Peacock die from Tattered Lace ... so that just might be the inspiration for tomorrows card

More tomorrow ...

Hugs xx


August 13, 2013

Teal Christmas ...

Hi Everybody

This card is so much better in real life as the pale turquoise is Glitter card and it sparkles under the filigree layer.

The background piece has been embossed with Regency Swirls from Crafters Companion  and it is very ornate.

The Silky Crush ribbon and the Dazzler are from Creative Studios  and the ribbon is so soft and easy to tie.

The beautiful Frilly Flourish is from Want2Scrap  and is my finishing touch

So just a couple of dies and some pretty embellishments and there is a lovely card.

More tomorrow ...

Hugs xx


May 23, 2013

Gorgeous Green ...

Hi Everybody,

My posts for the next few days will be scheduled so I hope they work OK.

My "Film Crew" and I are going to Whtiby on Friday until Monday and I am really looking forward to this short break.  So fingers crossed that everything works as it should until I am back home.

Do you like Green ???

This card was made with the Matting Basics to create the Hinged Card  and the white layer was embossed.

I created a frame from the Radiant Rectangles and added it to the top with foam pads.

The tiny Diamante stones were added to each to the scroll parts.

The sentiment was stamped with Versamark and then heat embossed in silver ...  and that too is on foam pads.


The large Diamante flourish is from Want2Scrap  ... and they have now started to add the option to buy some of their gemstones by 1/2 cups  and that is a really cost effective way to get some.

The Dazzler in the bow is from Creative Studios. and these can be bought in different shapes and sizes as well as colours to match your theme.

The ribbon is from my "Stash" and to the bow I have added in a collar for extra effect.

And just to add in a little extra I have embossed the envelope to the card.

  I have left space for the address and stamp but the rest of it matches the pattern on the card.   The finished card will fit into a standard sized envelope for posting.

More tomorrow ...

Hugs xx


February 12, 2013

My favorite machine...

Hi Everybody,

I love my Spellbinders and my choice of die cutting machine to go with it was the Grand Calibur.

They can jazz up the simplest of things without any effort at all.

Of course you will find that the dies will go through most other machines too and give you the same beautiful results.

But I have had several emails from people who have bought the Grand Calibur and don't know how to layer up the "sandwich"

The Calibur enables you to use the larger Grand dies... and I have covered cards made from them in other blog posts.

So ... I thought that the best way to answer the questions was .... Yep !  you guessed it ... in a video.

This is one of the films that was done over the weekend when it poured down most of the day.

The Grand Calibur Explained is another short tutorial but it has had some good comments on YouTube

The white adapter plate is available from  Creative Studios  which is a UK based company... and the link will take you directly to the page with the plates on there.

Hugs xx


November 08, 2012

White on White

Click to Enlarge
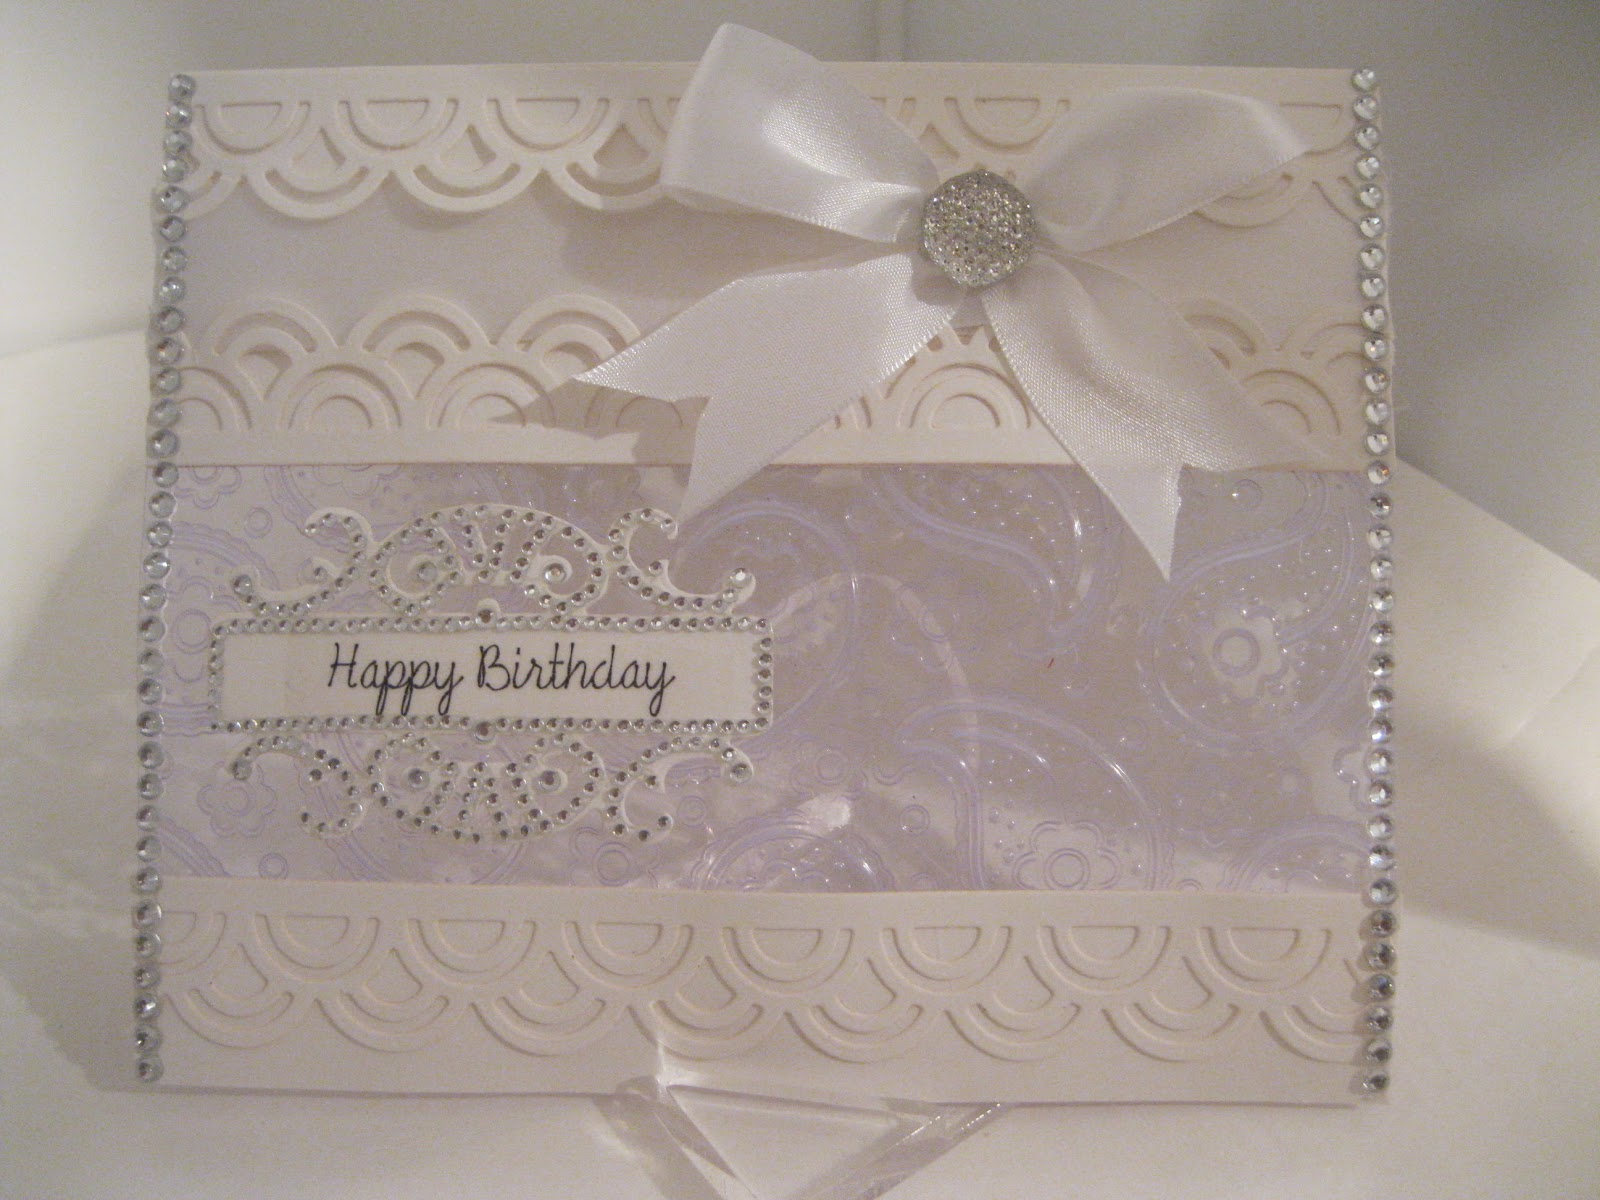
 Here is another White on White Card and I did this one for a birthday that is coming up in December.

I have used a thick white stain ribbon to slide under the borders and made a large bow from the same ribbon.

The centrepiece is a Dazzler from   Creative Studios

I have folded an A4 card in half and used it with the fold at the top.


After folding the card in half I cut  the front section in two again and  made it smaller by about  6cms.   I used a piece of acetate that was about 9cms wide to fit into the gap to leave a panel that was see through, with the card adhered around it.

(Unfortunatly the stand, although clear is visible and spoiling the look of the acetate)

I  embossed the Acetate before adding it to front panel.   I cut out three of the Asian Accents borders and added them ... two to the top and one to the bottom of the card.

The embossing folder that I used was the Paisley M-Bossabilities ... and it is a double sided folder from Spellbinders..... but you will need the Raspberry plate to use it in the Grand Calibur.

Between the two top borders I added my white ribbon and the bow with the Dazzler centre, and along each side of the card I added in my beautiful Diamante Bling from Want2Scrap

The sentiment was stamped onto the same white card and then I used the Fancy Tags 3 with the matching Bling and added it to the Acetate panel.

Quite an effective card and the embossed acetate makes it just that little bit different.

Hugs xx

August 18, 2012

Just one more ...

I have one more  Christmas card to show you and  then I  am not  making any more for a few weeks.

This one has the  aperture removed with the  largest of the Heirloom Baubles  and the centre filled with some more of the pretty  stripy paper.

I have then cut another  Heirloom  bauble and covered it with Micro Glass Beads  which adds  lots of texture to the shape ... you can just make them out  if you enlarge the picture.

I buy mine in pots  from  Creative Studios  and there are lots of other goodies too.

The beautiful Diamante strip on the front of the Bauble is from Want2Scrap   along  with the Swirl on each side of the aperture....  on the right hand corner.

I have matted it all onto some silver mirror card

The little sentiments are from a set I bought many years ago from   The Glitter Girls  and they are all wood mounted.

So I am having a free weekend this week.  

Today  we are going to visit some friends on their Canal boat and going for a sail through some locks on the canal near "Botany Bay"

We will be having a spot of lunch on the way and I just hope it is not raining....

Then next Sunday the 26th ... I am going to the Sincerely Yours Craft Show  in Leigh.

I've got my pennies all saved up and a list of what I want ... and I can't wait

Hugs xx