Beautiful Card Designs Made Easy

April 23, 2012

More Flowers...

The names to all the Spellbinders dies that I have used will be  BOLD  so that you will know what has been used should you wish to add them to your collection.


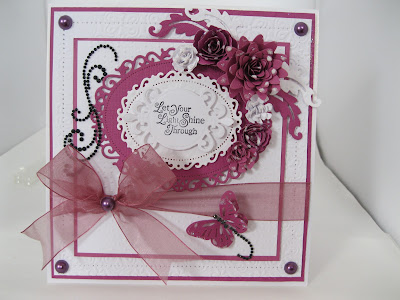
Here are those Bitty Blossoms again and they have been combined with the Damask Motifs  from Spellbinders.
I have layered them over the Romantic Rectangles with one of the Fancy Tags 3 at the front, and the leaf shapes tucked behind the flowers are from the Damask Accents. 

The buckle on the ribbon is from the Ribbon Buckles and there are lots in that set for you to use.

This card is going to be for a wedding and so the name and date have been left off and will be added later.

The pearly flourish is fromWant2Scrap and I have coloured them,  the butterlfy and the pearl flower centres with Promarkers to match my colour scheme.
I have added Cosmic Shimmer around the edge to create the look of pearls

Hope you like....

Hugs xx


April 22, 2012

Playing with Spellbinders...

I love, love, love my Spellbinders and I use one set or another on almost every card I make.

I will add the names of the Spellbinders that I use BOLD so that you will know which sets they are should you wish to purchase them to build up  your own collections.

It is also no secret that I like to add flowers to my cards too.

I just love the effect they give to a card and I openly admit to being a "More is more...." kind of a card maker.

I know it is not to everyones taste and I do love the elegant looks to a more simple card ... I make them that way too ..... but if I can make a card were I can add the "Bling" then I am happy to add it.

I have bought a lot of my flowers from Wild Orchid Crafts   in the past, and the look they give is so beautiful.

But my latest love is the Bitty Blossoms and the Spiral Blossom 3   from Spellbinders

When combined together they make the most beautiful floral spray to grace any card.

On this card I have added the Floral Flourishes behind the flowers and the blue background  is glitter card.

I have also added some Nestabling around the sentiment
The purple colour with pure white make these flowers really pretty and I have sprinkled them with Glamour Dust.

The organza ribbon and the flourish set off the Lacy Ovals and the trail from the butterfly is a left over piece of the pearly swirl.


The Nestabling is from  Want2Scrap and always makes a card look special what ever the style. 

Here I have used them with the Spiral Blossom 1 ... which makes the most gorgeous roses ... and the Floral Flourishes again.     The lovely sentiment is from                                   Clarity Stamp     

The Hatpin is tucked into the flower spray and can be removed by the recipient so don't forget to tell them.

It makes a lovely lapel pin for them to wear.

      
Hugs xx

April 21, 2012

A Fun Card

This is the latest addition to the tutorials and there are both written and video instructions for this fun card.

It is one that kids really enjoy ... and hopefully you will too.

The  Magic Slider Card is very easy to create but because of the way it is designed it will have children fascinated with how it works.... but  keep  'em guessing!

This is how the card will look when it is given and it can fit into a standard envelope if you keep the height of the flowers low.  
 I have added Poppies to the front to match the theme of the card and they are from Wild Orchid Crafts  I have mixed them with some Ivy leaves and  red gingham ribbon.

The Poppy stamp is from Clarity Stamp and I have coloured it in with Spectrum Noir Pens  from Crafters Companion

As the card is pulled from the sleeve this is what will be seen and the result is quite amazing.
So I hope you will take a look at the short video tutorial on how to get this look and if you are new to cardmaking don't be put off and think it is too hard to do,  it really isn't.

And you will be pleased with the result especially when the children that receive it plead with you to tell them how you did the magic.

Hugs xx


April 20, 2012

And last but not least ...

Having covered lots of variations on the Easel cards over the last few days this is one that combines two different folds.

The  Gatefold Easel Card  is another easy card and  if you are new to this lovely hobby it is one that will have the recipients saying   "How did you do it ...."

Trying out new ideas is what will keep your interest going and stop you getting into a rut.


And the whole point of the Website was to show "Newbies" how to get these looks for themselves in easy steps.

There is no point in having all this lovely card in your "Stash" if you are too scared to cut into it  ... and so it was my plan to help folks build that confidence to get started.

Once again I apologise to any one who is a more experienced card maker ... it is not my intention to talk down to anyone.

If you already know about all this then that is fine but please remember that many people don't ... and to them it is all a learning curve and I only want to offer any help that I can.


So over the last few days I have brought to you some really easy ways to make your cards stand out from the ordinary and I hope, if you are new to cardmaking that you have enjoyed them.


There is a permanent link to the Website at the top of the Blog since it has had it's make over and I would be honored if you would pay me a visit.... either there or on FaceBook.


Hugs xx

April 19, 2012

Quad Easel Card

This one is really special and it is the card that was actually mentioned on Create and Craft TV by Hunkydory.

The demonstrator  (Ruth)  said she had got the inspiration for the  Quad Easel Card card from "Christina"

It certainly created a stir as people were emailing me asking if I was the Christina that had been mentioned, because they had seen the card on my website ... and at that time I didn't know.
So of course I had to find out and spoke to Ruth herself and she said she had got the inspiration from Card Making Magic.

I explained that it was my wesbsite and I went down to meet Ruth later in the month.  I often go into the shop in Preston for some of the lovely goodies that they have in there.

Cardcraft Plus  is the name and they  will send you  a  catalogue that is well worth browsing through.

So here is the card and the link at the top of the page will take you through to the written instructions ... 
but on there is also  a    video tutorial    that is very easy to follow, and I hope you will enjoy it.

There has also been added a "Tutorials" title at the top of the Blog and there you will find a list of some of the tutorials that I have on the website.

None of them are long so why not get your favorite brew and take a look and see if you woud like to try some of them for yourself.

Hugs xx