Beautiful Card Designs Made Easy

September 14, 2012

Exciting News ...


I am so excited about this I just have to share....

I have had an email from the lovely Sara Davies from   Crafters Companion   and   she has been watching my videos using the  Spectrum Noir Colouring System   that her company developed last year.      

This boy is the image I coloured and he is  from Mo's Digital Pencil

Sara  asked me if  would like to become involved in the Spectrum Noir Blog and I am of course delighted to say "Yes"
 
She has added my videos on colouring in Skin with these pens to her Blog and this is the post...Crafters Companion News
 
There will be more to come but I am so pleased about this offer and it is a great honor for me to be invloved in something I love doing.

This image is from Humphreys Corner and is available from Crafters Companion.
 
The pens will be out in force now as I  practise my  colouring and I will  keep  you posted as things progress.
 
But I am sure that you can imagine my delight to get this wonderful opportunity.
 
The Angels are definitiely looking after me.
 
Hugs xx

September 13, 2012

Black and White

Click to Enlarge
I have kept this card to just two colours and the Black and White always looks so elegant whenever it is used.

This one is created with the Envelope fold and the Parisian Accent border is glued underneath to look like lace.

The flowers are the Bauble Blossoms 1and 2 from Save on Hobbies  

These lovely dies are available to you at a really good price and are a good addition to your Spellbinders collection.

I have added in the Black Swrily Pearls from  Want2Scrap  

The ribbon has been made into a triple bow because it is thin and I have added a black pearl to the centre of it.  So only a short post for today ... more tomorrow!

Hugs xx


September 12, 2012

Colouring In


Baby Fairy Kiki
It is absolutely pouring down outside my window and it really is a day to stay in the warmth,  and get some practising done with my Spectrum Noir pens.
This lovely image is from Mo's Digital Pencil and she is Baby Fairy KiKi   and I think she is adorable. Her wings have been covered with the  Sakura Clear Sparkle pen.
 
The subject of colouring pale skin was covered in athe video Spectrum Noir Pale Skin and using the pens from the  Skin Tones  set and this image has been coloured that same way. 
 

Summer Fairy Finna
The skin is the same here but the hair on this image ... also from Mo ... has been coloured using the technique shown in the Spectrum Noir Dark Skin video.
I haven't made either of these into a card yet but it has been a very pleasant to while away an afternoon with my pens and see what happened as I coloured.
 
But I can't put it off any longer ... so I suppose I will have to do the housework tomorrow (sigh)
 
Hugs xx


September 11, 2012

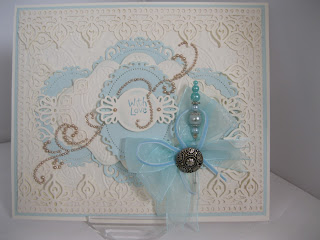
Not A Christmas Card ....


Click to Enlarge
I thought I would have a change from Christmas cards with this one and I brought out the Spellbinders.

I have  mixed and  matched many  of the ones that I have and I really like the  look of this card.

The colour is a soft teal  and cream and the oragnza  ribbon matches the card  perfectly.

In the  centre of the bow  I have added a  Vintage button  and the  Decorative Hatpin  is pushed throught  the centre  of the knot.

The Spellbinders  are in BOLD  to highlight the ones I have used for this card.
 
The background has been run through  the  Paisley M-Bossabilities folder  and then edged with the Persian Accents borders on each side.

I have cut Floral Ovals three times using the largest and the second largest dies and added them in Teal at the back ... with the two smallest on either side and the largest in the centre.

Labels 20 has been cut and embossed and raised on foam pads to the centre of the card.  Perisan Accents corners have been placed on either side of the label.

Another Floral Oval has been added in Teal to the back of the sentiment, which is cut in cream from the Persian Accents.

The Pearly Swirl is Le Creme Finesse from Want2Scrap  and I have curled it down the side of the card and around the "With Love" sentiment.

And the  reason it is  curled around  the sentiment is  because ...  I slipped with the  wording  and added  a  mark  (idiot!) .... so  covered it up with  the Swirl.

Hugs xx


September 10, 2012

Creating Card Stands

Click to Enlarge
I promised to share  several different ways that I use to make your cards free standing ... and over the weekend this is what I came up with.

Creating Card Stands  is another short video. 

I have tried to think of all the ways that could be adapted so that cards can be displayed in a very pretty way by the recipient.

I have covered the "A"Frame that I have used for quite some time and then moved on to ways to use the beautiful ornate stands that I discovered last week

These can be made out of any  card that goes with your colour scheme and I have given you some tips on what to do to make sure that your cards don't fall over.
 I got these  little stands  from  Ebay  and the link will take you to the straight to the page

And then I have also shown you how to make the most of your Spellbinders to create a frame that will be glued to the back of the card. 
You can adapt many of the dies that you may already have in your collection as long as it fits the back of your card.


And just in case you are saying that you don't have any Spellbinders or you don't want to buy the little card stand there is also a way that you can freehand cut a stand ... and so there is no excuse at all not to give this a go.


Hugs xx