Beautiful Card Designs Made Easy

September 09, 2015

Spellbinders Arched Window

Hi Everybody,

Earlier this week I was asked the question ... "What is the long thin bar for that is in the
Arched Window   die set?"

Here is a card that I made using that die set quite some time ago and I have added some Fancy Lattice  behind the frame to make the card look more churchy

The thin bar that is with the set is there for you to divide the window up into window panes if you wish.

By placing the strip in different places you can create a window that will give a new look each time you use it.

The dies  will produce solid panels or by nesting them together you can create frames of different  sizes

A really pretty die that can create some lovely effects for you and can be for many occasions.

This one is for a wedding but it would make a lovely Christmas card with a stained glass window in the frame

The bows centre and the Guipure lace in a soft cream are both from Wild Orchid Crafts and the sparkly Pearl and Diamanté strip is from Want2Scrap

More tomorrow ...

Hugs xx


September 08, 2015

Tuesday Tutorial - Floral Gazebo

Hi Everybody,

Todays tutorial is using the beautiful Floral Gazebo from Spellbinders and this can make the loveliest of wedding cards for you so easily.
Here I have dressed it up with flowers, ribbons and pearls and I am very happy with the result.
Spellbinders Supplies:

Other Supplies:

Instructions:

For the base I have folded an A4 piece of cream card in half along the short side and simply cut it in half. This will  give me two cards with the fold at the top to work on.  Save the other piece for another project.

I have matted and layered it with some vintage paper and cut a smaller layer 8x11 cms and layered that with the same paper
With the Gazebo I have cut two pieces ... one in card and the other in Craft Foam and glued the two pieces together.  This will make the die cut thicker as it is added to your card
Off setting the smaller panel I have added it to my card and wrapped the layers with ribbon before adding them to the base. Trim the panels as needed.
Have a practise run with where to add the bow, flowers and leaves and when you are happy with the arrangement  glue them in place.  Add in the appropriate sentiment using foam pads to raise it up.

Designers Tip:

Vary the color scheme to suit the wedding and the sentiment to suit the occasion. The die is pretty enough to blend with anything and this is the only die used on this card

More tomorrow ...

Hugs xx


September 07, 2015

Bank Holiday Winners ...

Hi Everybody,

The draw for the "Bank Holiday Goodies" has been done at random by InLinkz and the list is now closed. So if you didn't  add your name to the list then you are too late.  The emails have gone out to the two winners and you will each receive some crafting items for you to play with.

The winners are ....
Victoria Daniel (USA)
Christine Hubbard
please let me have your address so that the parcels can be posted off to you straight away.

I hope you will like the items and please let me know when it arrives with you.

More tomorrow ...

Hugs xx

Brusho Crystals

Hi Everybody,

You may rememberer me showing you some Brusho Crystals that I bought at the craft show last weekend ... well here is a card that I have made using them

They are very vibrant colors and a little goes a long way so use them very sparingly.

For this card I stamped and embossed in gold the Sketchy Rose from Altenew  onto some watercolor card

Then with a wet paintbrush and some clean water I have dampened the flower staying within the lines

Then with the red, orange and yellow crystals I have sprinkled on tiny amounts.  I evened out the color with my brush and allowed it to dry.

Once dry I have cut it out with scissors staying close to the embossed edge.  I did the leaves in the same way using the green from the pack

For the background I have sprinkled a very tiny amount of crystals and then spritzed it with clean water.  Trimmed it to size and layered it onto black card.  The sentiment is stamped onto the dry background and then all the layers added to my base

The flower has been added with foam pads underneath to give it height and the enamel dots have been randomly added for an extra effect.

I will be playing with these Brusho Crystals some more and I will make a video to show you what I do.

More tomorrow ...

Hugs xx

September 06, 2015

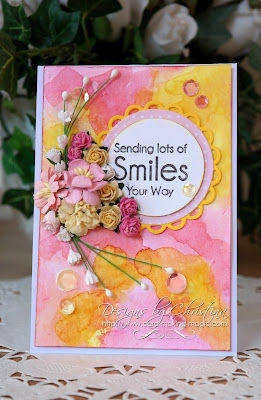
Pink and Yellow ...

Hi Everybody,

I know that this color scheme is not to everybodys  taste but I really like the look of this one.

It was just me playing around with some water colors again and for this one I have used Distress Inks. The colors I have used are Picked Raspberry and Mustard Seed

This method of adding the color to the card is one I have shared on Create and Craft and each time you try it the look will be different.

I have added in some pink and yellow flowers from Wild Orchid Crafts

The little sentiment is one I had in my "Stash" and I have no idea where it is from

Around the card I have dotted some pink and yellow sequins just to add that little extra.

The sentiment is added to Standard Circles Lg  and then layered onto pink spotty card

I have then added them with foam pads to Lacey Circles to the lower front of my card.

More tomorrow ...

Hugs xx