Beautiful Card Designs Made Easy

September 10, 2016

Card Winner ...

Hi Everybody,

Beautiful day here and it is Griffs birthday. Tomorrow I am taking him to see Amaluna Cirque de Soleil in Manchester and we are both really looking forward to it. Every time it has been advertised on TV I have said that I would really like to see that show ... and tomorrow is the day.


The winner for yesterdays card has been chosen and the name this week is you 

VAL JONES

Would you email me your postal address please to
christina@card-making-magic.com 
and the card will be in the post to you straight away.

I hope you will like it and please let me know when it arrives with you

Day off tomorrow ...

Hugs xx

September 09, 2016

Friday Freebie 135

Hi Everybody,

I have another card with the glue technique on it for todays give away and this idea was featured in a YouTube video quite sometime ago.

But it is an idea that you may like to try and so I make no apologies for adding the link again ... Using Glues

It Is ideal to use for the men in your life and the finished size is about 6x8"

So if you would like to have this card then all you need to do is leave me a comment at the end of the post.

Please come back tomorrow to see if your name is listed as the winner and then if it is you will need to email me your postal address.

I am happy to send the card anywhere and you don't need to have your own blog.  Nor does it matter if you have won one of my cards in the past you can still enter again if this is one that you would like to have

More tomorrow ...

Hugs xx

September 08, 2016

Woodland Scene

Hi Everybody,

Today I am featuring the new die set that comes free with Septembers 
Die Cutting Essentials 15

This will help you to create the prettiest of Woodland Scenes  and is a complete card front for any of your Christmas cards

But don't put it away again after the season is over because with a little change here and there this is something that you can use all year round

It would make excellent male cards.

For this one I have dressed it up with a summer theme.


I have added green grass and hills rolling away in the background and the sun setting in the distance.

There are more ideas on the video and I show you how to make this into a shaker card. 

Pop over to YouTube now and watch the   Die Cutting Essentials - Woodland Scene  
The magazine will be in the shops soon or you can buy it direct from Moremags
You can also subscribe to have the magazine delivered to your door monthly at the same link and save money at the same time 

More tomorrow ...

Hugs xx

September 07, 2016

Water Colour Wednesday - Best Birthday

Hi Everybody,

Todays clean and simple card is using  the  Best Birthday  matching stamp and die set from Clearly Besotted

You don't need to buy the dies to create this card because you can simply fussy cut around the image ... but I have to buy both if they are available ... don't ask me why !!

So to make this card I stamped the two outside characters directly onto my base card and stamped the central one onto another piece 

I water coloured them all in and then die cut the piglet out and added it on foam pads to the centre position on my card

The sentiment and balloon strings are from the same stamp set and the only extras on the card are some silver sequins that I have dotted around

They just don't look silver in the photograph .
 I inked around the edges of the card and matted it onto some grey before layering it onto the white base

More tomorrow ...

Hugs xx


September 06, 2016

Tuesday Tutorial - Swirl Stripe

Hi Everybody,

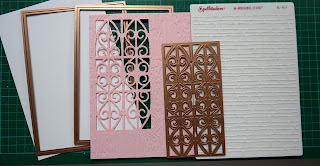
Today I am going to be using this really pretty panel die from Spellbinders that was designed by Becca Feeken.  It is in two parts and creates a panel that is about 3 x 6" and I have only used the centre part of the set for my card.
Spellbinders Supplies:
Other Supplies:
Instructions:
Using  die #7 from Matting Basics A cut two pieces and Create a Hinged card
With  die #7 from Matting Basics B cut another panel in pink
( Die #1 is always the samllest)
Use the centre part of Swirl Stripe and place it in the upper left corner of the pink card and cut.
No need to emboss this piece as you are now going to add it to your embossing folder and run it through the machine
I added some Parchment/Vellum to the back of my patterned area and then added foam tape to the back to support it all
Wrap this panel with lace along the bottom section before adding it to the base card
Cut as many leaves as you would like to add to your creation.
I used Foliage Two for my flourishes but that die is now retired so in the supplies above I have given you an alternative die  for the same effect
Cut the Celebrate word four times in white and once in gold.
Layer them all together with the gold one on the top.
Add the leaves, flourishes and flowers to the right hand side of the card
Add the sentiment along the bottom on top of the lace.
I use a hot glue gun to hold all my additions in place
Sparkle the flowers with some glitter on the petals
Place the pearls around the flowers and onto the patterned piece
Push the Hatpin into the petals as the finishing touch

More tomorrow ... 

Hugs xx