Beautiful Card Designs Made Easy

January 19, 2017

Pretty Quick - Stained Glass Dies

Hi Everybody,

Late yesterday I added four new vidoes for you to see and they are featuring new die collections from Craft Stash  Today I am adding four more with the Pretty Quick dies titled Stained Glass.

The first one features the Stained Glass Rose and Chalks and the pastel chalks give this a really pretty effect.

It is easy to do so if you have them grab the chalks and have a go.

This one is the same die but really quick with just some pretty paper.  Stained Glass Rose and Designer Paper

Dig out those lovely background papers that you have been saving and make this card in noi time at all/

Keep a batch of them ready for those last minute occasions
Next we have the  Dove and for this one I have used coloured pencils and a little blending fluid

But this is yet another quick and easy cards which is after all what these dies are there for ... Pretty Quick cards with no hassle

Stained Glass Dove and Pencils is the video
And last but not least we have the Dove added to some beautiful mirror card that is also available from the Craft Stash website

I featured the mirror and glitter card a little while ago in another vidoe and it comes in a mixed colour pack of ten sheets

So I hope you have enjoyed all eight of the videos that I have added and there are lots more on the way soon as it is time to show you what the freebies are for January in the magazines

More tomorrow ...

Hugs xx


January 18, 2017

Honey Bee Haven Collection

Hi Everybody,

Today I would like to share with you a brand new collection from Apple Blossom called the  Honey Bee Haven  
 This collection can be bought as one set and used all together to create really pretty card and it is now available to buy from Craft Stash 

To show this collection off to its best I have not one but FOUR new videos that you can view which will highlight each part individually

The first video features the Hexi Die  and I have used this to create this bright and colourful card using the waste pieces.

Keep the positive piece for the next card and the video is Hexi Effect 

I also used the stamp to add the pattern to the hexi shapes.

Here I have used the positive piece so in effect we get two cards from one cut but the background is embossed with the HoneyBee Folder

I also used the Beehive Buddies on this card too and the video is named  Honeycomb Aperture
And here are those Beehive Buddies on a complete card and I really enjoyed working with this whole set

The video is called Busy Bees

And last but not least we have the Hexi die made into a stamp to add to the background with the rest of the Honey Bee Stamp Set used to create the rest of the scene

The video showing the making of this card is named Honeycomb Stamp

I hope you will enjoy the videos and not mind the croaky voice too much as these were filmed while I had my chest infection

More tomorrow ...

Hugs xx

Water Colour Wednesday - Moon Monsters !!

Hi Everybody,

I had fun creating this bright card using Gansai Tambi watercolours and a stamp set that I bought from a craft show last year.

It is from Woodware and is called  "The Blimps" and there are three different creatures in the set.

So for the card I created the background with Faded Jeans Distress Inks and then spritzed it with water to create the sky.

The bottom part of the card is grey for the moon that they are standing on

The sentiment stamp is from a free set that I showed you in a video is called  Up In The Air

The world is a die cut from Spellbinders World View  and I simply added that with foam pads underneath.

Stamping the images, colouring them and then cutting allowed me to add more foam pads under them to raise them up

And I added Glossy Accents to the eyes for effect.

I really like this card and I think it is one that children will love as a birthday card

More tomorrow ...

Hugs xx

January 17, 2017

Tuesday Tutorial - Ovals & Rectangles

Hi Everybody,

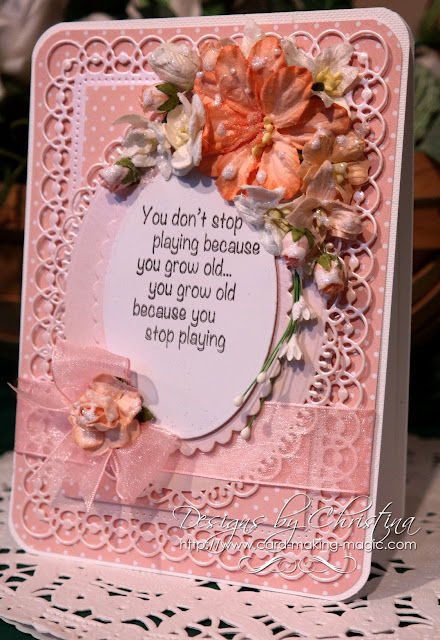
I thought for todays card I would dress it up with some pretty peach coloured flowers and use some of the older Spellbinders die sets. This card is a 5x7 and I have used the dies that will create a card that size without any measuring from me.
Spellbinders Supplies:
Other Supplies:
Create a base card with the largest die #7 from Matting Basics A
Hand cut another layer, with peach patterned card, to leave a really thin border around the edge
Round the corners
With the largest dies from the Ovals and rectangles sets cut panels in plain peach coloured card
Add foam tape to the back of each of these panels
With the ovals cut a scalloped layer in peach.
Stamp and heat emboss a verse onto white card and cut with the oval to match the scalloped one
Layer together with foam pads between the layers
Layer everything together and wrap with ribbon before adding to the card base
Add the oval sentiment to the top 
Choose a selection of flowers in peach and white varying the styles and sizes
Add these to the top right of the card. I use a hot glue gun to add my flowers as I don't want them to fall off the card once given
Dot the flowers with glue and sprinkle with glitter to finish

More tomorrow ...

Hugs xx


January 16, 2017

Magazine Feature ...

Hi Everybody,

Wow! I am so happy to have been featured in the magazine and so I just had to tell you about it and show you the pages

You may have had your copy as it was on sale at the end of December.  

The magazine was Die Cutting Essentials Special Vol 3  and I hope you liked the cards.

 But maybe you didn't realise that it was me !!

Well here I am and I am really honoured to be in the magazine.

And I have been asked to do more for next months mag too Special Volume 4

I really enjoyed making these cards and the feature was to use an embossing folder in different ways 

There is also a link for you to go to their website and see five more cards that I made for the same project

It was really exciting and this is the first time I have done something like this ... so wish me luck 

More tomorrow ...

Hugs xx