Beautiful Card Designs Made Easy

June 15, 2012

Brown Haired Baby Fairy

I am so delighted with these images from  Mo's Digital Pencil that  I have been colouring them in for days.
This one has normal coloured hair ... but then fairies can have whatever they want... well the ones at the bottom of my garden can. 

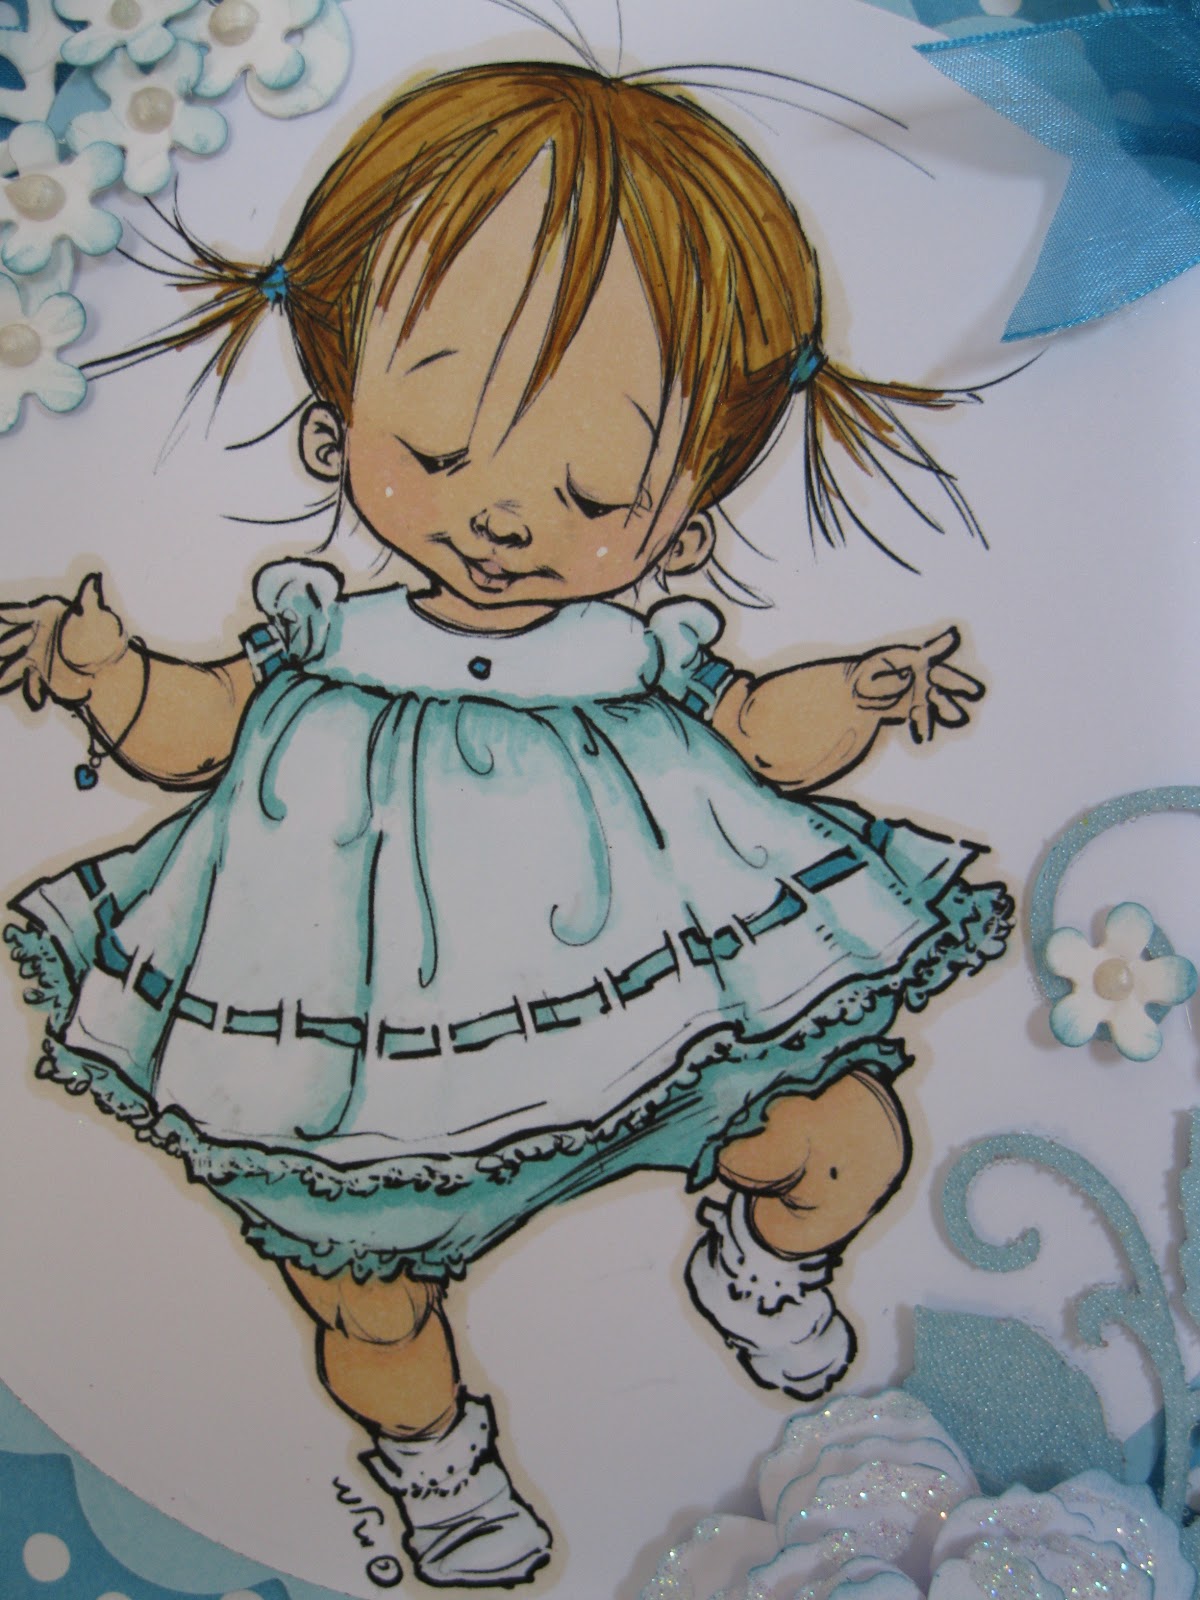
I have coloured this one with Spectrum Noirs from Crafters Companion and I am getting quite a lot of emails on this colouring system.    Many are asking me to compare them to Promarkers and Copics.
To be fair to any of the mentioned pens it is not about comparison as each brand has it's own merits ... and each perform well in their own individual ways.  I have pens from all and I enjoy working with each just as much as the other.

So if you are wondering which to buy then I would suggest that you buy a small sample of  each brand,  say some of the skin tone sets,  and see which is your prefered choice is,  for the budget that is available to you.

For this card I have double layered the ribbons, and the flowers are from Wild Orchid Crafts and the added "Bling" is from Want2Scrap   The image has been layered onto a Spellbinder Oval and then the Scalloped Oval

The very pretty papers are some that I found on my computor and I have no idea where I got them from ... so if you recognise them then please tell me... they have been matted and layered with some pale lilac card.

Hugs xx


June 14, 2012

Another Baby ...

This beautiful image is another from the magic pencil  of  Mo Manning  and you will find many, many more at
     Mo's Digital Pencil

This is called  "Walker"  and can be found in the Kids section on the website.

I think it is adorable ... and it would make a lovely gift for my Great Grand-daughter.

And here is some exciting news ...
 I have written to Mo Manning and asked her permission to feature her images in a series of videos, that I would like to do on colouring in,  and she has very kindly given me that permission.

I don't profess for one minute to be an artist ... but they will be based on what works for me and maybe it can help you too.

And I think these images would be perfect to be used for various aspects using alcohol marker pens and covering areas like skin, hair and clothes.

And maybe wings on the Baby Fairy images like the one featured a few days ago.

The  self adhesive Pearls in the corner are as always from Want2Scrap  and I have used two different sizes to decorate the corner.
The large white flower is one of the  Bauble Blossoms  from Spellbinders.

I really like this card and I will be using the images on many cards and buying more from such a talented artist.

Hugs xx

June 13, 2012

A Personal Story

Card Making Magic is now just over three years old and this has been the most extraordinary journey I have ever made.  I knew absolutely nothing about websites  and ...apart from sending the odd email  ... nothing about the internet either.

But I went ahead and dived in and, with a lot of hard work over those years,  it has gone from strength to strength. And then I had the idea  to add videos to the pages ... and that took it into another dimension... and the response from those tutorials has amazed me.

Through  YouTube  I started to get "followers" and some of the comments they leave me are wonderful.... some of them have been following me for a few years now.  They spur me on to do more and many many of my followers email me with questions and stories of their own.  I now have requests to do tutorials on things that people want and I do my best to accomodate them. 

One follower in particular asked if we could communicate more privately away from  YouTube and we started to email each other. We have built up quite a friendship and it was Naomi who encouraged me to start Blogging. She helped me every step of the way and I will always be grateful for that help. We went one step further and started to chat regularly on Skype.

And then she asked  if  I ... and my film crew  ... would like to visit her  in Canada.  Of course we debated this for a while and then we said "YES" and so then the planning started from both sides of the pond.

Last week we booked our flights to Nova Scotia and I am so excited to be going to Prince Edward Island.  It has come around so quickly and now it is just over one week away and I will get to meet Naomi.

She is like a kid in a candy shop and is planning all sorts for us to do in the two weeks we will be with her and her family.  On the 22nd  June we will fly from Heathrow and I can hardly wait, it is going to be such an adventure for us all.

In the meantime I have scheduled posts to go out for my Blog and I will be adding more to the pages from Canada ... and maybe show you a project or two that Naomi and I have created together.

Wish me Bon Voyage for the 22nd ....

Hugs xx


June 12, 2012

Spellbinders Bauble Blossoms

A little while ago I had an email from a lady who had bought this  Bauble Blossom die  and  was very disappointed with the result.

She said she didn't like the look and all the petals where bunched together instead  of flared out  form the centre.

So as a picture paint a thousand words I thought the best way to explain how I use the die was to .....
    make a video!

Spellbinders Bauble Blossoms  is a short tutorial on how to get a really good look for the flowers that you want to enhance your designs.

This is another of those Baby Fairies from Mo's Digital Pencil  and I hope you have taken the time to have a look around some of the cutest images there are.

I have used Spectrum Noir pens to colour the image and this has started off a whole new set of emails asking about the colouring of these.

So gues what I will be doing soon ....... more videos!!

The "Bling" as always is fromWant2Scrap  and the flattened look with the pearls was a happy accident I made a while ago.

But the mistake looked OK and so I have used it several times on other cards and decided to share the idea with you.... you may like it too.

Hugs xx

June 11, 2012

Baby Fairies...

I am always happy to pass on any good finds that I make and so I just have to show you these. Now this may be a website that some of you already know about ... but I have just joined the band wagon.

I  bought these delightful images from  Mo's Digital Pencil  and I  love, love, love 'em all they are so cute.  My favorite one is the baby with the ladybird that I have coloured with blue hair.

There are loads of really gorgeous images for you to choose from  and they are not expensive.
I have coloured all of these with  Spectrum Noir pens from Crafters Companion  and I am very pleased with the results.  They have all been matted and layered onto Spellbinder shapes.

There is a mix of images here. The top left and bottom right are from the "Baby Fairies" collection.
The child with the cupcake is "Kai is 1" and the other is "Girl on the potty"

But once these are made into a card ... well how could you not be pleased with the result.
The "Bling" as always is from Want2Scrap and I think it makes the card look really special.

I have used the pearly Finesse Swirls for this card and added them to the image itself... saving one pearl for the flower centre... and used the Diamante borders along the edges.

The flowers are from Wild Orchid Crafts and I have dotted some glue along the petals and then sprinkled them with Glamour Dust.
I will be having a lot of fun using these images in the coming months ... so keep a look out for them again in different colour schemes to ring in the changes.

Hugs xx


June 10, 2012

Nestaboard ... Labels 20

This has to be one of my favorite shapes as the Labels 20 is so versatile.

I featured this card earlier in the year but it is well worth showing again.

This time the Nestaboard shape has been treated to a  technique using Silver Gilding Flakes.

You will find it explained in the video  Mosaic Card

For this I used two of the shapes from the Nestaboard Labels 20  and layered them together.  The lace along the bottom adds a really feminine touch.

The Roses are handmade and the  video Paper Roses  will show you how to make these for yourself.   You will always have flowers to match your projects if you use the same ones as the base card.

The Nestaboard is available from Want2Scrap  and they will ship worldwide so that you too can enjoy their lovely "Bling"

Hugs xx

June 09, 2012

Nestaboard ... Lacy Ovals

This pretty shape is created from the largest Nestaboard shape in the  Lacy Ovals  and gemstone Nestabling frames the shape.

Both of these products are from   Want2Scrap  and are explained more  in the video  Alternative Spellbinders

The Skeleton leaves,  White Gardenias  and Roses  are  from Wild Orchid Crafts 

There are also some stems of pearls on gold wire but I can't remember where I got them from ...  soreeee!
I have used Gilding Flakes to get the Gold effect and the bottom of the oval has had some tear drops from a pair of un-used earrings added to it.
I also glued into the oval some matching pearls to complete the look.

The sentiment is layered onto a Fluer Di Lis Accent and I cut another in gold card as a shadow effect.  I used the smallest peice of gemstones from the Nestabling to frame it.

Both shapes are suspended from one of the Elegant Posts.

Hugs xx


June 08, 2012

Nestaboard ... Labels 2

This is another shape from the Nestaboard  family and this one is the Labels 2 that matches the Spellbinder die.

With this one I have inked it up with Versamark and covered it in red embossing powder then heated it and sprinkled in some Glamour Dust while it was still hot.

Around the back of the shape I have added some white lace and  on the front I have used a red Rose  from Wild Orchid Crafts  and curled  the wire from the flower around a  cocktail stick.

Once added to a card it looks totally different ... and with this one I have used a white square doily in the baackground.
The ribbon technique is explained in the tutorial   Ruffled Ribbon  and  is very easy to achieve.

The Nestaboard and the Pearly Swirls are from  Want2Scrap and make a real statement to any card.

Hugs xx

June 07, 2012

Nestaboard ... Scalloped Hearts

This is a product called Nestaboard from  Want2Scrap

It is compressed board that is used to match ... or instead of the Spellbinder dies. 

It is an excellent alternative to buying the dies ...  as they are pricey and you may not want to buy them.

But these are much less expensive  .... and they give a really pretty effect that you can dress  up anyway you like.

There are several shapes in decreasing size to each packet for you to create your own toppers.

And the company will ship worldwide too.
This is the largest one from the  Scalloped Hearts  I have covered the shape in  pretty pink paper and then edged  it with the matching  pink gemstones from  the same company.
The flowers are from Wild Orchid Crafts  and this is the topper that was made using all these wonderful products.

But when added to a card front with a lacy square doily in the background and  the result is very pretty.
The addition of the organza ribbon and the punched butterfly add the final touch and is a card I would be very happy to send for any occasion.

Hugs xx


June 06, 2012

Matting and Layering

A cardmakers term that  needs to be explained as many new  cardmakers are stopped in their  tracks by words  that those of us who know  how to make cards use  willy nilly.

I remember going to a computer  class many years ago and being asked by the tutor  "Do you know anything about computers?"    To which 80% of the class said a most emphatic "NO!!!"

She then proceeded to tell us to use the mouse to add the cursor to the search box ... and click,  add the title  "Whatever it was.... "  and hit enter.

Most of us spent the next few minutes looking for furry creatures running around, wondering what a cursor was,  why we needed to hit anything and  where and what it was we were entering. 

So a not very  helpful tutor and a not  very explicit lesson, as she clearly didn't understand  the answer "NO" to  her own question in the first place.

I know when  I started to make cards it was something I had never come across and I  couldn't find a detailed answer to  my question   "What is matting and layering?" ....

Having been asked the same question ...  and  not wanting to be tarred with the same brush as  my earlier  tutor with the PC's, ...  I decided to make a short video to explain  exactly what  Matting and Layering   is.

It is aimed at those people new  to this hobby  who don't know all  these terms  that are bandied about.

It has had a good response from lots of people ...  so I seem to have hit the correct level and I am happy to be of use to the many many  people joining the growing band of new cardmakers every single day.

It is for  You  that  Card Making Magic   was born.

Hugs xx

June 05, 2012

Choosing Colours

Some of the questions I have been asked lately ...  in emails to the website ... are concerning colours and patterns for the cards that I make. 

"How do you choose colours?"
"How do you know which patterns work together?"
"Do clashing colours work with each other?"

If you are a seasoned card maker then maybe to you the answers are obvious.

But the website is created for those that don't know the basics and so I tried my best to answer these questions as easily as I could.

I kept in mind that many people are a little scared of colours and patterns ... unlike me who goes ahead and tries anything with anything... and I wanted to build up that spirit of adventure in the newest of cardmakers so that they will be happy with what they come up with.
So I have done two more videos that will deal with this subject,  and maybe answer some of the concerns that arise when someone is faced with any array of colours, patterns and textures and they don't know where to start.

And judging by the response on YouTube ...  and in yet more emails it has been very well recieved.

Choosing Colours  is under five minutes long  and yet I hope it gives the information that a "Newbie" will find useful the next time they want to make a card.
And this card proves the point of not being afraid of colour and just playing with the papers that you have in your own "Stash" and seeing what works together.

The image is from Humphreys Corner  from Crafters Companion and has been coloured with Spectrum Noir pens. 

Floral Ovals from Spellbinders has been used to layer the image

The "Bling" as always is from Want2Scrap and is well worth checking out.

Hugs xx


June 04, 2012

Pretty card ....

Back to the pretty girly card for this one and I thought I would make it for a young birthday.

This one is pink .... well no surprise there then .... and the Teddy Bear was free with a magazine.

I have layered him onto a Spellbinder Floral Oval and then added the lot to the card with foam pads.

I have added Glossy Accents to the balloon and sprinkled in some Glamour Dust whilst it was still wet.

The background has been created with embossing folders and the ribbon is from   Fantastic Ribbons   where you will find some wonderful lace and buttons, as well as many coloured ribbons.

The number three was created from that useful little addition the Card Candi ... and you can get many colours, patterns and sizes from   Craftwork Cards

There are many things that you can do with this little embellishment and using it to make the number is just one of them.  I have added them to this card with tiny foam pads and I have used the pink polka dot ones for effect.

Hugs xx

June 03, 2012

... and puppy dogs' tails.

Here are some more of the cards that I have made with a "boy" theme to them. 

And now I am getting withdrawal symptoms and will need to make some  "girly" cards soon .... very soon. 

This one has the Faux Leather  that I posted about a few weeks ago ... and the buttons to keep the male look.

The link takes you to the video on how to get the look for yourself .... from masking tape.

The images have been coloured with Promarkers ... and were done in  the early days when I first started to colour in ... so not very good  ... but hopefully I have got better.

This is a stamped image from  Lili of the Valley

They have lots of lovely boy stamps for you to colour anyway you want.

And the addition of the ribbon does not take any of the boyish look away.


But it will be back to the pretty cards again tomorrow so I can use all the embellishments I like to add.


Hugs xx


June 02, 2012

Slugs and snails ....

If you're like me then you are simply in heaven whenever you have to make a card for a girl.

You can go to town on all the lovely embellishments that can be added ... Flowers, Ribbons and Pearls in abundance and pretty pastel pinks and lilacs Mmmmm Mmmmm !!

But every so often we need to make a card for the boys and then we have to start head scratching to come up with the ideas.
 
This image was free in a magazine pullout... and there were lots of them on the pages.

I scanned it into the PC and now I can print them off to the size I want whenever I need a new image.


I have coloured all these images with either Spectrum Noir or Promarkers.
This young man is from the LillyBoo collection from Cuddly Buddly

There are many images to choose from and they suit all age groups and occasions.

They are not expensive.... and because they are digital downloads they are yours instantly.

The name on this card makes it more personal and I  added the wall background to keep the boyish look.

This one was from   KennyK Downloads 

The digital papers are all in shades of blue... and are free from  Summertime Designs

You will find lots of papers for you to use and this one is the Fathers and Fedoras Kit.

Buttons are always a good addition to male cards and the sentiment for this is from the "Pretty Tuff" CD from PolkaDoodles

But even though it is a male card doesn't mean  it can't have some pearly swirls on it.

And this one just adds a little more to the Tug of War boys from KennyK.


Hugs xx

June 01, 2012

Can I borrow some shaving foam ????

I had to buy some cheap shaving foam to do this technique as my Film Crew uses an electric shaver ... just no consideration some folks !!!

And then to top it all I couldn't find a dish big enough to add the card .... so I improvised.

The  Shaving Foam Technique   is another of those messy ideas but still fun ... especially if you craft with children.

For this card I kept the colours softer,  in keeping with the image, and I coloured that in with Promarkers.

The addition of the large organza bow softens the look even more.... and you could add flowers, pearls and gemstones for even more of a finishing touch.

Hugs xx