Todays card is one of the new additions to the Spellbinders range and this is the Decorated Birthday.
The die cuts the whole shape of the card for you and all you have to do is fold and decorate it. I chose to use the flowers die that is in the set and I am happy with the result.
Lay the main part to the die cutting edge down into the correct side of your card and cut and emboss and remove from the die.
Carefully fold the card along the scored lines left by the die starting at the front. Mountain fold the first two and valley fold the second two. Mountain fold the top part to the card and also waht will create the back of it. Your card should now look like the photo.
Cut the Happy Birthday section from some card of your choice and carefully remove from the die. I sued spray adhesive on the back of mine and pressed it into place on the front panel
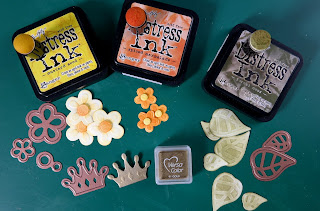
Cut the flowers and leaves ... I chose to cut mine in white and then ink with Distress Inks using a sponge dauber. layer the parts to the flowers and add a corresponding leaf to the back of each one.
I added a pearl to the centre of each flower too. I have inked the crown with Gold but you could simply cut it from gold card
Space the flowers and leaves onto your card and add the crown at a jaunty angel to the top of the sentiment panel
More tomorrow ...
Hugs xx


Christina, a fun card. This set is interesting and I am thinking it would be nice to have to make a fairly quick card and a pretty card. With 30+ people in the immediate family I can never get cards made ahead of time. Now we are expecting our 11th grandson and grandchildren will number 16. I think our family are like rabbits. Lol.
ReplyDeleteThank you for sharing this set.
~blessings, Louise
wow that's a great die, another one for the ever growing list, love the end result
ReplyDeletecheers, Kaye
Wonderful card Christina! This die is now on my wish list. Debra x
ReplyDeleteA lovely colorful card Christina, love the crown at a jaunty angle .
ReplyDeleteElaine H X
Beautiful card Christina.
ReplyDeleteMorning Christina,
ReplyDeleteInteresting looking dies.
Lydia
X
Clever stepper card - good idea and pretty result
ReplyDeleteLovely card for a simple tutorial Christina. Hope it is not too foggy and cold in Blackpool. Enjoy your day.
ReplyDeleteA very handy die to have in your stash, as I think they are perfect for children's cards, one pass and a couple of embellishments a ready made card. Thank you for showing this die. X Ros
ReplyDeleteWhat a sweet card and especially helpful when a quick card is needed. I can see that this die set could create a simple card or a fancier card with a change of paper and embellishments. Love your flowers!
ReplyDeleteGreat card-I bought this die a few weeks ago & not had chance to use it so this is the inspiration I needed!
ReplyDeleteMichele
Beautiful birthday card, I love the design and the pretty flowers
ReplyDeleteLG Petra
I like big cards and I find these are rather small, but a lovely card you have here Christine....thanks for the tutorial....luv Ursula xx
ReplyDeleteGood Morning Christina :) Thank you for all your hard work on this wonderful tutorial. Enjoy a lovely day. Big Hugs.
ReplyDeleteHi Christina
ReplyDeleteThis looks like a 'must have' die that will be very usefull. Thanks for the tutorial
Love & best wishes
Jenny C xxx
Hi Christina,
ReplyDeleteWhat a great way to make a shaped card without having to worry about measuring and not cutting the wrong bits...can you tell I'm speaking from experience here lol. I love the blue card you used and aren't those flowers cute. It looks like another add to my Spellbinders wish list although it will have to wait a while as the next purchase has to be the 5x7 matting basics sets :). Thanks for the tutorial.
Bx
Hi Christina
ReplyDeleteA very handy die to have in our collection. Saves all that measuring that we have to do. Cut out, decorate and your done.
Very pretty. I just received the Happy Birthday die, but haven't used it yet. Thank you for the idea.
ReplyDeleteI really love the look of your blog and your posts!
ReplyDeleteI will follow your post from now on with excitement :)
see you soon!
Lovely card, the dies make it come tighter much easier.
ReplyDelete
ReplyDeleteGreat looking birthday card...
I can see how easy it is when you have all the dies....tfs
Well done Christina
This comment has been removed by the author.
ReplyDeleteA really useful die Christina and I love those shaped cards.
ReplyDeleteKind regards
Anne Owens
Love this did Christina. Gorgeous card. Thanks for showing and for the tutorial.
ReplyDeleteHi Christina another beautiful card love the die and the shape of the card.
ReplyDeleteKind regards
Anne Owens
Hi Christina, sorry I deleted my txt as when I checked before it was not here so I had repeated it more or less on the 30th blog, anyway I think this die is really good think you could make a lot of easy cards with it but will look like you spent an age on them. A cleaver idea. Take care Melody xXx
ReplyDelete