Beautiful Card Designs Made Easy

June 10, 2015

Pink Pearl Birthday Card

Hi Everybody,

Once again I am back to pink and I have edged the whole card in a pearl string from Wild Orchid Crafts

I added it to the card with a hot glue gun to make sure it stayed put and I think it looks really pretty.

The card is created by simply cutting an A4 card in half and   Creating A Hinged Card

I have made a pink and then another white layer and cut the aperture with Oval Regalia and this part was  embossed and then added with foam tape

I glued the detailed panel flat to the card so that it looks sunken and then embellished around it with flowers from Wild Orchid Crafts

Notice the Gypsophila  framing the Oval  ... I just love this flower addition to WOC

The centre panel is raised with foam pads and Sentiments Three  cut several times and glued together than added to the card

The satin ribbon is from MeiFlower  and is added to the flowers with a pretty acrylic flower over the knot.

I am preparing to video the making of this card so watch this space ...

More tomorrow ...

Hugs xx


June 09, 2015

Tuesday Tutorial - Classic Scallop Edgeabilities

Hi Everybody,

Today I am using an older Spellbinders die set and this one is the Classic Scallop.  It creates a lovely fancy edge to your cards but today I am going to show you how to it to use it in a different way.

The card is a 5x7 card and I have used lovely teal card in two different patterns - spots and stripes


Spellbinders Supplies:

Other Supplies:

Flowers from Wild Orchid Crafts
Pearls from Want2Scrap

Instructions:


From Matting Basics A #7 cut two white panels for the base card and Hinge together
From Matting basics B #7 cut a colored panel 
From Matting Basics A #6 cut a patterned price of card and emboss 
 (Please remember that the smallest die is always #1)


These are the dies in the Classic Scallop set and it shows clearly the cutting edge to the die at the bottom. The other two are inserts that will give you the pattern that you want in your scallop. 
I am using the middle one for my card

To a piece of the colored card that is about 3 1/2 " (9cms) wide I have taped the cutting edge and the scalloped detail die and run it through the Grand Calibur


Then once this has been cut and embossed I have taken a piece of patterned card and trimmed it to the width I want. Mine is about 5cms (2")

Lay it onto the colored card and place the two dies at the other side and when you have it as you want it to look remove the patterned card and tape the dies in place and run them again through the Grand Calibur


Glue the embossed patterned and colored layers together but don't add them to the base card yet .
Add the patterned strip to the Classic Scalloped panel with foam pads in between them and  trim to fit the front of the card 

Plait some white ribbon through the scallops and then glue the ends in place neatly on the back


 Add this to the larger mats with foam tape to give dimension and then add all of these layers to the base card


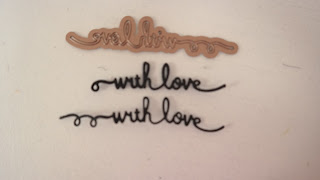
Cut the With Love Sentiment several times and glue them together one on top of the other to create a nice thick wording. I have trimmed mine down a little and added it to the card in a central position.
 
Add a little Rose to the bow at the top of the card and three small pearls to the bottom right hand corner and there you have another pretty card to add to your repertoire 

More tomorrow ...

Hugs xx

June 08, 2015

The Wednesday Card Class

Hi Everybody,

These are some cards that I wanted to show you and they have been done by the ladies in my Wednesday Card Class

One week we prepared the modelling paste background for the cards and we then had to leave it to dry until the next weeks class.  So when they came back the following week we got busy and made these cards.

As usual there interpretations are completely different and each has made a card in her own style. From the masks that they chose to use to the colors of the cards is all their individual taste.

The cards on the right are the ones that Brenda has created and she used pretty shades of lilac for one and a vibrant turquoise for the other.


The ones on the left are from Mary and she opted for a very lively orange and yellow for one and a lovely muted gold for the other

Haven't they done well making some very lovely cards

I really like the look of all these cards and the ladies went away happy after that weeks class.  I take photos each week of the cards we do as a record of the progress they have made

We have been working together now for over a year and we looked back at some of the cards we had down in that time and they are really pretty.

It has been a real pleasure to work with them and we have some fun along the way too ... Long may it continue

The flowers are as always from Wild Orchid Crafts and the glitter I use is from Glitter Magic.  The ribbons are from Mei Flower 

More tomorrow...

Hugs xx

June 07, 2015

Sweet Pink Flowers

Hi Everybody,

This card is created in the Hinged Card Style   and I have used 5x7 Matting Basics A&B to give me the layers

The top layer has been embossed with the 8x8 Folder from Crafters Companion  called Elegance

I have stamped and embossed the sentiment into the channel on the folder before I emboss and then I am sure that it is in the correct space

The flowers are a mixture of Roses, Chrysanthemums, Tulips and Cherry Blossom from Wild Orchid Crafts   and I have sparkled them with Glitter Magic 

But the flower I have really fallen in love with from WOC and I am using it a lot is Gypsophila   This is such a pretty flower and so versatile.

I curve it around some of my sentiments or,  as here in this photo,  just draping it from the corsage,  but I love it ...look out for it in other floral displays I do you are sure to see it !!

I have added the flowers to Labels Thirty Three  using the #4 die and then cutting a Faux Nestie  around it ... and if you click the link the video will show you how to get this result for yourself

The card is lined and the butterflies are from my "Stash" with butterfly trails with Diamanté from Want2Scrap

(Any of the colored words are links to other pages ... all you need to do is click them and  a new window will open for you)

More tomorrow ...

Hugs xx


June 06, 2015

FF winner ...

Hi Everybody,

It's blowing a gale here in the North West ... sunny but very windy and later I have to go shopping and then it will be playtime with Isabella.  At least the rain will hold off  and we can play in the Playhouse.

But for now the draw has been done this morning by my "Film Crew" and the name picked to win the pretty pink card is ...


Vicki ...
Can you email me please 
christina@card-making-magic.com
with your postal address and I will get the card in the post to you straight away
You have 48 hours in which to claim it and please let me know when it arrives with you and I hope you will like it.

More tomorrow ...  

Hugs xx