Today I am using an older Spellbinders die set and this one is the Classic Scallop. It creates a lovely fancy edge to your cards but today I am going to show you how to it to use it in a different way.
The card is a 5x7 card and I have used lovely teal card in two different patterns - spots and stripes
Spellbinders Supplies:
Other Supplies:
Flowers from Wild Orchid CraftsPearls from Want2Scrap
Instructions:
From Matting Basics A #7 cut two white panels for the base card and Hinge together
From Matting basics B #7 cut a colored panel
From Matting Basics A #6 cut a patterned price of card and emboss
(Please remember that the smallest die is always #1)
These are the dies in the Classic Scallop set and it shows clearly the cutting edge to the die at the bottom. The other two are inserts that will give you the pattern that you want in your scallop.
I am using the middle one for my card
To a piece of the colored card that is about 3 1/2 " (9cms) wide I have taped the cutting edge and the scalloped detail die and run it through the Grand Calibur
Lay it onto the colored card and place the two dies at the other side and when you have it as you want it to look remove the patterned card and tape the dies in place and run them again through the Grand Calibur
Glue the embossed patterned and colored layers together but don't add them to the base card yet .
Add the patterned strip to the Classic Scalloped panel with foam pads in between them and trim to fit the front of the card
Plait some white ribbon through the scallops and then glue the ends in place neatly on the back
Add this to the larger mats with foam tape to give dimension and then add all of these layers to the base card
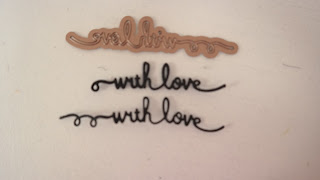
Cut the With Love Sentiment several times and glue them together one on top of the other to create a nice thick wording. I have trimmed mine down a little and added it to the card in a central position.
Add a little Rose to the bow at the top of the card and three small pearls to the bottom right hand corner and there you have another pretty card to add to your repertoire
More tomorrow ...
Hugs xx


I love your tutorials. It never occurred to me to glue the sentiments one on top of the other.... duh...... I will be cutting and stacking a few to use when the mood takes me.
ReplyDeletevery clever, love it, must get some border dies
ReplyDeletecheers kaye
Beautiful card Christina in lovely colours. I do have this set in my box but unfortunately I have lost the outside scalloped edge die in my set! So annoying! The ribbon adds a lovely finishing touch!x
ReplyDeleteLovely card-great idea using the border dies. I have these and often forget about using my older dies.
ReplyDeleteMichele
Hi Christina, another very pretty card. Thanks for sharing this great idea for our edgeabilities die. I'll have to off now to have a go, fingers xed. Janelle x
ReplyDeleteGood morning Christina, A very unusual card ,prefer your other style,hope you don't mind me saying.Take care Jane B.
ReplyDeleteLovely card Christina, I've got this die set so I'll be having a go at this. Thank you!
ReplyDeleteMaggie B x
Oohs love this card it's so elegant xx
ReplyDeleteThanks for the tutorial Christina, I too have this die, so will get onto a project using it, funny how we tend to put our old dies to the back and they are forgotten about, thank you for reminding me!.....luv Ursula xx
ReplyDeleteGood morning Christina and all
ReplyDeleteWhat a lovely different card. Love the way you have used the ribbons and dies.
Joan
Good Morning Christina :) It always amazes me how you come up with such wonderful and interesting techniques in using your dies! Thank you sooooo much for sharing and for all the work you put into your Tuesday Tutorials for us. You are a most generous Dear Lady. Enjoy a a lovely day. Big Hugs.
ReplyDeletegreat tutorial. i just love the sentiment die. lovely card.
ReplyDeleteThis is a very elegant design card . Love the colors.
ReplyDeleteI love the idea of the criss-cross of the ribbon...I must try this on one of my cards...
ReplyDeleteBeautiful card and great tutorial.
Well done Christina
Hi Christina
ReplyDeleteWhat a lovely stunning card you've made for us today. I love the colours you've used as well.
A lovely way to use the border die. Well done Christina - again ! xxxxx
ReplyDeleteThis is a lovely card to show off the border dies which I have but rarely use. Must get them out again and follow your tutorial. Thank you Christina x
ReplyDeleteGreat Tutorial Christina. Must have a try at this card. It's very pretty.
ReplyDeleteThank you again!! This is a set I have. Got them on a close out about a year and a half ago. Didn't really know how to use them. :) well now I do!!
ReplyDeleteVery different and very interesting! I think I will be able to do this type of card myself. Thanks for the tutorial. Dianne
ReplyDeleteWhat a lovely card
ReplyDeleteThank you for another informative tutorial. Love the EF you have used An all together beautiful card
ReplyDeleteBeautiful Christina, that card still looks as nice now as it did then. Love Anne Owens x
ReplyDelete