Beautiful Card Designs Made Easy

September 07, 2015

Brusho Crystals

Hi Everybody,

You may rememberer me showing you some Brusho Crystals that I bought at the craft show last weekend ... well here is a card that I have made using them

They are very vibrant colors and a little goes a long way so use them very sparingly.

For this card I stamped and embossed in gold the Sketchy Rose from Altenew  onto some watercolor card

Then with a wet paintbrush and some clean water I have dampened the flower staying within the lines

Then with the red, orange and yellow crystals I have sprinkled on tiny amounts.  I evened out the color with my brush and allowed it to dry.

Once dry I have cut it out with scissors staying close to the embossed edge.  I did the leaves in the same way using the green from the pack

For the background I have sprinkled a very tiny amount of crystals and then spritzed it with clean water.  Trimmed it to size and layered it onto black card.  The sentiment is stamped onto the dry background and then all the layers added to my base

The flower has been added with foam pads underneath to give it height and the enamel dots have been randomly added for an extra effect.

I will be playing with these Brusho Crystals some more and I will make a video to show you what I do.

More tomorrow ...

Hugs xx
September 06, 2015

Pink and Yellow ...

Hi Everybody,

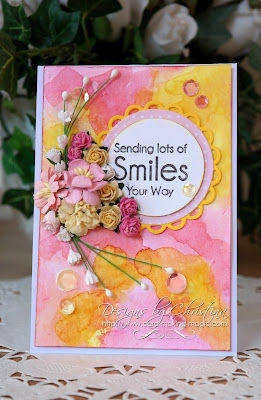
I know that this color scheme is not to everybodys  taste but I really like the look of this one.

It was just me playing around with some water colors again and for this one I have used Distress Inks. The colors I have used are Picked Raspberry and Mustard Seed

This method of adding the color to the card is one I have shared on Create and Craft and each time you try it the look will be different.

I have added in some pink and yellow flowers from Wild Orchid Crafts

The little sentiment is one I had in my "Stash" and I have no idea where it is from

Around the card I have dotted some pink and yellow sequins just to add that little extra.

The sentiment is added to Standard Circles Lg  and then layered onto pink spotty card

I have then added them with foam pads to Lacey Circles to the lower front of my card.

More tomorrow ...

Hugs xx


September 05, 2015

Card Winner ...

HI Everybody,

Today I was up bright and early and it is a lovely day. A little on the cool side but I quite like that.  Yesterday I went to play with Isabella and she gets funnier every time I see her.

For new readers of my blog Isabella is my great grand daughter and she is three ... and a budding comedian. Over the last few months we have said to her when she ignores us ... "Are you cocking me a deaf ear Isabella"  and it turns out that she has what is commonly called Glue Ear and it is affecting her hearing.

She cannot pick up sound clearly and on Thursday she had an operation to put Grommets into both ears. I didn't know what the op was but it is to release the build up of fluid in the ear and create a tiny passage so that the air can make the tiny bones in the ear function correctly.

So she told us that she went to hospital and they put something over her mouth. She didn't like the smell and it made her cry.  But now everything is really loud.  She is back to being her bossy, independent  little self and she is adorable.

Enough of that ... lets get on with the draw.  The name chosen from the list of comments today is YOU ...

Debra Kenworthy...
please email me your full postal address with postcode and country to
christina@card-making-magic.com
and the card will be on its way to you and I hope you will like it.

Please let me know when it arrives with you

More tomorrow ...

Hugs xx


September 04, 2015

Friday Freebie - 083

Hi Everybody,

This weeks card is a vision in white and features some of the dies from the Victorian Collection from Spellbinders.

This one is  Royal Circle  and I have backed it onto some silver mirror card for effect.

I have just cut one of the circles and then cut it in half to form the semi circles on the card.

Stagger them as you add them and then across the centre I have added a white panel that is also backed with mirror card and around that I have tied some wide satin ribbon from Mei Flower

The centre to the bow is one from my "Stash"  Use any embossing folder that you have to create some texture on the base panel and then layer it onto silver card before adding it to the base card

Layer the sentiment in the same way to complete your look.

So would you like to win this one ?? Then all you need to do is join the group of followers and leave me a comment at the bottom of the page.  It is from those comments that a name will be selected as the winner

The name will be in tomorrows blog post so please make sure that you come back and check if the winner is you.  You will have 48 hours to claim the card by sending me your postal address.

More tomorrow ...

Hugs xx

September 03, 2015

Special Wishes

Hi Everybody,

This card is a little more subdued than yesterdays but uses the same dies for the sentiment and the same pink spotty card from  AnnaMarie Designs

This card is 5x7 created with  Matting Basics  and I have used both the A and B sets to give me the layers that I need.

The next layer is parchment and I have embossed it with the Tied Together folder

Now this folder sells out every time it comes back onto the market so you may need to search for it.

I have trimmed the top and bottom of the parchment with  Scalloped Borders One

I have added it to my card with foam pads that sit under the sentiment and the ribbon and lace so that they cannot be seen

Into the cross sections I have added tiny pink pearls from  Want2Scrap

The sentiment has been stamped and embossed and then layered on tot the card front with foam to raise it up and I have used Standard Circle Lg  and matted it onto Lacey Circles

Have you joined in the new "Give Away"  yet .. you have until next Monday to add your name so what are you waiting for ??

More tomorrow ...

Hugs xx