Beautiful Card Designs Made Easy

November 27, 2015

Friday Freebie 095

Hi Everybody,

There will be some new videos added to the blog and website next week with some pretty cards and so I hope you will pop back to view.

The card on offer today is in Teal and has beautiful foiled card in the background.

The label shape is surrounded by Diamanté and the flowers sit alongside it in blending shades.

The inside of this card is lined and it is ready to send to who ever you wish.

If you would like to own this one then all you have to do is leave me a comment at the bottom of the page.

In the morning a name will be drawn from the hat and the winner announced in the days blog post.

More tomorrow ...

Hugs xx


November 26, 2015

More with Alphabets ...

Hi Everybody,

Todays card is using the Alphabet dies that I have and this one is Donnas Alpha  from Spellbinders.

This can be done with any that you may have in your own crafting "Stash"

All you need to do is create your base card and one other layer from white card.

Mask off an area on the layer card and add ink to blend it out then remove your masking tape
Add in the word that you wish to spell so that it is half on the band of colour

Cut  it from the card... then add the cut letters to some double sided foam tape.

Emboss the lower part of the card and  add this panel flat to your base then place the raised letters back into the correct place.


Stamp and emboss your sentiment and add it to the card

Play with different words and colours to vary the look,

On the blue card I splashed some water on to the Distress Ink to bleach it out a little

Simple easy card and another way to get more for your money using dies that you may have had for quite some time.

More tomorrow ...

Hugs xx

November 25, 2015

Water Coloured Peonies ...

Hi Everybody,

Todays card is back to water colouring and this is the Peonies Scrolls Stamp from Altenew.

I bought mine from Make the Day Special and they have many dies and stamps sets that match each other.

It was lovely to sit and relax as I coloured the flowers and I used the Aqua Tints from Spectrum Noir to get the look

The finished card is 5x7" and I layered the panel onto some pale pink card.

I have used the die set   Peony Scrolls Die   to cut out several flowers and leaves, after they have been coloured and allowed to dry

I have used foam pads to layer on them onto my card front and it gives them varied heights so that some overlap others

The leaves are just tucked underneath each of the flower heads and again I used foam pads.

The sentiment is a chipboard one from Want2Scrap but I wanted to make it more glamorous so I added some gold foil  to it with the Heidi Swapp Minc Machine 

I have only had the new Minc Machine a few days and I am still playing around with it to see what I can create but I will be sure to add some videos as soon as I can.  But it looks like a lot of fun to play with.

More tomorrow ...

Hugs xx
November 24, 2015

Tuesday Tutorial - Arched Window One

Hi Everybody,

Todays tutorial is using the Arched Window that could be suitable for any occasion. Wedding, Christening, Sympathy or Confirmation.  I have decided to use mine for this Christmas card and apart from a little painting it was very easy to do.

 Spellbinders Supplies:
Other Supplies:
Instructions:
Create a base card by simply folding an A4 piece of white card in half along the short side and then cutting it in half.  This will create two bases for you to use.
Cut another panel slightly smaller than the base card and emboss it with a brick effect pattern
Lightly rub a blender over the raised areas with a pale ink to accentuate the bricks ... I used Antique Linen
From the Arches die #3 and #4 cut them together to create the frame 
From the thin strip cut two or three to create the bars on the window.
(Please remember that die #1 is always the smallest)
Keep the small centre panel for another project
With any stamps that you have in your "Stash" create a little scene but make sure that it will fit inside the frame that you have just cut. 
I used a tree for mine and water coloured around it with Broken China and Black Soot.
Once it was dry I used a glue pen and dotted around the picture then sprinkled it with glitter
Create the window and add as many bars across as you like ... or leave them out altogether if you prefer.  I then added some Acetate to the back and trimmed it to fit the frame.
Add foam pads around the frame and carefully add it over your little scene and trim if needed
Add more foam pads to the back for more dimension
Wrap the twine around the bottom of the window frame and add in a couple of miniature bells
I stamped my sentiment in black and then heat emboss it with clear powder onto a strip of parchment 
Add the brick embossed panel to your base card and place the window in the position you prefer
Wrap the sentiment around the panel securing it on the back 
Add all to the base card and embellish as you like
On the card at the top of the page I used cream pearls and on the card at the bottom of the page I used white ribbon and Diamanté snowflakes
But both are really pretty cards
There is another idea using this die set for a Wedding Card

More tomorrow ...

Hugs xx

November 23, 2015

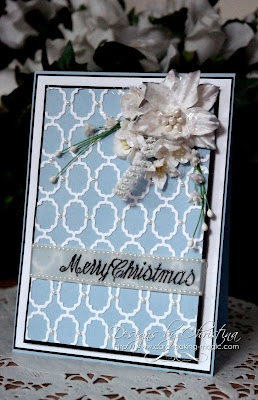
Christmas in Blue

Hi Everybody,

Todays card is another non traditional coloured Christmas card and this time it is in a pretty baby blue.

It is very simply made and is a 5x7 " size

I have layered the blue with a thin layer of black and then onto white card and the patterned layer is  Grate Effect   from Spellbinders

The card is from  Papermill Direct  and it is all 240- 260 gsm.

There are some lovely colours to choose from and this is the card I use mostly for my base cards

The flowers are from Wild Orchid Crafts and they have some really lovely Christmas sprays on their website at present

I have added some clear glitter stands to the petals for a sparkly look

The sentiment has been stamped onto a strip of parchment from AnnaMarie Designs  in black and heat embossed in glossy clear embossing powder from Wow.

You will find some beautiful spotty and striped card on  AnnaMaries  website so it's well worth a browse around

I have used pearls in the cross sections of the pattern and also to edge the parchment and I am very pleased with the result

More tomorrow ...

Hugs xx