Beautiful Card Designs Made Easy

Showing posts with label Altenew. Show all posts

December 04, 2024

Altenew Flowers

HI Everybody,

Todays cards are all created from the same stamp set and it is one of the Create Your Life bundles that I bought ages ago.

I need to use these more to get my monies worth from what turned out to be an expensive purchase.

 It was the postage costs that pushed then over the top and so I stopped my subscription

This is the Feathered Lilies  and for the first  5x7" card I stamped it in full, coloured it with alcohol markers and then cut it out with the matching die.

Once it was cut out I added to the embossing folder and ran it through the machine to get the raised areas on the flowers.

The backgrounds panels are also embossed and the sentiments are some that I already had on my desk.

For the next two card this is the same stamp coloured again with markers  but this time  after the flowers have been embossed I have cut them in half and trimmed them down to fit an  A6 and a DL

This gives me a twofer and both look really pretty when completed , and you can see the original configuration when you look at them side by side. 

But this is a good way to make large stamps go a little further as well as vary the look for your designs, which helps to break the sameness that can sometimes happen 


I have splattered both with gold paint but on the DL one, because I was impatient, I managed to smudge the splats at the bottom of the card.

But I am not unhappy with any of the looks that I get for these cards and .they would suit many occasions if I swapped out the sentiments. 

Hope you like 

More tomorrow ...

Hugs xx


April 22, 2024

Altenew Magnolia Blooms

 Hi Everybody,

Todays card is created from another Altnew kit that I have collected a long time ago. This kit is the Magnolia Blooms kit from August 2022.

I have stamped and coloured the arrangement with the layered stencils and die cut it out using the matching die but then I have cut the flowers down even more to fit onto the front of my DL card.

It gives the display a totally different look and I am very happy with the finished card.

The sentiment is also from the stamp set and there are lots to choose from.

The flowers have been added to an embossed panel with foam pads underneath to give them height.

I have added some small black pearls to the front as a little extra embellishment,

These kits are beautiful but the cost of the postage has prevented me from continuing to collect them each month.

But I still have the ones I did collect to play with and I really enjoy them all very much.

More tomorrow ...

Hugs xx

April 18, 2024

Altenew Card with Envelope

 Hi Everybody,

I have been playing with my Altenew Kits again and this one was the Never Stop Dreaming from February2022.

I used the layering stencil to colour the stamped flowers and they are a soft delicate pink.

I added them to a white embossed panel and for that I used a really old Spellbinders embossing folder.

I am determined to use older items and make sure I get my monies worth from them.

I have also challenged myself to use up any paper packs that I have and with these I have been making my envelopes. 

The one shown here is a pretty floral one that compliments the card well and it is from a pack that Helen Griffin brought out a while ago.

It is a 12x12 pack and I used this for many of my envelopes. 

It has been really enjoyable going through drawers and cupboards and finding older stuff and making it work for me again 

More tomorrow ...

Hugs xx 

July 20, 2023

More Altenew Flowers

Hi Everybody,

Todays card is a DL size and once again I have used the Altenew Flowers Kits that I have. 

This also has a matching die to cut it out and again I have added it to an older Card Making Magic embossing folder.

This folder is one of my favourites and the effect is very subtle. It is the Simply Dots folder.

I made the colour scheme yellow as this is not a colour I use often but I do like the effect with these tulips. 

I used the stencil in the kit, before embossing it, to add some flourishes to the background under the flowers.  The pearls along the side are just a little extra decoration.

Another pretty card that would sit any occasion and is reasonably quick to make.

More tomorrow ...

Hugs xx

May 24, 2023

Altenew Flower Cards

Hi Everybody,

All three of these cards featured today are using a die and  layering stencil from Altenew. It is the Bitterroot Flower die set 

I have altered the look by colouring them in different colours and adding them to a different background each time.

This first one has simply been coloured with the stencil direct to card and then that has been layered onto oink mats and a base card of a deeper shade of pink. 

I used the Card Making Magic Torn Edges die set for the layers.

The gingham ribbon has been wrapped around the top two layers before adding it to the base card, and the sentiment is from another Altenew stamp set that has also been added direct to the card.

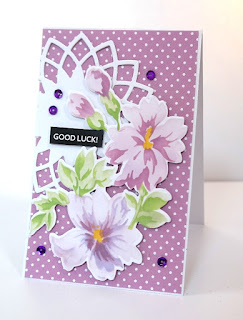
This card has been coloured with purple and lilac inks and added with foam pads to a die cut shape.

The dotty card background has been trimmed to fit an A6 base with just a small border around the edge. 

The card itself is from Anna Marie Designs  and can be seen in this pack from their website. The white die cut is a really old Spellbinders die

You could of course stencil extra flowers or leaves and add them to your card as well to fill out our display even further.

When doing this colouring I find it easier to die cut the shape out first and then stencil the die cut turning the stencil as I need it.

For the card to the right I have created one of my Plaid backgrounds, and the video for that is here

I also used an Alcohol marker and a ruler to highlight the edges which gives the appearance of the card being layered.

This way of giving the layered look saves on postage costs if that is something that you ned to consider.

I thing all three look really pretty whichever colourway you use but the plaid one has to be my favourite

And they have all been dressed up with either pearls or sequins 

More tomorrow ...

Hugs xx

January 02, 2023

Altenew Craft a Flower

Hi Everybody,

For my first card of the year I have used the Altenew Craft A Flower layering die set called Sulfer Cosmos, that produces two different flowers, and I really love this set.

The dies are easy to layer as they have symbols on them not that makes it easy to follow the diagram. 

I have used pink card for my flowers and inked the centre of the petals with a darker pink ink.

With fine liner pen I drew in the feint black lines and under some of the petals I have added small foam pads to give some dimension.

Then every flowers has been covered with Accent Glaze from Made To Surprise and sprinkled with glitter.  This gives them a lovely shine .

I have used other die cuts that are on my desk, left over from other projects, to add more interest to the card. 

I will be using this flower over and over again in the future as I love the effect that it gives

More tomorrow ...

Hugs xx

December 05, 2022

Altenew Layered Daffodils

 Hi Everybody,

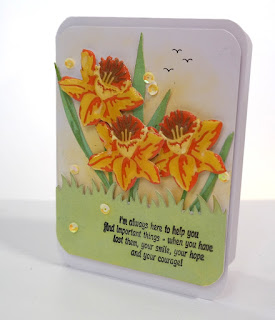
These flowers are created from a really old die set that was with a magazine a long time ago.  It creates beautiful layered Daffodils and these I have covered with Glossy Accents.

I have been using these Glossy Accents quite a lot lately as they bring out the colours in the card once they are applied and I really do like the look of the flowers once they gloss has dried.

For the background to this card I added some pale ink and then simply added the birds  in the distance by hand.

The grass in the front is from another old die and I can't remember where I got that from but I am sure they are everywhere.

I added the sequins as an after thought because .... I have a mucky fingerprint under one of them and it needed to be hidden.

And although the flowers look pretty this is not a card I would give to someone because of the fingerprint. No I am afraid this one is destined for the trash can and I will have to make it again !!!

More tomorrow ...

Hugs xx

September 08, 2022

Altenew

Hi Everybody,

For todays card I have used the same stamp, from the Craft Your Life Project Kit for last November, to add the ghost impression for the background panel.

Then I stamped the flowers again onto some more card and coloured them in with the layered stencils and this adds the shading to the flowers very easily.

The matching dies cut them out perfectly and they have been added to my card front with foam tape to raise them up.

The sequins dotted around highlight the green in the leaves and the sentiment is from another Altenew stamp set that I have had for a long time.

I enjoy using these kits as they are such good value. They include the dies, stamps, stencils and a 3-D embossing folder in each kit, and this kit is called Elegant Motifs

More tomorrow ...

Hugs xx 

September 06, 2022

Altenew Project Life Kit

Hi Everybody,

Todays card is using the new kit from Altenew for August 2022, and this is Magnolia and Blooms 

I have stamped the image with Versamark onto Parchment and then heat embossed it in gold powder.

The image has then been lightly coloured on the wrong side to add shading to the flowers.

The result is very delicate. I have then added it to a panel that has been run through the embossing folder in the kit and ink splattered with black and gold.

I  cut some of the design off the main image and repositioned it on the card, then carefully placed foam tape under the flowers so that it cannot be seen from the front of the card and added it to the embossed panel.

The sentiment is from the same stamp set and the grey pearls are my finishing touch.  

This little A2 card is using the same set but I have added it an embossed panel using a folder from my own collection.

The stamped image is again gold heat embossed and by cutting up the larger portion I ended up with two cards.

Getting a 2fer is always a good deal and uses up all the extra bits that you may have on your desk.

The little butterfly on this card is something that has been in my bit box for a while and I thought that this was a prefect place to add it in.

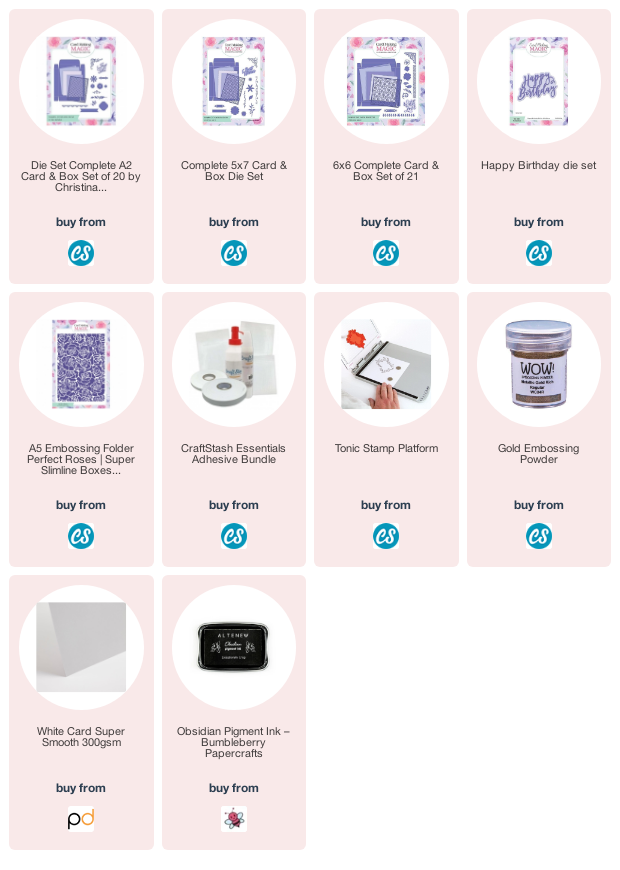
The sentiment is also from my own collection and I have add all the links at the bottom of the post.

Some of them are affiliate links which means I will get a small commission if you buy through the links.

And this is the other card created from the larger portion of the stamped image.

The image has been coloured using the matching stencil in the kit and this is an easy way to colour them, especially if you don't like colouring.

I am happy with all of these cards made from one kit and I really love the Altenew Craft Your Life kits which come out monthly.

More tomorrow ...

Hugs xx

August 09, 2022

Gold Embossing Powder

 Hi Everybody,

Todays card is using gold embossing powder  on pink card with a stamp set from the Altenew Monthly kits that I subscribe to.

It is a black base card and I have  added in another black layer that has been splattered with gold paint. I have die cut the image out with the matching dies and then added it to the card with foam tape.

It had been dotted with gold sequins and it is a DL size card that will fit into a standard sized envelope. So no extra expense there. 

And now on a completely different subject I am having the cataract removed from my left eye this morning and at least this time I know what to expect from the procedure.

I will be glad once it is all over with though and as I said before, if you are waiting to have this done then it really is worth it. It does not hurt but  I didn't think it was a pleasant experience.

I will try to get done what I can for the rest of the week but please think about joining Lou Collins and me on Facebook Live this coming Friday 12th August, to see the new collection that is being launched, and to try your hand at winning some prizes.

Talking of which .... don't forget to check back and see if your are the winner of last weeks give away as it has not yet been claimed, and it wont be there forever.

More tomorrow ...

Hugs xx

April 20, 2022

Altenew Cards

Hi Everybody,

For both of these cards I have used the layering stencil from the February Craft Your Life Kit from Altenew.

The stencils are part of the kit, which also has dies stamps and an embossing folder. but they can be used as a standalone product 

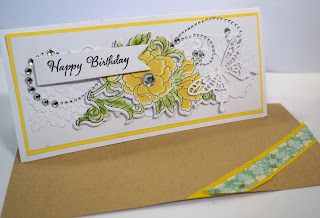
For the yellow flowered card I have stamped the image first in black ink and then used the stencil over the top to create the flowers.

Such an easy way to get a coloured image especially if you are not in to colouring.  

The black lines have been added with a fine liner pen for effect.

For the blue flowers I have simply used the stencil to achieve the layer and then cut it out with the die set.

The die cut has then been added to the card front with foam pads to raise it up

The background to this card is Washi Tape and the sentiment on both cards is from the stamp set in the kit.

The little butterflies are from another stamp set

Easy, effective and pretty cards that would suit any occasion.

More tomorrow ...

Hugs xx

January 25, 2022

Altenew Craft Your Life Kit

Hi Everybody,

I had a day off yesterday and did absolutely nothing except walk Ruby on the beach.  She loves going down there and can have a really good run around, but the tide was too far out for us get near the sea, which is no bad thing or she would be in it even if it is so cold.

But I have got some new cards to show you and these are made with the new January Altenew Kit called Feathered Lilies.

I have used the stencil in the kit to colour these  flowers with Altenew Inks.

They have been embossed in the folder, and then die cut and added with foam tape to the card front.

The background has been embossed with the Simply Dots folder from Card Making Magic

It is a very delicate card and could be for any occasion you liked, and the finished result is a 51/2" square 

The sentiments are stamped from Label Love also by Altenew and many of these products I have had in my stash for a very long time.

This card uses the Pallet background stamp from Altenew coupled with the Painted Inspirations stamp 

This time I have stamped the image and then coloured it with the stencil and although it is the same set it looks different with the stamped outline.

Adding the die cut in a different orientation also makes it look different.

These kits are so good and in each one there is a die set, stamps, embossing folder and often multiple stencils for you to colour and layer the images.

Really useful if colouring is not your thing

More tomorrow ...

Hugs xx

January 18, 2022

Altenew Craft Your Life Project

Hi Everybody,

I think I have told you a few months ago that I have subscribed to the monthly Altenew Craft Your Life Kits and this is the one that was received in November.

These kits are lovely and so full of items for you to use in many different ways.

There are dies, stencils, stamps and an embossing folder in each kit and the flower is a new one each month,

I have added an envelope to each of my cards and decorated them all with Washi Tape, and they are all in cellophane to keep them clean
This one has the addition of Diamante  to it and it is a slimline card.

These cards will be going in my charity shop box which I will take to the shop once it is full, and there are usually about 150 cards in each box that I take to them

I enjoy making these cards as there is no pressure for certain designs and no deadline to meet either.
I can just make them how I like and add them to my box and the charity shop seem to like getting them too.

And with having a new floor fitted in my craft room I have really gone to town and cleared out all of the items that have been made or bought over the years and never used.

More tomorrow ...

Hugs xx


October 28, 2021

Altenew Flowers

Hi Everybody,

I have used a mixture of things on this card but I do like the end result. It uses one of the flowers from the second of the Craft Your Life Monthly Project Kit from Altenew and this is the Lush Garden.

The background is created with Distress Oxide Inks blended in an Ombre effect.

The black lines on the background have been hand drawn using a ruler and alcohol marker pen, and then the panel has been embossed in a Card Making Magic Embossing Folder

The flowers have been arranged at the bottom of the card and I have used foam pads to give some height. 

The final additions are some black pearls and the sentiment is Label Love also from Altenew.

This card also uses the same kit but this time in turquoise and the flowers have been added to a Washi Tape oval.

I have also used the same embossing folder and added the oval with foam tape underneath for height. 

The Label Love sentiments are always useful and Altenew also do a Mega  Label Version. 

More tomorrow ...

Hugs xx


October 25, 2021

Altenew Project Life Kit

 Hi Everybody,

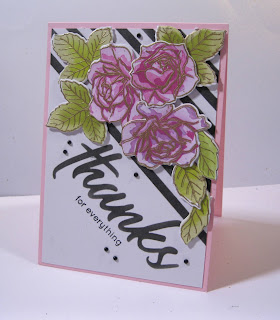
This is the new monthly kit from Altenew for October and it is the Garden Rose. There are several items in each of the kits such as stamps, dies to match, a 3-D Embossing Folder and Stencils.

For this 5x7 card I have used the diagonal stencil in the background and I have inked it in black. The large "Thanks" is also one of the stencils and the sub sentiment is from the stamp set.

I stamped and gold embossed the roses and leaves and used the layering stamps to colour them. .The dies cut them out and they have been added to the card with foam pads underneath them.

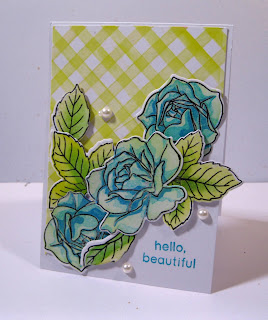
For this next A2 sized card I have coloured the roses in shades of teal ink.
I have used the stencil again for the background but this time I have used coloured ink and I have altered the direction of it to create the criss cross pattern in the background..

Each of the cards has been dotted with pearls to add soe extra interest.

Both are pretty cards and I am really loving the new monthly Project Life Kits from Altenew

More tomorrow ...

Hugs xx


October 12, 2021

Ink Swiped Background

Hi Everybody,

Todays card has been created with an Ink Swiped Background. 

I used a pad of yellow ink and simply swiped it down the card leaving splotches of the ink along it. 

Then I cut a Mandala shape out of parchment and added it off centre to the card front..

The flowers are from Altenew and are some from the monthly subscription kit Project Life, called Hello Beautiful.

There are so many ways that this kit can be used and I am happy that I subscribed to it each month.

 I will be using this one a lot more, colouring my flowers in different mediums.

Altogether I think this is a pretty card and it was so easy to make. 

The background is unique and just a simple swipe of the ink pad. Then just allow it to dry blotchy for a novel look.

More tomorrow .
..
Hugs xx

October 11, 2021

TwoFer

Hi Everybody,

Don't you just love getting a Twofer whenever you are card making. And in case you don't know what that is it means two cards for the price of one.!!!

These two card where just such an event and yet they look totally different. 

Each uses the same dies and embossing folder. The same inks and both are 5x7"  cards with the fold at the top

So let me tell you what I did to get these looks.

 First I created the base cards and a white mat to go on top.

For this white mat I inked up the debossed side of my embossing folder and ran it through the machine to add the pink spots to my card panel.

(This  Spotty Embossing Folder is one that will be in a new collection coming soon, and I love it) 

I used the upper and lower case from the Alphabet sets and cut out the word YOU into the centre of this panel and put the actual  spotty words to one side. Add this to the base card

Cut the same word several times from white card and stack them up. I coloured the top letters with pink ink.

The flowers  and leaves where stamped and cut lots of times to give me as many as I needed, and some of them I coloured with markers. The others I placed to one side for now.

I added the coloured word into the cut out word on my panel and arranged the flower and leaves around it and to the centre of the flowers I added small wooden buttons, and dotted the rest of the panel with pink pearls

I added Glossy Accents to the word YOU and left it over night to dry

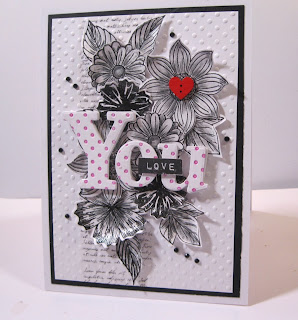
For this card I embossed my spotty panel and added it to some black card and then onto my base card.

These flowers have been coloured with an ordinary pencil and I used a paper stump to smooth it out. They have been added to the embossed layer with glue and foam pads

The spotty letters  have been layered onto more white ones to add dimension and added to the top of the flowers. 

I dotted some black pearls around this cards and the little red heart just adds the finishing touch.

The little sub sentiments for both cards are from Altenews Label Love

I really love the look of both of these cards and there was no waste from making them either. 
So a win win situation 

More tomorrow ...

Hugs xx

September 21, 2021

Slimline & Altenew

Altenew Just Jasmine 

 Hi Everybody,

This beautiful set is from Altenew and I bought mine from Craft Stash. when they had the set on special offer. It consists of a stencil, dies and a stamp set to give you this lovely Just Jasmine Flower.

I added my design to a slimline card and used a pink mat to pick out the colour in the flowers, and the result is very pleasing. I am a big fan of Altenew and always ready for a bargain from them. 

Layering stencils are so good especially if you are not a fan of colouring yourself. They make things so much easier for you as all you need to do is add the steps from the guide that comes with them. 

Altenew Bitterroot Flower


This is another set from Altenew and this is the Bitterroot Flower, and in this set I have got the stencil and the dies.

I never tire of flowers as I think they are such a beautiful addition to any card and you can colour them any shade you wish as they are your flowers.

This is a 6x6 card but the effect is just as good.

Tomorrow I have another style of colouring to show you and I will show you some of the cards I have made

More tomorrow ...

Hugs xx 

September 15, 2021

Altenew Project Kit

Hi Everybody,

I have decided to treat myself, on a monthly basis, to the beautiful  Create Your Life Kits from Altenew.
I saw these being shown on YouTube and I thought the kits where absolutely fabulous.

 So I toyed around with the idea and then I took the plunge and went for the monthly subscription.

 That was the best way to save a little cash as they are discounted by $10 if you take out the subscription. The shipping to the UK makes the price go up but I am still happy with the products. 

These featured cards are from the first kit and this is Seasonal Blooms. There is a large stamp set. co-ordinating dies, stencils and a 3-D embossing folder

The shaped card is the first one I made with the set and I used the  stamp as it was and just die cut it out.

I turned the die cut onto its side and made a side opening card. I used the die again to cut out the front of the card to match. This is a 6x6 card

I am very happy with the way it turned out, and it spurred me on to make some more in different colours.

For this card I have cut the stamped design up and added it to an embossed panel with foam tape. 

From that cut up stamping I made three other cards, using the 3-D folder to create the extra background. 

I added some flat backed pearls for extra decoration and the sentiment is from Card Making Magic

This card is an A2 size card which is 41/4 x 51/2 

The main bloom is a Sun Flowers but who says I have to colour it yellow.

Your flowers can be any colour you wish whatever die and stamps you are using. 

But I went with the yellow sunflowers for this card.

Once again I cut the stamped image up and added them with foam pads to different areas of the card front. 

You can get a lot of use from one stamp set by simply cutting it up and using parts of it, or all of it in different areas.

I used a different embossing folder for this one and this is 5x7 card

I will show you some cards when I use the next kit that I already have and the new one that was out on Sunday is on its way to me and I will be sure to sho you some of those too.

More tomorrow ...

Hugs xx
August 12, 2021

Altenew Flowers


 Hi Everybody,

These beautiful flowers are the Bitterroot Stencil and Die Set  from Altenew and I think it is lovely. I have really enjoyed playing with this combination and the stencil is perfect if you don't like to colour the images your self.

It is a layering stencil and comes in three parts. It was a little confusing to start but I watched a tutorial on YouTube about this one and it all became clear after that.

The die cuts out  two  flowers and two buds all in one pass and additional flowers can be added if you prefer. 

You can of course alter the design of the flowers any way you wish by adding in more or leaving some out, and then adding the leaves around the display as you like. 

Experiment with the stencil and see what you can come up with and it is far quicker than getting out your pens or water colours to make your card. 

So tomorrow sees us back to the Friday Freebie again and I hope you will take part by adding your comment and leaving your FULL NAME.

It's nice to be back 

More tomorrow ...

Hugs xx