Beautiful Card Designs Made Easy

August 30, 2024

Friday Freebie - Spellbinders Set 4

 Hi Everybody,

This is the last of the Spellbinders sets that I have on offer and this is set 4.

It is a matching die and stamp set along with beautiful Rosette Wall embossing folder that is sure to make some lovely backgrounds for you designs.

Last weeks offer has not been claimed and so I will add it again later on and hope that it goes next time.

But if you would like this set then all you need to do is leave me a comment at the end of the post with your 

FULL NAME

From those comments one name will be chosen and announced in a blog post over the weekend so it is up to you to come back and check if your name is shown as I have no way of letting you know if you are the winner.

I am happy to send this to you where ever you are and it doesn't matter if you have won before.

More tomorrow ...

Hugs xx

August 29, 2024

Parchment & Marker Pens

 Hi Everybody,

I know that not everybody has alcohol ink refills  but most of us have alcohol pens of many different brands.

But is doesn't matter whcih brand you have this look can be achieved with any of them.

I also use Isopropyl Alcohol as it is a lot ... and I mean a LOT... cheaper than blending solution and the effect is not that much different.

Try to get the higher percentage if you can as it will work much better that the lower one. I used 99.9% and it wouldn't go any lower than 91%.

I got a one litre bottle from Amazon and it is not expensive and will last you for ages.

I have shown other videos in the past where I have used it to Colour Ribbons and Flowers 

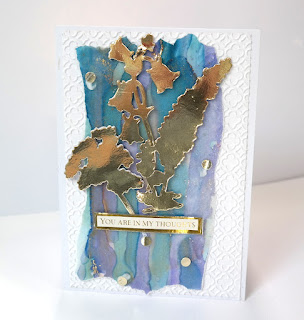
The card to the left has been done with the pens as shown in the video but I have used lots of coloured pens to produce the dots around the sentiment.

It just gives another look to the end result and I quite like it too. You can of course leave it off if you prefer. 

The video is a little longer than usual but I hope you enjoy it anyway.

Parchment & Marker Pens

Clicking the YouTube links will open  new windows in for you to view the videos listed but please come back here when you are finished.


I  have really have had a good time playing with Parchment and using it in lots of different ways.

For the card to the right I was inspired by a tortoiseshell brush that I have in my bedroom and I picked out the colours as close to it as I could.

It is the same style as the green one done in the video,  and I like both of them .

More tomorrow ...

Hugs xx

August 28, 2024

Parchment Scraps

 Hi Everybody,

Playing with the parchment over the last few weeks has produced quite a bit of left over pieces and so this was one way to put them to good use.

I added them to some white card to give them strength and then I cut them down into banner strips, of varying widths and lengths,  with a little fish tail at the end of them. 

For this top card I layered them on to an embossed panel with foam tape in between each banner and I mixed up the colours so that each one would be on a different colour.

I dotted small dots around the front and they are created from the hole punch and gold card, and I added the video for that a few weeks ago.

They do look very effective on my card. and these strip have been added vertically on my design  

On the card to the left I followed the same process but dressed this card in silver and added these strips horizontally to the embossed panel

The butterflies have been backed on to parchment  and the wings curved up a little to give movement

Just by playing I have created some lovely cards from bits of  parchment  that would otherwise have been wasted.

And had some fun in the process.

More tomorrow ...

Hugs xx


August 27, 2024

Parchment Panels

 Hi Everybody,

In the video yesterday with
I made quite a few backgrounds and rather than waste them I have turned them into cards.

This is the parchment done with the Sunray Stencil and some blue and lilac inks and the result is really very pretty and subtle.

This one is done by taking the ink onto the parchment once the stencil has been removed and so gives a positive image.

I have added gold embellishments to the front of the card, and both the sentiment and the butterfly have got more parchment behind them. 

The finished card us a 6x6 with the fold at the top as I think a card stands better when done this way.

The card to the left is also a 6x6 and this was done by rubbing the inks onto the parchment through the stencil and so taking the negative colour onto it.

Both show the Sunray stencil but in completely different ways, and each is as pretty as the other.

For this one I have added a silver die cut that was already on my desktop and added it with a large grey flower to the front of my card, and I turned this one into a Birthday Card.

Have fun with your parchment and use any of the ideas that I have added to the blog pages over the last few weeks.

It is a lovely material to work with and it is nit expensive but gives impressive results.

More tomorrow ...

Hugs xx

August 26, 2024

Parchment & Alcohol Inks

 Hi Everybody,

Today I am adding the video that I mentioned last week and this one is using the parchment with some alcohol inks that I have had for some time and never used.

Mainly because I was intimidated by them, but now it's time to put my brave face on and have a go with them.

There are lots of good tutorials on YouTube with these inks and I have watched loads.

 This is my effort with them and the first time they have been out since I did the Yupo Paper Videos ages ago. 

Parchment & Alcohol Inks 

I hope you enjoy this video and it is part of the Parchment Ideas playlist on YouTube.

I have to say I have enjoyed playing with them and I intend to do more,  but I want to incorporate the Gelli Plate with them too and see what looks I can achieve there. 

You can use the refills for alcohol pens or simply scribble the pens onto the parchment and then spread the colour around with the Isopropyl for a blended look.

More tomorrow ...

Hugs xx