Beautiful Card Designs Made Easy

January 30, 2013

Jewel Box Saga ... Finished

Hi Everybody,

Here is the finished Jewel Box and I am so pleased with the result. It is going to go on the dressing table in my guest room and I will look at it and think ... "I did that..."

Click to Enlarge

And for those of you who have thrown similar boxes away ... shame on you.!!!   

You'll be going to car boots in the summer now looking for another ... I know I will.

This is what I have done to finish my box ...


Once the varnish was dry I put it all back together so that I could see where I wanted to add my embellishments

You can see that the interior has been stained a beautiful shade of blue and I have added white lace to the sides of the doors and the drawers.

I have put back all the original hinges,  knobs and handles and only replaced the broken hinges to the lid.

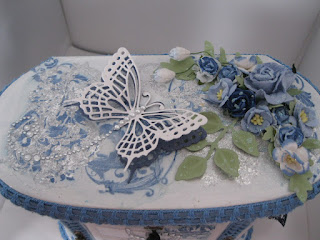
On the lid I stamped the same swirl and then added silver Gilding Flakes.

The Corsage on the right consists of Spellbinders Foliage leaves and a mixture of flowers from
The large butterfly is a Marianne Creatables and I have added a Diamante strip to the body and for the butterfly trail

This is the right hand side of the jewel box and I have used Spellbinders Les Papillion butterflies and done the same thing to each of them.

Around the edge of each door, along the top of the lid and along the bottom edge I have added in some matching blue trim.

I added it under the door fastenings to make it look neater. 


 The left side has been treated the same way ... and using Diamante for the trails.

The braided trim can be seen clearly around the edges.

I found the little navy blue tassel in my "Stash"  and couldn't resist hanging it from the top knob.
On the drawer fronts I have added in a large  Diamante Frilly Flourish from Want2Scrap

I simply stuck it in place and then used a craft knife to separate the gemstones so that the drawers would open.  

That way the pattern stays in line and all I needed to do was tidy up any tiny gaps.

It looks much better in real life.

 Although a photo is a brilliant concept it can never portray the real beauty of something.


I don't mean to sound conceited but I really am proud of this little work of art.


So there is the finished Jewel Box.

And for the lady on YouTube ... who left me the comment saying that she thinks  I add too much "Bling" to my designs ...Well look away now 'coz this is serious overload ...

It will surely offend her sense of keeping it simple ... but I love it !


 And not to leave the back plain I have also decorated that too.

I have cut some trellis and a butterfly and added them along with some leaves and flowers into the recessed panel that was at the back.

The braided trim can be seen along the back panels too.

And to go a step further I have even glittered up all the flowers with Glamour Dust.

Thank you for your interest in this project and for leaving me your comments ... it is much appreciated.

Got to find another jewel box now and start again ... and although I didn't film this one ...  I promise I will for the next .... soreeeeeee !!

Hugs xx


January 29, 2013

Jewel Box Saga ...Pt 4

Hi Everybody,

In the last stage I added all the patterns that I wanted on my jewel box and left it to dry.

Although not shown in the photo I have repeated the process on the two side doors and the lid.

Today I have been back to it and given everything a coat of clear satin finish varnish  and then left it to dry again.

That will protect everything from some wear and tear.

Tomorrow I will put it all back together and add all the "Bling" that I want to add.

So while I am waiting for it to dry I have been busy making some butterflies from flower petals, lace and beads.

They are about 7cms long but they are much prettier in real life than they look on the photo.

I can add these to cards or any project where a butterfly is needed.

This one has white feather added to the back of it and one small rosebud in the centre.

I have curled the antennae from some silver wire, and cut up a small piece of lace that I had in my stash.

It is a good way to use up all your odds and ends and here is a tutorial on how I got the look.

Making Butterflies  is the written instructions but I will have a video out soon.

Click to Enlarge all the photos
This one has the addition of a little sparkle to the wings and i think they look very pretty.

More on the jewel box saga tomorrow.

Hugs xx

January 28, 2013

Another Altered Art Project

Hi Everybody,

This is another Altered Art project and this is for my daughter ...(the one throwing away the jewel box ... how could she???)

Click to Enlarge the photos
She has an empty box that had some hair straighteners in it and because it was quite a large  she wants it  for storage in her bedroom.


This is what I have done to it and I hope she will like it when she gets it back.

I have kept it pink as the box itself  was in good condition.

But I have got the Spellbinders to work on the top of it in several layers.

The Spellbinders used will be  BOLD so that you will know what has been used.


I have added a base of Snow White Centura Pearl from Crafters Companion  to the lid.

I cut it with a fancy edge to be just a little smaller than the pink lid ... so that  it leaves a narrow border.

Then I have cut two of the Romantic Ovals in a matching pink card and laid them to cover the top.


I cut the Second smallest of the Grand  Decorative Ovals  in  the white and added it with foam pads.

Then a layer of  a plain oval in pink with the largest die from the Floral Ovals layered on top of that.

The Fancy Tags 3 has been cut in pink and white and layered to give a shadow effect and then the matching Pearls from Want2Scrap  are added.

I have used some beautiful pink flowers from Wild Orchid Crafts  and added Glamour Dust to the petals for extra sparkle.


The Decorative Hatpin  and the pins are from the Sparkles Group and if you add in the code CGDIS5  you will get an automatic discount at the checkout.

On the right hand side I have made a butterfly and used some more pearls to create the butterfly trail.

Small pearls have been added to the corners  and I think that this is a very pretty  addition to any bodies dressing table.

Hugs xx

January 27, 2013

Jewel Box Saga ... Pt 3

Hi Everybody,

Well this time the Give Away went off with out a hitch and both winners have claimed their prizes.  I am so pleased and I hope you will let us know how you find them .... honestly ... before we start to sell them

As for the Jewel Box ... well here we are with an update on it's progress.

So  far it has had two coats of white Acrylic inside and out and it looks much better.

The inner lining is a plush kind of material and so I followed Colleens'  advice and sprayed the material with some fabric paint.  (Thank you)

It's not perfect but it is better than the stained and faded beige that it was before.

It is a lovely rich blue and then once it was dry I glued some white lace around the edges.

I used the same technique that I used for the Miniature Dress Form  with the stamps and tissues and the video will show you how I got the look.


To make sure that I got the Flourishes pattern to position correctly I held the three loose drawers together with an elastic band.


I applied the "Slap It On" and  laid the tissue on top and pressed it in shape around the curves to the drawers.

Don't try to cut the tissue while it is wet ... leave it to dry and then with your craft knife carefully run it between the drawers to separate them.
I did the  same to the rest of the jewel box, back and front using the  Bubbles stamp  from  IndigoBlu

Then it time to step back and let it all dry before going any further.


Hope you like it so far ....

Hugs xx

January 26, 2013

Two Winners ...

Hi Everybody,

Today the names for the Blenders has been drawn randomly by InLinkz and as promised we have two lucky people to win this super useful tool.

I hope both winners will enjoy using them and that they will let us know how they get on with them.

Both ladies have been notified by email of their win.

And you both need to send me your snail mail address so that I can get your prizes in the post.


Email me:- christina@card-making-magic.com

So who I hear you asking has won ????

Congratulations ....The winners are ....


Carol Parker  and  Marion  Hinchcliffe


You will receive five Blenders complete with Foam Pads for Water Based Inks and Five Felt Pads for use with Alcohol Inks

More to Come ...

This week has seen us working really hard on producing more of these Blenders to sell.

Please remember that we are not some mass producing company out to make a huge profit .... No it's just my "Film Crew" and I working in a drafty garage trying to give you the best tools we can for the the best price.

 They are all hand cut and sanded by  Griff and the handles are screwed on so as to give you good service...  The last thing you want is for one of these to fall off as you are working with them.   So they are very well made.

And then the rest of the production is down to me and I finish them off ... add the foam ... and pack them up. And we have quite a few packs ready to go very soon.

So to keep the cost really good Griff has modified the handle on them.   They have been trialed and they are very easy to use.

You will still get five in a pack ... complete with a foam pad on each one to use with Water Based Inks.

I am also including five felt pads so that you can interchange them as you need and use them with Alcohol Inks.

As soon as they are available I will give you the link to the shop page .... and keep my fingers crossed that you will buy.

Hugs xx