Beautiful Card Designs Made Easy

February 02, 2013

Challenge Time ...

Hi Everybody,

It's that time again for another challenge over at Paper Creators  and this time the theme is for Circular Easel Cards.

These are very easy to make  from the Easel Kits and the one I have done is edged with a scalloped frame from Spellbinders.

I have decoupaged the layers to the birds using Pinflair Glue Gel to give it some height.

The  flowers around the edge match the flowers in the topper and they are from Wild Orchid Crafts 

They are a mixture of roses, cherry blossoms, and small daisy like flowers and all have been glittered up with Glamour Dust.

The Pearl flourish is from Want2Scrap

The stopper for the Easel is created from one of the sentiments on the sheet and it says "You are my favorite Chick"

Why not pop over to Paper Creators and join in the challenge. You could win £10 to spend on some of the "Goodies" from the shop.

Hugs xx

February 01, 2013

A Baby Girl ...

Hi Everybody,

Click to Enlarge
I have made this card today for a friend who has just had a baby girl.   I can't resist  baby cards especially  for  girls when  I can go to  town with the  ...  Flowers, Ribbons and Pearls.


This  is right up  my street and I really enjoy making this type  of card.

So here is my card to  welcome the  new baby.

I have made it to a book style and I have used the Grand Labels 4

I have cut a page from each of the four largest dies all in different card... and another layer of lace in between the fourth and third layers.
The cream card has baby feet embossed into it.

The other layers have also been embossed and a double layer of pink and white braiding has been added to the centre.

The pink bow at the top has a small pearl heart buckle and the charm is a baby shoe in silver.

The flowers from Wild Orchid Crafts  are a mixture of  Roses, Cherry Blossoms, Carnations and Tulips and all have been glittered with Glamour Dust.

The leaves have been cut from the Foliage set from  Spellbinders.

The Butterflies  I have used are Organza with glitter on the wings .... very pretty.

I have added the flower corsage to a Labels 20 shape and used the matching pearl   "Bling"  from Want2Scrap

I have also added the babys' name and birth date to the same kind of label and added in the pearls again.

I have made a card stand in cream to display it ... and of course it has to have matching box.

The box lid also has the baby feet embossed into it.

If you want to make a box to match your cards you will find the instructions in the tutorial
Making Boxes


Hope you like ....

Hugs xx

January 31, 2013

A small request please ...

Hi Everybody,

A little while ago I told you about a company that sells "Close Out"  Spellbinders for a really good price.

Well they have now just started a Facebook page which will show you all the new Spellbinders ... as they come in ... so that you will be the first to know of what's on offer.

Scott ( the owner) is going to update the page regularly to keep you all up to date.

He is trying to get  to 1,000  likes in the next few months and I wondered if you would pop over there and see what he has .... click the "Like"  button and make it happen sooner for him.... especially if you have bought dies in the past.

Save On Hobbies   is the website and over the next few days he has some news Spellbinders coming in ... so keep on visiting and then you won't miss them because as they are "Close Outs" once they are gone they are gone.

Hugs xx

January 30, 2013

Jewel Box Saga ... Finished

Hi Everybody,

Here is the finished Jewel Box and I am so pleased with the result. It is going to go on the dressing table in my guest room and I will look at it and think ... "I did that..."

Click to Enlarge

And for those of you who have thrown similar boxes away ... shame on you.!!!   

You'll be going to car boots in the summer now looking for another ... I know I will.

This is what I have done to finish my box ...


Once the varnish was dry I put it all back together so that I could see where I wanted to add my embellishments

You can see that the interior has been stained a beautiful shade of blue and I have added white lace to the sides of the doors and the drawers.

I have put back all the original hinges,  knobs and handles and only replaced the broken hinges to the lid.

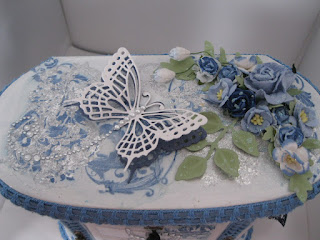
On the lid I stamped the same swirl and then added silver Gilding Flakes.

The Corsage on the right consists of Spellbinders Foliage leaves and a mixture of flowers from
The large butterfly is a Marianne Creatables and I have added a Diamante strip to the body and for the butterfly trail

This is the right hand side of the jewel box and I have used Spellbinders Les Papillion butterflies and done the same thing to each of them.

Around the edge of each door, along the top of the lid and along the bottom edge I have added in some matching blue trim.

I added it under the door fastenings to make it look neater. 


 The left side has been treated the same way ... and using Diamante for the trails.

The braided trim can be seen clearly around the edges.

I found the little navy blue tassel in my "Stash"  and couldn't resist hanging it from the top knob.
On the drawer fronts I have added in a large  Diamante Frilly Flourish from Want2Scrap

I simply stuck it in place and then used a craft knife to separate the gemstones so that the drawers would open.  

That way the pattern stays in line and all I needed to do was tidy up any tiny gaps.

It looks much better in real life.

 Although a photo is a brilliant concept it can never portray the real beauty of something.


I don't mean to sound conceited but I really am proud of this little work of art.


So there is the finished Jewel Box.

And for the lady on YouTube ... who left me the comment saying that she thinks  I add too much "Bling" to my designs ...Well look away now 'coz this is serious overload ...

It will surely offend her sense of keeping it simple ... but I love it !


 And not to leave the back plain I have also decorated that too.

I have cut some trellis and a butterfly and added them along with some leaves and flowers into the recessed panel that was at the back.

The braided trim can be seen along the back panels too.

And to go a step further I have even glittered up all the flowers with Glamour Dust.

Thank you for your interest in this project and for leaving me your comments ... it is much appreciated.

Got to find another jewel box now and start again ... and although I didn't film this one ...  I promise I will for the next .... soreeeeeee !!

Hugs xx


January 29, 2013

Jewel Box Saga ...Pt 4

Hi Everybody,

In the last stage I added all the patterns that I wanted on my jewel box and left it to dry.

Although not shown in the photo I have repeated the process on the two side doors and the lid.

Today I have been back to it and given everything a coat of clear satin finish varnish  and then left it to dry again.

That will protect everything from some wear and tear.

Tomorrow I will put it all back together and add all the "Bling" that I want to add.

So while I am waiting for it to dry I have been busy making some butterflies from flower petals, lace and beads.

They are about 7cms long but they are much prettier in real life than they look on the photo.

I can add these to cards or any project where a butterfly is needed.

This one has white feather added to the back of it and one small rosebud in the centre.

I have curled the antennae from some silver wire, and cut up a small piece of lace that I had in my stash.

It is a good way to use up all your odds and ends and here is a tutorial on how I got the look.

Making Butterflies  is the written instructions but I will have a video out soon.

Click to Enlarge all the photos
This one has the addition of a little sparkle to the wings and i think they look very pretty.

More on the jewel box saga tomorrow.

Hugs xx