Todays pretty blue card is created with the romantic Rose from Spellbinders and it makes the loveliest of cards for all your female friends. I have created mine in two shades of pastel blue but it would look good in any colour that you choose.
It is a simple layered card ... quick and easy to put together for any occasion.
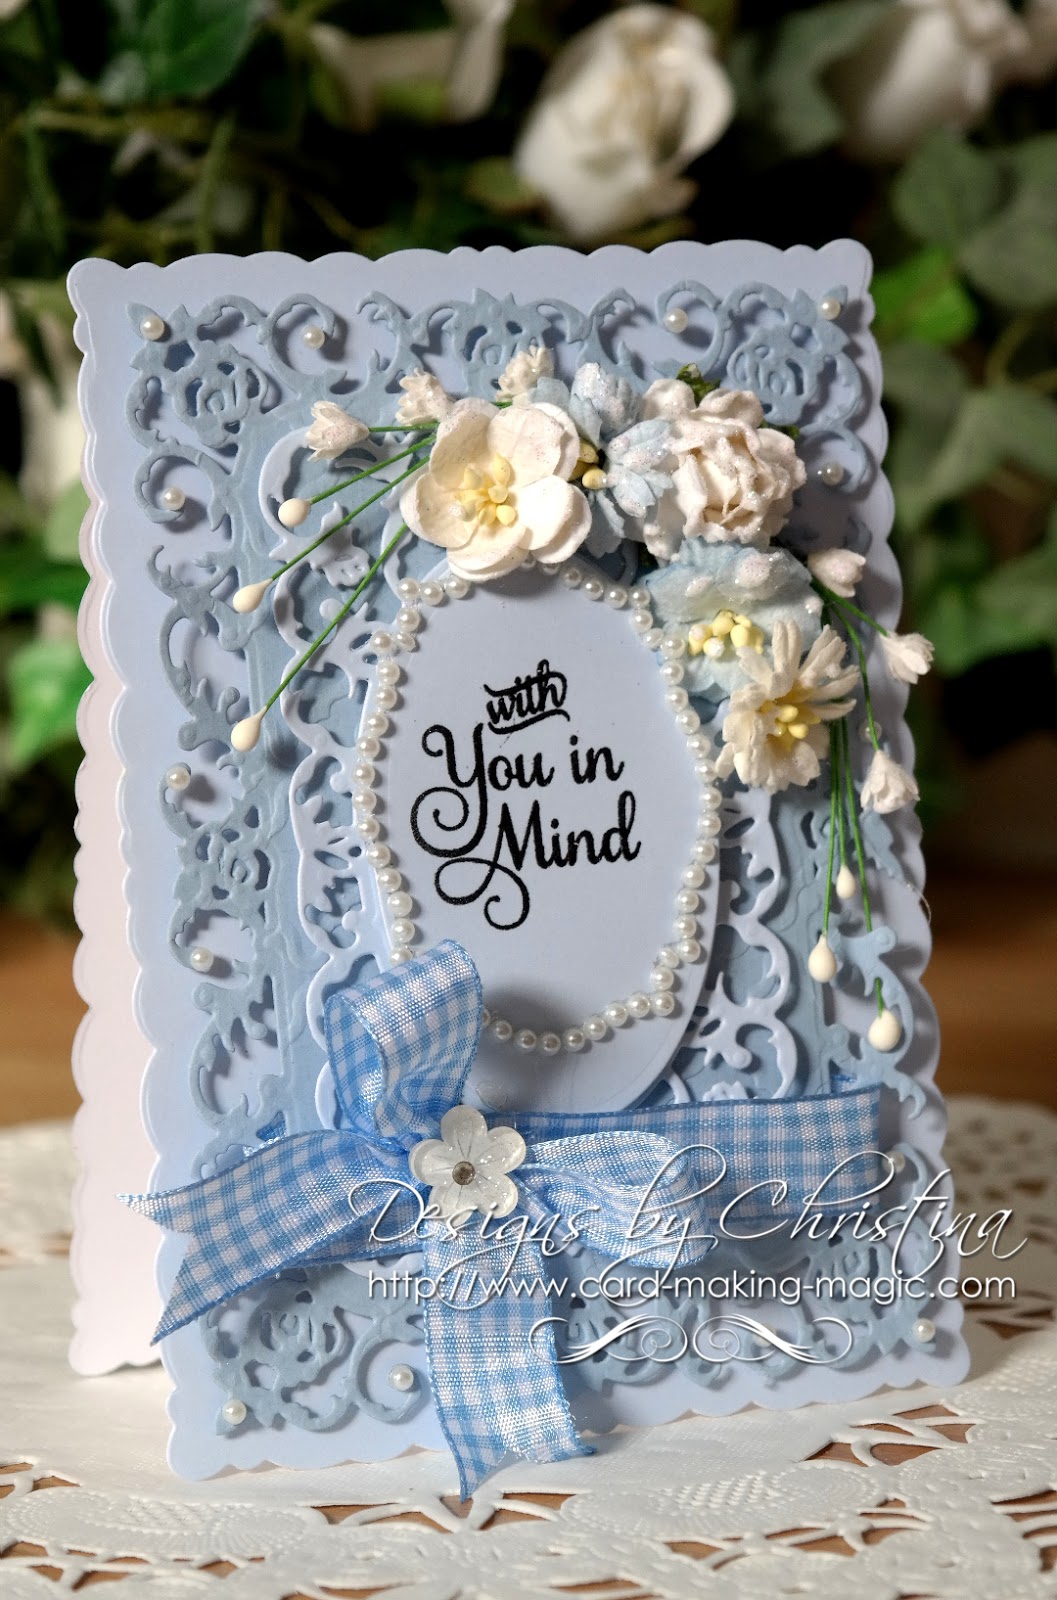
Other Supplies:
- Want2Scrap - pearls
- Mei Flower - ribbon
- Glitter Magic - fine glitter
- Wild Orchid Crafts - Flowers
- JustRite Stampers - Family Sentiments
- Papermill Direct for 240 gsm Card
Instructions:

From die #3 cut two panels to make the base card from pale blue card (die #1 is always the smallest)

Take one of these panels and score and fold it on the short side by about an inch. Add glue to the folded edge and glue the two together along this edge only.
This will create an "A" frame leaving the rest of the card open for it to stand ... as your base card.
Make sure that the correct side of the card is on the outside

From #2 and some darker blue card I have cut one panel and from the same base card and die #1 I have cut another smaller panel

Layer the two together with foam pads between the layers and wrap with ribbon before adding to the base card

Have a dry run with flowers and bows to see where you like them and when you are happy with the arrangement glue them in place.
I use a hot glue gun but be careful as they get very hot and will burn your skin if you drop the glue onto it ... How do I know this ????
Heat emboss your sentiment and cut with the oval and add with foam pads to the front of the card.
Glitter the flowers and decorate with pearls for a really pretty effect to your designs.
More tomorrow ...
Hugs xx
Oh so feminine and sweet! Lovely layers and pretty flowers. Another beautiful card.
ReplyDeleteTruly beautiful - more like the cards we are used to.
ReplyDeleteChristina that is such a pretty card, I just love it!!!
ReplyDeletehugs
Lyn
xxx
Gorgeous card and in my favourite colour too! Debra x
ReplyDeleteMorning Christina, absolutely gorgeous I just love your cards they are always so feminine with lots of beautiful flowers.
ReplyDeleteNancyd xx
Gorgeous card, really pretty.
ReplyDeleteMichele
Oh Christina i am in love with todays card, so so delicate , just gorgeous and gorgeous and beautiful style and colors .Thank you for the Tutorial . { can i ask you please what Card stock do you use ? }
ReplyDeleteHave a lovely day
Elaine H X
Gorgeous card , love the frame dies.
ReplyDeleteoh my gosh this card is breathtaking . the color is so delicate. xx
ReplyDeleteMorning Christina,
ReplyDeleteA very pretty card. Thanks for the tutorial.
Lydia
X
Thank you for making this tutorial. It's a beautiul card!
ReplyDeleteHi Christina,
ReplyDeleteA really pretty card, lovely shad of blue.
Di B. x
Hi i agree stunning card and love the colour too.
ReplyDeleteMarion H
beautiful card. Great tutorial. xxx
ReplyDeleteLovely card as usual Christina, I realy like the romantic rose, oh dear another die to treat myself too,thanks Ann
ReplyDeleteHi Christina,
ReplyDeleteWhat a beautiful card. I love the die set you used (another for my wish list lol). The two-tone blue is very effective. I can certainly attest to how hot the glue gun gets, my thumb is still healing up from the dollop of hot glue that landed on it instead of the card a couple of weeks ago lol.
Bx
Always lovely.
ReplyDeleteHi christina, a gorgeous card today right up my street going to get that die I love it.
ReplyDeleteKind regards
Anne Owens
Beautiful card. I love the Romantic Rose die!
ReplyDeleteGood Morning Christina :) Beautiful, Sweet, Feminine Card this morning! Absolutely Love it! Thank you for the wonderful tutorial and introducing this die. I had not seen this one before that I recall. Enjoy a most lovely day. Big Hugs.
ReplyDeleteHi Christina
ReplyDeleteA lovely card today. I'm not to sure how the base was put together though as on the tutorial I originally saw you attached the two pieces together using a piece of card folded over and glued the two base pieces onto that.
I have amended the instructions to tell you exactly how to make this base card. The other tutorial shows you yet another way to put a card together but the method on the card above is easier and doesn't require the hinge mechanism
DeleteAnother card to drool over! I think this type of card is one of the nicest that you can give. Thank you Dorothy
ReplyDeleteGreat looking card....I love the fancy background and the placement of the flowers...tfs
ReplyDeletewell done Christina
Thats realy very pretty xx
ReplyDeleteLOVE this!! All of the bits and bobs added to it are fantabulous!!! TFS!
ReplyDeleteBeautifully, the bow, the flowers, the ribbon , and the dies make a stunning card. Thank you for the tutorials. ~blessings
ReplyDeleteGood morning Christina, a lovely card today. I think I have the die for this card, if not a similar one so I will give it a try. Mother's birthday is in February and this looks just perfect. Thanks for the tutorial. Dianne Crowe
ReplyDeleteBeautiful! Love the colours.
ReplyDeleteLove this card. The frilly-ness of the dies, the colors you chose, the additions of ribbon, flowers, and especially the pearls all come together to make a beautiful card.
ReplyDeleteBeautiful card Christina and thank you for the tutorial.
ReplyDeleteTruly beautiful card Christina. Just love the dies you've chosen. Thank you for the tutorial - you do spoil us!
ReplyDeleteHi Christina
ReplyDeleteThanks for the tutorial and what a very pretty card. I have this die and I must agree it makes some lovely cards
Love and best wishes
Jenny C xxx
Hi Christins, such a beautiful card, I love the shades of blue you have used.
ReplyDeleteRegards Liz
Stunning design and colour
ReplyDeleteHi Christina, really pretty card an I love it in the blue shades, great tutorial thank you. Take Care Melody xXx
ReplyDeleteOh my gosh, I love this card. It looks like it took so much time to make!
ReplyDeleteHi have just found your blog. A big thank you for all the information you provide for each card. I have made some cards but never quiet know what products to use. So buy dies and stuff and then don't really know how to get the most from them. So have a random selection of stuff. So thank you for giving me guidance on what to buy and ideas how to use them.
ReplyDelete