Beautiful Card Designs Made Easy

December 31, 2014

Casual Santa ...

HO HO HO !!

This is Santa here just to say "Bye" for this year as my work is done.

All you good little boys and girls will have got your gifts and now it's time for me to head off back to the North Pole. 


I just had a few little repairs to make to the sleigh and then the reindeers will be able to take us home.


Christina took this picture of me while I was busy mending the sleigh ... not my usual attire but the red suit is for special days.


Mrs Santa will be waiting with a nice roast dinner and the red suit can be washed and ironed ready for next year.

The Elves will also get some time off  ... until they have to start making next years toys.


Be good and take care ...

Santa  xx

~~~~~~~~~~~~~~~~~~~~~~~~~~~~~~~~~~~~~~~~~~

Footnote from Christina

The image is from Just Inklined and I thought it would make a really good Santa out of his normal outfit. He has been colored with Spectrum Noir and his glasses are Glossy Accents.  I have even smudged a little black on his skin to look dirty.

Colors used ...

FS2 FS3 IG2 IG3 IG6 TN2 TN4 EB4 TB6 TB7   Blender pen

P.S.   Thank you for entering into the spirit of todays card and especially to Elaine who wrote this lovely reply to Santa and I hope she won't mind me adding it here:

Dear Santa 
Thank you so much for all your hard work 
All the Little Boys and Girls are so happy with the New Gifts they have
You did a grand job .

I hope the repairs to your sleigh are not too major 
and you have a good journey back to the North Pole 
then the reindeer can have a good long rest .

Mrs Clause will be so pleased to see you 
back home and will spoil you 
with good hot dinners 
after traveling all over the world .

Christina has taken a very good Picture of you 
( she has a new camera you know and has been practicing , isn't she doing well ? )
it is nice to see you without your splendid red suit 
but to be honest i would have known your lovely face anywhere .

Anyway Santa 
I just want to wish you and yours a very Happy New Year .

Take Care 
Elaine H X


December 30, 2014

So pleased ...

Hi Everybody,

On Christmas Day I had all my family around at my house for dinner and a very jolly affair it was too. One by one they all arrived ..  laden with gifts to be exchanged.  It was full of loud chatter and much laughter.

Griff bought himself a Christmas sweater with a big Snowman on the front ... but my youngest daughter out did him by wearing a sweater that had lights in the Christmas tree that actually twinkled.

My youngest Grand daughter Robyn ... who is 21 ... couldn't wait to get through the door to tell me her good news.  Her boyfriend Jamie had proposed to her and  given her an engagement ring as part of her Christmas surprise.

They make a lovely couple and seem so happy together and everybody was really pleased at the news.

And today I have made this card for them in  Robyns' favorite color of deep purple.  Inside here is a little tag with their names and the date on it and I know she will love it.


More tomorrow ...

Hugs xx

December 29, 2014

My gift ...

Hi Everybody,

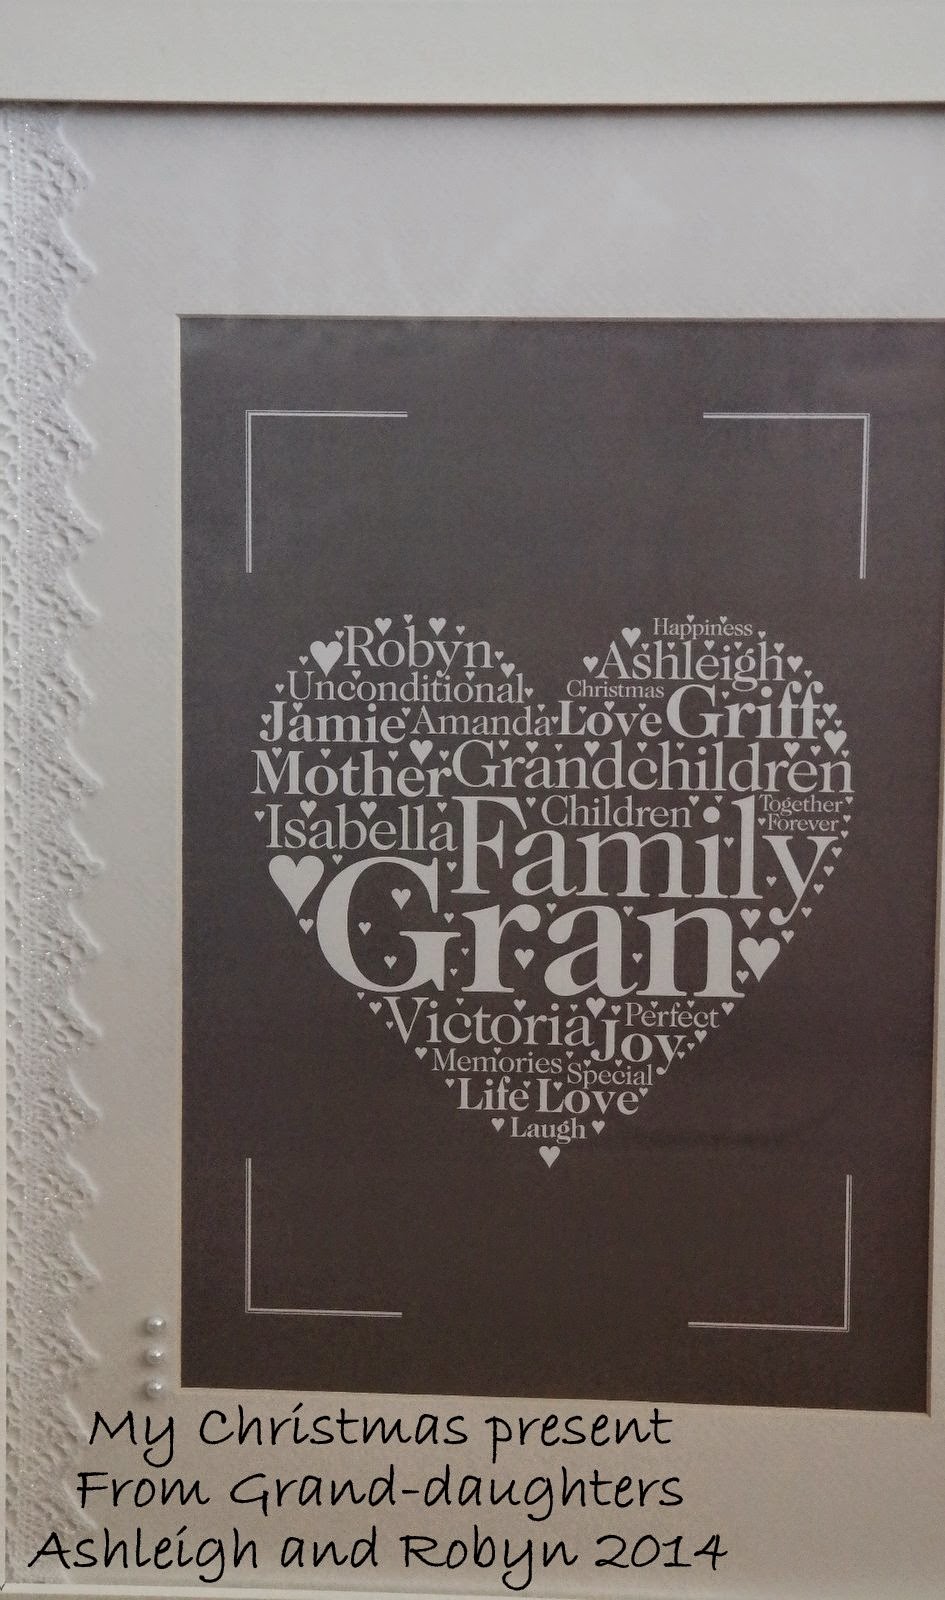
I had to show you this beautiful gift that my Grand-daughters give to me on Christmas Day

I was not allowed to open it until they where both with me and I was so touched by this lovely gift.

It is not a card but a large picture frame and it is created by Emma Ogden

She can be found on Facebook at Made by Emma Ogden

They had it specially made and have added all our family names to it.

This includes my husband Griff, my two daughters Amanda and Victoria, two grand-daughters Ashleigh and Robyn, one grandson Jamie and one great grand-daughter Isabella.

And I love it xx

This is Isabella playing with some of her gifts at my house.

Both of my daughters are in the photo and the one bending down is grand mother to Isabella.

We had a lovely time playing with her  and the keyboard was so much fun.

And I had quite forgotten how much mess one little girl can make ripping open presents.  She couldn't wait to get to the next one ... kids !!

More tomorrow ...

Hugs xx


December 28, 2014

Card Winner ...

Hi Everybody,

I hope you are all enjoying your Sunday.  I know that some of you are in deep snow and although it looks pretty it is not my favorite thing ... especially if you need to be going somewhere.  The UK seems to grind to a halt whenever we have snow.

Here in the North West it is cold ... but the sun is shining and the sky is blue

Because I was late adding the post for last weeks Friday Freebie I have allowed it to run on until today and this morning a name was chosen

The winner of the bright and sunny yellow card is ...

Ann Morris

so if you would email me 
christina@card-making-magic.com
your postal address as soon as you can I will get the card in the post to you straight away

I hope you will visit on New Years Day as there is going to be a really huge Blog Hop and the chance for you to win lots of  "Goodies" from the many designers and suppliers that are taking part in it.

It is a really nice way to show readers that they and their comments are very much appreciated and I have a lovely prize that will be on offer. 

You will be able to click links to go to other blogs and all you need to do is leave a comment.  You will find blogs that will become your favorites as you hop along ... but please come back to me as you do ... I don't want to lose any of you wonderful people 

More tomorrow...

Hugs xx


December 27, 2014

Made for me by Gracie and Margaret

Hi Everybody,

I have a little tutorial going "Live" today on the   Spellbinders Blog   so I hope you will pop over and take a look ... click the link on their page to expand the tutorial

Before the end of the year is with us I wanted to show you two more cards that have been made and sent to me by my readers.

All these cards are so special and I really do appreciate the time and care taken to make them for me.

The largest one in this photo was made by Grace and she is a lady who lives opposite me.  It is very pretty in silver and white.

It is layered with silver paper and a lovely silver bow has been added.


The smaller cards is a beautiful hand painted picture of Grasmere Church

It came to me with a little note to say that this water colour ... painted by Margaret ... was sent to me because Margaret doesn't feel that any of her cards are good enough.

I think it is beautiful and I have taken it from the card Margaret and I have a silver frame that I am going to add it too

It will be a permanent reminder that although we have never met you took the time to paint this and send it to me and I thank you very much.


And as final note to this post can I say to all you cardmakers out there in the world .... NEVER ever under estimate your own work ... it is all wonderful .

More tomorrow ...

Hugs xx

December 26, 2014

Friday Freebie 039

Hi Everybody,

This is the last Friday Freebie for 2014 and so I have chosen a lovely bright and cheerful one to remind us that spring is on the way.

The card is completed in a sunny yellow and white with an easy sentiment added for any occasion.

The die that I have used is the really beautiful Fleur de Elegance   from Spellbinders

I love this die as it is so versatile and quite large too.
I have added in Flowers  in various shades of yellow and they are from Wild Orchid Crafts

The satin Ribbons I have wrapped around the layers  adds  interest to the front

The Pearls that adorn my card is from Want2Scrap 


These three elements are items that I use on most of my cards and of course give me the title for my Blog ... Flowers, Ribbons and Pearls

So if you would like to win the last FF card for this year then all you need to do is leave me a comment at the end of the post.

As it is so late in the day that I have added this post  I will keep this offer open until Sunday morning and then I will announce the winner.

More tomorrow ...

Hugs xx

December 25, 2014

To Everybody ...


Whatever the season means to you I hope it is a good one xx

December 24, 2014

Made for me by Mary and Brenda

Hi Everybody,

Over the last few days I have shown you some cards that have been made FOR me and not by me. Because I make cards I find that at Birthdays and Christmas time people won't make and send me cards because they don't make them like I do.

It wouldn't do for us all to make cards the same and the simple fact that it is handmade by YOU makes it super special to those that you give them too. Give the cards that you make with love and be proud of them.

Earlier this year I started a Card Class in my own home and most Wednesdays we have met and made cards.  I regularly post on these pages the cards that my two lovely ladies make.

Here are the ones that they have made in their own homes and gave to me at the last class for this year.


So you can see that I have a beautiful collection of cards that are there for all who visit my house to see.  I will be keeping each and every one of them as "Keepsakes" and thank you for taking the time to make me these lovely cards.

More tomorrow ...

Hugs xx

December 23, 2014

Made for me by Kim and Jenny

Hi Everybody,

Today I would like to show the cards made and sent to me by two more ladies who regularly visit my pages and leave me comments or send me emails.

I am so grateful for the support that ALL of you give to me in all the places that you can find me ... Website ... Blog .. Pinterest ...  Etsy ... Facebook ... Twitter and of course with Spellbinders. I couldn't do this without you

So here are the cards sent to me from Kim and Jenny


The gold one is made by Kim.   Griff and I met Kim and her husband Mick a few years ago on a cruise ship holiday and we all got on quite well.  We have kept in touch since the holiday and have met up again  and  have plans for more visits in the  New Year.

Jenny made me the silver card and she visits my blog regularly.  We made arrangements to meet when Jenny came to Blackpool for a visit with her husband Jim.  It was lovely to meet her and she gave me the warmest hug when I met her it was as if we had known each other for ages.

Thank you ladies the cards are on top of the telly ...

More tomorrow ...

Hugs xx

December 22, 2014

Made for me by Maggie and Christine

Hi Everybody,

Over the past year I have made some pretty cards that have had some wonderful comments from all of you and they are very much appreciated.

You seem to have enjoyed the things I have posted and the videos that Griff and I have done... and we have many more planned for the coming New Year.

But over the next few days ... as we head towards Christmas Day  ... I would like to show you  the beautiful hand made cards that  some of my followers  have taken the time to make and send just for me


The red one is from Maggie, and I have her permission to show you the card she made for me and added my name to it.  It has beautiful Poinsettias on the front and she has used the Spellbinders to perfection. I have never met Maggie but she often leaves me  lovely comments and emails me.

The Blue one is from Christine and I have know her for the grand total of 46 years. We met in Woolworths in Helston when both our husbands where in the Navy at Culdrose. This card has been stamped and decorated with snowflakes and Fir trees.

Both of them are very special to me  and will take pride of place on top of my TV along with the other cards that I will show you over the coming days.

More tomorrow ...

Hugs xx

December 21, 2014

It's not Pink ...

Hi Everybody,

Todays card is a million miles away from pink but I like it just the same

I made a card in my favorite style with the Hinge   at the top and it is a 5x7 which is a lovely sized card to create.

Not small but not too big to be posted and will take a nice flower display too boot.

I layered this with cream card and a designer paper from Anna Griffin.

But the shade of green was a little too bright for me once I had added it and so I diffused it by adding a piece of embossed parchment over the top

I added large pearls to each corner to hide the glue dots holding the parchment in place.

I wrapped the blue ribbon around the layers from top to bottom for a change.

The large oval was cut from the cream and this beautiful die is the Fleur de Elegance   from Spellbinders Classic Collection .. and is one of my favorite sets to use.

I used the flowers from Wild Orchid Crafts  and they are a mixture of Roses, Cherry Blossom, Rose buds, Tulips  and Sweetheart blossom

The lovely verse is from  Clarity Stamp  and it has been stamped in green and clear embossed.

I have added in HatPin to complete the look and pushed it through the bow.

More tomorrow...

Hugs xx


December 20, 2014

Here I am ...

Hi Everybody,

Late start today because I have been watching Junior Master Chef on TV.  It was the final and the three finalists are amazing they way they can put food together.

It takes me all my time to cook a roast dinner and I would love to have been there to taste the beautiful meals they all came up with.  Phoebe was the winner but every one of them is very special.

So a name has been chosen and  the winner of the Gold card is YOU ...

Ann Lauzon

Can you send me your postal address please to 
christina@card-making-magic.com
and I will pop the card in the post to you straight away.

I hope you will like it when you get it and please let me know when it arrives with you

More tomorrow ...

Hugs xx 

December 19, 2014

Friday Freebie 038

Hi Everybody,

I am so sorry to disappoint you with the C&C shows but the cancellation really was out of my hands

However I will be sure to let you know when I am back again though I won't be there until next year now.

So here is the card for todays Friday Freebie and it is a lovely gold and white offering

I have used the new  Decorative Labels Thirty Nine  from the Spellbinders Classic Collection

It is such a pretty and ornate die and the possibilities are numerous

I have stamped the sentiment and embossed it in gold fine detail powder to blend with the card

The flowers are all white and from Wild Orchid Crafts

They are a mixture of Roses, Cosmos Daisies. and Cherry Blossoms and they have all been sparkled with Glitter Magic

If this is a card that you would like to win then all you need to do is  leave me a comment at the end of the post and if you are not already a follower then please join.

A winners name will be chosen and announced in tomorrows blog post so please come back and check if it is you.

You will have 48 hours to claim the card and I really hope the winner will like it once they get it home.

More tomorrow ...

Hugs xx


December 18, 2014

A Gilded Life ...

Hi Everybody,

This is a complete change for me and working with these bezels is something I have never done before I went on my trip to Spellbinders in Phoenix

We did a workshop with Stacey and these are what I made.

Now I know there are experts out there who will think they don't hit the mark ... but this is my first attempt and I was quite pleased.

They are the Chandelier and Heart  Bezels from Spellbinders   A Gilded Life  collection and I have added the link so that you can view some of the other products that are available.

The jewellery that can be made is fabulous and with practise you can make it too.... and better than I have done.

I added in some of the self adhesive strips from Want2Scrap  to add a little more adornment to my pieces and maybe I will wear one on Create and Craft today.


News Extra 

I am sorry to tell you that the Spellbinders shows lined up for TV over today and tomorrow have been taken off Create and Craft because  they have sold out of the Teal Grand Calibur ...

You have been busy treating yourselves to Christmas presents  and you have bought them out and  now there have no more  in stock at present ....

 Disappointed ???  Yes ... me too !!

More tomorrow ...

Hugs xx


December 17, 2014

Three ways to use ...

Hi Everybody,

Today I would like to introduce you to this beautiful die template from
Spellbinders Victorian Collection 
 it is called  Heirloom Oval (click the link)


 The set is in three parts and it can be used in many different ways.  Here I have tried to show you three ways to make this die work for you so that you get the full value from your purchase.

The first card has used the die to create the base  which has been hinged at the top to use in portrait view.

Then another layer is cut with the filigree pattern and layered on the top with foam pads.

I used the smaller centre part raised again with foam pads and added a simple pre printed greeting topper from Anna Griffin

The ribbon, hat pin and the  Wild Orchid Crafts  flowers all compliment the card which is very simply decorated
The second card has used the three largest dies to create the filigree pattern cut in white.

I then used the outer edge and the inner one to cut another frame in pink but without the filigree pattern in it and glued these two together

I cut another complete shape in white and added a verse to this before adding in the frame I have just created.

Then add all of this to your matted and layered base card and decorate as you wish.  I have used Crinkle Ribbon and WOC flowers ... plus the hat pin
The third card creates the base card and hinges it on the long sides to use in Landscape view.

A frame has been created as in the second card and added with foam pads to the base.

I have decorated with WOC flowers and added in a pearl flourish from Want2Scrap

All my flowers have been sparkled with Glitter Magic

I hope I have helped you to see that by varying the Orientation  the color and the decoration you can create really pretty cards that you will be proud to give

And now I am on my way to the Create and Craft Studio to show you the Teal Grand Calibur tomorrow

More tomorrow ...

Hugs xx


December 16, 2014

Winter Dress Form ...

Hi Everybody,

Over the weekend I have been busy creating this beautiful dress form in satin and lace.

And although it didn't start out as wedding dress Griff says it would be a lovely gift for a winter Bride

I gave the dress form two coats of flesh colored paint and allowed each coat to dry

Once dry I wrapped the whole dress from in cling film and created a separate bodice for it from paper mache and gauze to stiffen it.


I did two layers,  allowing each layer to dry thoroughly,  and then I cut it up the back with sharp scissors  and removed it from the dress form and took away the cling film.

I carefully shaped the top and trimmed the bottom of the bodice to make a lovely shape and then covered it in  ribbon and lace .. and trimmed it as needed

The back of the dress was laced together with thinner ribbon where it had been cut off the dress from.

It took me all day to add in layers of the tulle, lace and ribbons

I carefully placed tiny gemstones from Want2Scrap   along each length of the ribbon  and I cut them into fish tails

The tiny white roses are from  Wild Orchid Crafts  as are the pearl and diamanté gemstones on the bows.

It really is much prettier in real life and the question is ... who do I give it to?

Maybe Isabella my Great Granddaughter would love it.  I am going to watch her sing Carols at her nursery school today.

I can imagine the teacher saying "Come on Isabella ... sing"   and she will reply "In a minute ..."

Three year olds can be such fun

More tomorrow ...

Hugs xx


December 15, 2014

Oh dear me ... It's pink !!

Hi Everybody,

After the drama of yesterdays card I thought I would return to ...  a nice gentle Pink !!

For this card I have used the  Tied Together  die for the background and this is also an extendable pattern.  I got mine from   JGD Crafts  and the link above will take you to the actual die on their website.

To extend these  patterns,  on this or any other extendable die ... either lengthways or widthways ... all you need to do is line it up with the previous pattern and cut it again.

The beautiful assortment of  flowers are from Wild Orchid Crafts

The ribbon is some that I brought back from Phoenix and I know that some of you don't like big bows,  but this ribbon ties so easily that I couldn't resist.

The lacy piece at the bottom of the card is created with the Flourish Trim   and is one of the Die D-Lites from Spellbinders.

A really pretty die and although small is very versatile for adding that extra touch to your designs.

More tomorrow ...

Hugs xx


December 14, 2014

Autumn Colors

Hi Everybody,

Now I know it's cold and Christmas is on the way ... but I thought a little card in Autumn Colors would make a change

This is the  Leaves A Fallin'   die from Spellbinders and is one of the new ones from the Trendy and Simple Collection.

I have just cut the entire die out as it is and added it to my card but you could also cut the leaves out of the card and use them individually in a flower display.

I have changed the color scheme too as my usual choice is white base and a pastel color.

But for this card I have gone for deep brown and tan with a lovely olive green.

The flowers are deeper colors too and they are from  Wild Orchid Crafts  and I have added in the sparkle with glitter from Glitter Magic

The ribbon  is some that I brought back from my trip to Joannes craft store in Phoenix  but I cannot remember where the large Autumn leaves are from.

Into the mix I have added three small Hatpins in colors that match the card and the inside has been lined too.    Sentiments Four    is cut all in one strip and so easy to apply and especially good if your hand writing is untidy ... like mine !!

Want2Scrap  self adhesive pearls are all around the frame.  Different for me but I do like the card

More tomorrow ...

Hugs xx

December 13, 2014

This weeks Winner ....

Hi Everybody,

This is a busy week for me as I will be back on your TV next week.  I have four shows for Create and Craft and I am really hoping that you will join me... and maybe send me an email in to the show

Bur more on that later as I know that you are waiting for me to say who has one this weeks card. Well it's you ...

 EMA

and so if you can email me please ...
christina@card-making-magic.com 
with your postal address then I will get the card in the post to you straight away.
I hope you will like it and please let me know when it arrives with you.

So back to next week ... I will be with you at 3 pm and 6 pm on the 18 th and again at 10 am and 2 pm on the 19 th ... then home in time for Christmas.

I will be featuring the  new Teal Grand Calibur from Spellbinders.  I have had lots of emails about the box that I made the last time I was there and so... Fingers crossed !!  I will have the time to show you again 

I will keep you up to date with what is happening as I should have a little more time to keep on blogging this time.

More tomorrow ...

Hugs xx 

December 12, 2014

Friday Freebie 037

Hi Everybody,

Todays card is staying with a more laid back feel and there are no flowers on this one

It is created in peach, black and white and has a rather dramatic feel to it.

I have used the Botanical Swirls  and I also added a video to show you how to get the best result from any of the expandable dies

The Diamanté  flourish is the luxury touch to this card and it is from Want2Scrap


If you would like to win this card then all you need to do is  join the growing band of followers and then leave me a comment to let me know you have been to visit ... and would like to have the card.

A name will be drawn from the hat by my trusty "Film Crew" and the winners' name will be announced on tomorrows blog post.

Please come back to check if it's you who  has won as you will only have 48 hours in which to claim it by sending me your postal address.

More tomorrow ...

Hugs xx

December 11, 2014

Masculine Card

Hi Everybody,

Just in case you missed the update on the Butterflies die from yesterdays post ... the die is available in limited quantities and so if you see one then you will need to grab it quick

One of my readers Helen Aiken has located this die at Sunrise Crafts ... but be quick or it will be gone

I am often asked for ideas for male cards as this is an area we all seem to struggle with each time we need to make one.

Well there couldn't be a more simple card to put together than this one

All it uses is an embossed background ... a border die ... and some ribbon and a sentiment ... and that's  it ... job done.

So to be more precise I have cut my base card from brown card and layered it with a deep  leaf green.

The top layer is cut in white and I have embossed it with the Diamond Fleur De Lis EL-031 M-Bossablities folder. It gives a really deep pattern into the card and is excellent for any card

The  border is cut with   Petite Monarch  and I have added tiny pearls to each point.

The ribbon is just a thin gingham from  Mei Flower  and I have added a pearl buckle to it. The sentiment is from Anna Griffin and matches the color scheme perfectly.

More tomorrow ...

Hugs xx

December 10, 2014

Two Ways to Use ...

Hi Everybody,

This pretty die template is the Spellbinders Butterflies and is one of their expandable range

I have been informed that this die is available and so if you see it grab it quick as once it is gone ... it will be gone forever 

Helen Aiken has just found it here at Sunrise Crafts  for you   Butterflies Pattern

Todays post is to show you two different ways in which I have  used  this die.

~~~~~~~~~~~~~~~~~~~~~~~~~~

For this one I have simply cut the whole die from some pink card and used it as it is, and teamed it with a soft cream

I created a frame around the cut piece with Matting Basics and added it on foam pads to give dimension

I wrapped it all in pink ribbon before adding it to my base card.

Then I  added the bow with a dazzler for the knot and a little sentiment that can be for any reason you wish.

The outside edge of the frame has been surrounded by a white pearl strip that is self adhesive and it is from Want2Scrap

I have added a small heart to each of the Butterflies

~~~~~~~~~~~~~~~~~~~~~~~~~~~~~~


For the second card I cut the whole piece in green and then carefully cut out the butterflies.

I spattered the butterfly embossed background piece of  cream card  and added it to the same green card as the Butterflies.

The Butterflies have been layered two together and the wings bent upwards slightly

Each Butterfly has a pearl body and small trail just to add the finishing touch

The verse on the second card is from Sheena Douglass  "Little Bit Sketchy" range

And there you have a very easy card that looks nothing at all like the first card and yet uses the same expandable die template.

I hope you will enjoy playing with any of the Spellbinders that you have in your collection and looking at them in ways other than their intended use.

More tomorrow ...

Hugs xx


December 09, 2014

Reflective Moment ...

Hi Everybody,

Todays card is  in a pretty shade of blue teamed with white  and the die used is the  Reflective Moment  from Spellbinders

If you click the link you will see what the die template looks like and it is a large 5 x7 set

I have embossed the background piece of blue and then added the die cut panel with foam tape to give dimension

The sentiment is from  JustRite Stampers  and is the one that will fit the Labels Twenty Nine

I have also added that panel with foam and then edged it with Diamanté from Want2Scrap  for a really pretty finish

The beautiful flowers are from Wild Orchid Crafts  and as usual I have added fine glitter from  Glitter Magic

The satin ribbon is from  Mei Flower  and I have tied it in a bow and added a dazzler to cover the knot

Another card that I like and it's not pink !!

More tomorrow ...

Hugs xx


December 08, 2014

Back with pink ....

Hi Everybody,

Todays card is once again in my comfort zone with Flowers, Ribbons and Pearls.

I have used the Anna Griffin papers and these are some that I got while in Phoenix.

They are from a box of 5x7 papers called Lovely Layers and the patterns, colors and quality is exceptional.

I have embossed the panel before adding it to the card front to give more texture

I cut two of the border strips Petite Monarch and added in some pearls

I have wrapped it with two types of pink ribbon and a double bow with a cluster of flowers over the centre

The flowers and the white leaves are from Wild Orchid Crafts   with added sparkle from Glitter Magic    The pearls are from Want2Scrap  and the little sentiment is also from Anna Griffin

Yes !! I like this little 5x7 card

More tomorrow ...

Hugs xx

December 07, 2014

Elegant Ovals ...

Hi Everybody,

Todays card is using some very beautiful Anna Griffin papers and a lovely blue ribbon and in a style that maybe you wouldn't associate with me

This one is very vintage and I have woven the ribbon through each other on the bottom edge.

I have tied a double bow and added a gemstone to cover the knot and just tucked it in place under the sentiment.

The bas card is blue  but the sentiment tag is also from Anna Griffin and I must say it makes a very pretty card.

Maybe not quite my style but one that I am quite pleased with all the same

The only Spellbinders that I have used on this card is the Elegant Ovals and I have cut the largest #4  in the same blue as the base and #2 in cream and layered them together

More tomorrow ...

Hugs xx

December 06, 2014

Good Morning !!

Hi Everybody,

Today is cold, dull and wet here in the UK but I am up bright and early this morning as I have lots to do.  The main thing is to get my Christmas Tree up with it's beautiful lights shining and then I will be on the way to being ready for Christmas.

But first of all is the draw for the lovely purple shaving foam card.  My "film Crew" pulled a name from the hat and the winner is ....

Diane Naylor

You have 48 hours to send me your postal address please to 
christina@card-making-magic.com
and I will get the card in the post to you straight away and I hope you will like it when it arrives

More later ...

Hugs xx

December 05, 2014

Friday Freebie 036

Hi Everybody,

Todays Friday Freebie is a card with a background created with   Shaving Foam 

This is an old video tutorial that I did and I have added it before but for those that are new to the idea I have added it again

The Card is in a lovely deep purple with a flower corsage to match and the flowers are from   Wild Orchid Crafts

I have sparkled them up with fine iridescent glitter from Glitter Magic

The hat pin is a very feminine addition and it is removable from the card.  I use 3" hat pins with end protectors from the Sparkles Group

The sentiment is from   Lili of the Valley   and is one of a set on an A5 sheet of verses

Now if this is a card that you would like to win then all you need to do is add a comment at the bottom of the page.

Scroll down to just under my signature and there you will see the word Comments and if you click that word it will open another window for you.

A name will be chosen at random and the winner will be announced tomorrow morning in the blog post.

This is the last day of the  Spellbinders Sneak Peak and Give Away 

Click the link to see the  Imperial Square  that I featured on Monday ... the links on each designers pages are open for 48 hours for your chance to win the featured die set

 And for other die templates on offer visit the other designers blogs and enter there for more chances to win.  A winner will be drawn each day with a grand prize to be won on the last day


More tomorrow ...

Hugs xx


December 04, 2014

Card Class

Hi Everybody,

In the last card class my ladies tried their hand at creating a more masculine card with the unusual technique shown

If this is a new idea to you then maybe you would like to watch a tutorial on Faux Leather Effect

The two different color schemes make the card look totally different and you can make it suit your recipient whether male or female

It is very easy to do and I hope you will enjoy the short video  ... and I am sure that you will agree that both Mary and Brenda have made lovely cards on this their first attempt.

The Spellbinders Sneak Peak and Give Away is now in its fourth day

Click this link  HERE   for the form that you need to fill in and submit to be in with a chance

Visit the other Designer Team blogs too for even more chances to win and there are other sets on offer... and at the end of the week there will be a grand prize fro someone to win.

But remember that these dies are  being newly launched at the CHA shows in California and  they will be available for you to buy  next spring 2015

The link is open for 48 hours and is the only way to enter.  Good Luck

Thank you for all the comments on my practise run with the camera. I had some really good tips and advice from many of you and I will take each and every one on board and work with it.  Many of you preferred the third photo of the cards and that was my favorite one as well.

It was only a practise run and my first attempt with my new camera and I do intend to use other staging props and not just the ones shown.  So hopefully my pictures will get better

 All the advice given was well received by me and in the manner it was intended

More tomorrow ...

Hugs xx


December 03, 2014

Practising Photography ..

Hi Everybody,

A few days ago I told you that one of the workshops we had done at the  Spellbinders Ambassadors Retreat was on photography.  I was very interested because up until then I had  simply used a little point and shoot type camera that was not expensive.

But since then I have come home and bought myself a better camera.  I am now snapping away to practise taking photos that are more interesting for the viewer.

This involves "staging"  a photo to get the best angle and light and using props to dress the area in a pleasing way.  All very new to me but very exciting ideas just the same.


 So these are my very first attempts at presenting a card in the best possible way,  with the cameras focus on the card itself and the background out of focus to enhance it.


 The dies used are not the subject for this test just the photo ... so ... What do you think about my practise shots???


The size is also not a problem as I can make them the size I want within the blog post.  It's just the idea of presenting a better shot of the subject I am asking you about and the way they have been set out to please your eye.  

I will keep on practising and I will get better

Don't forget that this is the third day of the   Spellbinders Sneak Peak and Give Away   and to be in with a chance to win the dies on Designers Blog post you need to add your name and submit it.

Here is the entry form  to win the Imperial Square that I featured and you won't be able to buy this until next spring 2015

More tomorrow ...

Hugs xx

December 02, 2014

Laced with Love

Hi Everybody,

Todays card is another from the recent Create and Craft shows and features the "Laced with Love" Collection.

These  beautiful  Spellbinders die templates will help you to create the most elegant cards

For the next three weeks they are exclusive to Create and Craft 

This one is the Lonely Hearts and I have glittered it up for extra effect

I have dressed this up with organza ribbon and pretty flowers from Wild Orchid Crafts

Into the flowers I have added in a pretty hatpin that I have made and you can also make your own and the Decorative Hatpins Tutorial  will show you how I did them

I buy 3" silver hatpins with end protectors from the Sparkles Group  and if you add the code CGDIS5 at the checkout then you will get a discount on your purchase.

Don't forget the  Spellbinders Sneak Peak  contest that is running until the 5th December for the chance to win the featured die template.

The entry form is HERE  click the link to fill out the form and submit it for your chance to win

Please visit the other Design Team members blogs for more chances to win


More tomorrow ...

Hugs xx

December 01, 2014

Spellbinders Winter CHA 2015 Sneak Peak and Give Away -Day 1


Welcome to the first day of the Spellbinders Winter CHA 2015 Sneak Peak and my first attempt at showcasing for this wonderful team

The beautiful template that I am featuring is the  Imperial Square  and it is one of many being released at the Craft and Hobby Association for 2015  You will have the chance to win this at the bottom of the page. The  sentiment has been cut in silver from Sentiments One

My first project was created as a beautiful silver and white Congratulations Card that would be ideal for wedding day and the die is a pleasure to work with


 Supply List

Cross Promotional Partners
Other Products 
  • White Hammered card
  • Silver Mirror Card
  • White Organza Ribbon
  • Heart hatpins
  • Foam tape
Instructions

Cut two Grand Square #7 (the smallest is #1) to create the base and join together with a hinge

Cut two Grand Square #6 from white cardstock and emboss both peices keeping one for later

Hand cut a silver layer to fit in between these two layers to form the base.

Mat and layer the embossed white and silver card together


Cut and Emboss the entire Imperial Square die set with white card stock

Using foam tape layer this with a slightly larger piece of silver card

From the four smallest dies cut each one four times in silver

Then onto the silver and white embossed layers add the four largest  ones into each of the corners

Next take your silver and filigree layer and add it to this panels making sure it is centred and level

With the four smaller corners add them to a white centre shape securing with glue on the back.

Add this panel to the card front with foam tape for dimension.

Wrap all these layers with white ribbon and they can now be added to the base layer and the ribbon workings will be hidden in between these layer.

Cut Congratulations from Sentiments One and add it to white card


Using the centre part of the Imperial Square die set cut the word panel and then trim to fit the centre of your card.

Take the second piece of white embossed card and add it to the inside of the card to line it

I have also cut another Imperial Square and trimmed it down to fit as a pocket inside the card

Glue three sides leaving the top part open and into this slip a label shape that can be used as a greeting or for your signature.


A Designers Note...

When you are adding words to your label a good tip is to use a ruler and the grid lines on your cutting mat to help you get them straight and line them up equally on either side of your  card

And here is a second card using the same die in another way and this will be featured in a later post complete with instructions on how to make it

For you chance to win click  HERE   fill out the entry form and submit ... Good Luck   (The link is only open for 48 hours) 
(This link is now closed)

For the Official Contest Rules click HERE

Questions ?   Contest Questions    (No entries will be accepted at this email address)

To see other projects and for  more chances to win please visit  Debbie Olson at Thinking Inking  to start this brand new "Give Away"


More tomorrow ...

Hugs xx