Beautiful Card Designs Made Easy

April 30, 2016

Todays Winner ...

Hi Everybody,

After an early start going to Slimming World weigh in for 8am ... and finding that I have gained half a pound !! it was in to town to buy some last minute goodies for my holiday.  I have had lots of good wishes for a safe journey home ...
 and I haven't gone yet. 

We fly out early Monday morning to Faro in sunny Portugal. So today I have bought my self some new clothes to take with me and some sandals as it is quite warm out there. 
 Griff is not coming with us, just a girly week away,  but he has done the draw for this weeks 
Friday Freebie card.

The name drawn from the hat is you 

Ruth M 

so if you could email me your postal address please to
christina@card-making-magic.com 
the card will be on it's way to you 

I hope you will like it when it arrives and please let me know when it does. 

If you could email me as soon as you can the card will be on its way to you on Monday. But is it is after that then I can't post it till I get back home.

I have lots of blog posts all scheduled for next week and tutorials on here and YouTube 
So this is my last "Live" post until I get home. 

More tomorrow ...

Hugs xx

April 29, 2016

Friday Freebie - 116

Hi Everybody,

Todays card is in deeper colours and I have added in a "Thank You" tag but you could change this to what ever you wanted

It has a lovely floral display from Wild Orchid Crafts  that have the sparkly treatment on the petals.

It is very textured and is much better in the hand than the photo.

So if this is a card that you would like to have then all you need to do is leave me a comment at the end of the post.

Have a look at the Winners Page  and tomorrow blog post to see if it is your name that is shown and follow the simple steps on that page to claim the card

More tomorrow ...

Hugs xx


April 28, 2016

Shabby Chic ...

Hi Everybody,

The cards that I have been making in the Shabby Chic style have gone down a real treat with many of you and I have had lots of emails and comments about them. So today it is my pleasure no tell you that there is a new video on YouTube showing how I made this
I really enjoy making this style as I can go to town with all the bits and bobs I love to add.
Some one has said that they really like all the "Frippery" that I add and I thought that was a lovely word to describe the cards.

The flowers, leaves and lace are all from  Wild Orchid Crafts   and are a mixture of pale blue and beige. The pearls are from  Want2Scrap and the frame is cut from white card from Papermill Direct using the Die D-Lites Reflections from Spellbinders


Thank you for all the positive comments and I am happy that you like the cards too ... I have many more to show you and also to make on video

And over on Card Making MagicI am going to add a special section where I can add all the Shabby Chic Videos together I will tell you all on here when it is done and hopefully then you will pop over and visit the page.

More tomorrow ...

Hugs xx


April 27, 2016

Water Colour Wednesday - Feeling Sheepish

Hi Everybody,

Todays cute image is from Clearly Besotted and this is the Feeling Sheepish stamp set.

For this card I have stamped them direct to water coloured card and used Gansai Tambi water colours to paint them.

There is a matching die set that will cut the sheep and the grass out for you but you will need to purchase them separately

I kept the layout simple but it was fun to do and I quite liked the card once it was finished.  I like to try different things from time to time as this keeps the card making block away.

More tomorrow ...

Hugs xx

April 26, 2016

Tuesday Tutorial - Parisian Accents & Motifs

Hi Everybody,

The other week I asked if there was any particular die that you would like to see in a tutorial or video and the most requested one was for the Parisian Accents and Motifs. This die is no longer available on the Spellbinders website but I know that many of you have this set and still love and use it often.
I have used a soft cream and Kraft card today for this really pretty floral card
Spellbinders Supplies:
Other Supplies:
Instructions:
With die #7 from Matting basics A cut two and Create a Hinged Card from cream card
With the small square die from Parisian Accents cut the shape six times from Kraft card and link them together on two sides using the little knobbly areas on each piece.
With Matting Basics B take dies #5 6 & 7 to create the frames ...
Using #7 and #5 will create the wider frame 
Using #6 and #5 will create the thinner frame
Once you have cut the wider frame you can add the linked squares to it by gluing just around the edges and then adding foam pads to strategic areas to raise the patterned panel.
Hand cut and emboss another cream panel making it slightly larger than your patterned frame work
Make sure that this is leaving a small border around the base card and and it in place
Add foam pads to the thinner frame and add this to the top of the wider one to give you a double frame around the filigree panel
Cut your word several times and glue them together to make a sturdy sentiment and with foam pads add it to the front of your card.
I decorated my card with a large pearl flourish and then added the word over the top.
Have a dry run with your flowers to see where you would like them before gluing them permanently in place. Dot with glue and sprinkle on the glitter for a sparkly effect.
And here is another idea using the same colour combination but other dies from the Parisian Accents and Motifs.
Next Week:  Persian Accents and Motifs

More tomorrow ...

Hugs xx  

April 25, 2016

Baby Cards with Tonic-Gold

Hi Everybody,

I wanted to show some more ideas for beautiful baby cards using the Rococo Baby dies from Tonic-Gold and they are always such a pleasure to create.

But these are featured in a video that I have and I hope you will enjoy it.

It is available to view on YouTube from today and here is the link for you  New Baby Cards

I have used the Baby Balloons  and the Adorable Elephants from the Rococo Collection  and teamed them with the New Baby Sentiments 


These dies are really good to work with and cut easily through most die cutting machines

As always I enjoyed making the pink one the most and adding in all the little finishing touches.

Both cards are reasonably flat enough to go into an envelope as there are no deep flowers on them ... but I can't promise that that will last for long

More tomorrow ...

Hugs xx

April 23, 2016

Card Winner Today ...

Hi Everybody,

Here we are with another Saturday .. another weekend and another card give away winner. 

Aaaand another weigh in with Slimming World and this week I have stayed the same.

 I am surprised at that, as I have been somewhat naughty this week. 

 The reason is I am winding down into holiday mode because my youngest daughter and I are taking Isabella on holiday to Portugal on the 2nd May, before she starts school in September. 

 This will be three generations all going away together and it should be a lot of fun.  So that's me ... Great Gran, my daughter Vickie , who is Isabellas Grandmother and is called  Nana Vickie, and Isabella the mischievous four year old.

 But all my blog posts and  Tuesday Tutorials have been done this week and they are all scheduled to go out on the designated days. I have even added lots of videos tutorials on YouTube too.

The name for the winner of the card has just been chosen by my trusty "Film Crew" (Husband Griff) and the winners name is

Tina Gray ...
please email me with your postal address to 
christina@card-making-magic.com
and the card will be on its way to you.

Please let me know when it arrives with you and I hope you will like it.

More tomorrow ...

Hugs xx

April 22, 2016

Friday Freebie 115

Hi Everybody,

Todays Freebie is a floral creation made with the dies from Spellbinders Victorian Garden Collection and is in white and silver

It is prettier in the hand than the photo shows and could be for any occasion.

The centre panel is cut twice in white and silver from the  Majestic Oval

The flowers are from Wild Orchid Crafts  and are different sized Roses and Gypsophilia

Over on the right hand side of the oval is a tiny organza butterfly and the whole lot is surrounded in pearls from Want2Scrap

So would you like to have this card?

Then all you need to do is leave me a comment and a name will be drawn from those comments and added to tomorrows blog post.

If you should miss the blog post then all the winners names are added to the Winners Page  which is always available in the side bar to the left along with some simple guidelines

And there is a new video to view on YouTube with the  Heirloom Rectangles  and this was a request in response to my asking what you would like to see ... so thank you for the request

Good Luck everybody 

More tomorrow ...

Hugs xx 

April 21, 2016

Baby Card in Pink ...

Hi Everybody,

Todays beautiful baby card is one that my daughter asked me to make for her friend

I was happy to oblige as I love to make this type of card ... especially for little girls

For this card I have combined some of the Rococo Baby dies kindly sent to me by Tonic-Gold

The focal point on the card is one of the  New Baby Sentiments   "Welcome to the World"  and I have added it onto one of the layered Art Nouveau Ovals 

The  Baby Balloons  I have cut several times and glued them together and added it with foam pads

I have created it in the Shabby Chic style and I really love this card.

And of course it had to have a box to match it and to this I added another sentiment from the Baby set

The paper pack that I have used is one that I have had in my cupboard for a long time and it is the 12x12 New Arrival from Forever Friends.

More tomorrow ...

Hugs xx

April 20, 2016

Water Colour Wednesday - Peony Bouquet

Hi Everybody,

Strictly speaking this is not a water colour although it has been done with water based Distress Inks. 

But in this case the stamps do all the work for you and you just get the pretty result at the end.

This is using the new  Peony Bouquet   from Altenew.  It is a layered stamp and there is a matching  die  to go with it ... aaaand it is gorgeous !!

Both products are from  Sevenhills Crafts  which is a UK company but they stock a lot of the newest stamps from the USA without the expensive postage costs.

The Distress Inks I have used are Dusty Concord, Milled Lavender, Squeezed lemonade, Mustard Seed, Wild Honey, Bundled Sage and Forest Moss and they have been stamped onto Neenah Classic card 

The enamel dots are from  Want2Scrap  and they blend really well with the flowers

More tomorrow ...

Hugs xx


April 19, 2016

Tuesday Tutorial - Asian Accents and Motifs

Hi Everybody,

Todays tutorial is one that was requested and it uses the Asian Accents and Motifs. I have made this card using both sets  in a  pretty shade of lilac and the card would suit any occasion or gender ... minus the flowers !
Spellbinders Supplies:
Other Supplies:
Instructions:
With die #7 from Matting Baiscs A cut two and Create a Hinged Card  in white
With die #7 from Matting Basics B cut another panel in the colour of your choice
With the long border die from Asian Accents cut four strips
With #5 from either set cut one panel in white and emboss with your folder
Attach the four strips to the edge of the embossed panel making sure that it will fit the front of your base card.
Trim off the corners as neatly as you can  ... but don't stress about it as we are going to cover any mistakes as we build the card ... I promise !!
Cut the square from Motifs and the circle from Accents in white and hand cut a smaller square that will sit between these two layers
Cut as many pieces of Architectural Accents and  the leaves as you need in green and white
Add the main panel to the base card with foam tape in between to give some depth and add in the Architectural Accents so that they drape over the corners and hide any mistakes.
 I promise you that if you make the front of the card beautiful NO BODY will notice the mistakes ... and you're not going to tell them ... are you ???? 
Arrange the flowers, tucking in extra leaves and accents as you go.
Dot some pearls around the flowers and sprinkle the petals with glitter
Line the inside of the card to match the front for an extra special touch
And if you are looking for a quick card then try this one by simply cutting two of the square dies from Asian Motifs. Fold one of them back a little to create a flap and add glue to the area alone. Add the other piece to marry up the pattern and then layer up with the other die shapes cut in alternating colors.  Add in a little sentiment and there you have another idea 
Next Week : Parisian Accents and Motifs 

More tomorrow ...

Hugs xx

April 18, 2016

To My Friend ...

Hi Everybody,

Staying with the Shabby Chic theme for  this card and I have to say I really love this card in the soft and gentle pale pink and green.  It is a 6" square top folded base and I have covered this with some pretty flowery paper that has had the edges distressed.
I have used  Medallions Three   for the pink layer  and added more floral paper to the centre.

The flowers, Cameo and frame are from Wild Orchid Crafts  and they have some beautiful new items in this month that are perfect for this type of look.

The leaves are from Foliage and then I have tucked in some Romantic Vine to the display.  This is a really useful little die to have to help dress out any of your floral arrangements and is one I use quite regularly

To the side of the flowers I have dotted here and there some pink pearls and the petals have a dusting of glitter to make them sparkle.

More tomorrow ...

Hugs xx 


April 17, 2016

Detailed Scallops on YouTube

Hi Everybody,

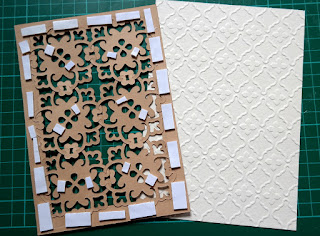
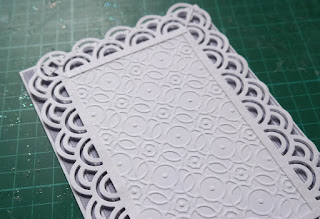
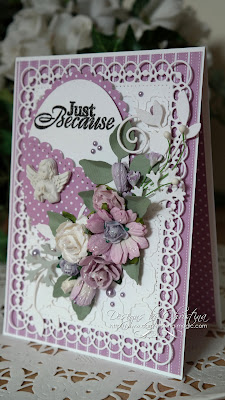
The latest Video Tutorial on YouTube is using the Detailed Scallops and making a really pretty floral card that is sure to delight your recipients

The white base card is Hammered white from Papermill Direct  and is usually the one I reach for to create most of my base cards

The Dotty and Striped card are from AnnaMarie Designs  and it is such good quality it is a pleasure to use

My flowers, the Dove and the Angel are all from Wild Orchid Crafts and I have used a mixture of Daisies, Roses, Tulips, Rosebuds and Gypsophilia.
The Detailed Scallops has been used to create the back panel and it fits perfectly on the 5x7 card base

The oval for the sentiment is the Classic Oval  and I have used the Scalloped oval to mat underneath it.

Border dies have been used to add the shape in the top portion of the oval but the Curved one I have ised is now retired so you can use any that you have in your own collection

More tomorrow ...

Hugs xx