Beautiful Card Designs Made Easy

October 01, 2024

Waste Not , Want Not

 Hi Everybody,  

While I was making the last Trellis card I stamped and coloured some of these flowers out to see which I preferred.

And of course once the video was complete I had all these beautiful images left over. 

So it was time to get busy and turn them into cards.

I wanted to make card of different shapes  to each other and so I decided on a square, a DL, an Oval and a small A6 and this is the result.

This is the 6x6 square card and for this I have used the embossing folder in the Altenew Craft Your Life Kit.

I cut the die cut up even more and add it with foam pads to the base.

I also cut an oval and added that over the base front

The sentiments is from an old set and the butterfly is cut from parchment and silver mirror card.

I have added pearls to the butterflies bodyline and dotted more around the card front.

This card is the A6 and I have dry embossed the card and added an embossed oval to the front. with foam pads.

The flowers have been left as is for this design and they have also been added with foam pads.

I used some pearl flourish that  found in my bit box  and cut this up to add in areas on the card front.

There is the silver butterfly again and I use these because they are so pretty and hide a multitude of sins if you make them !!!

I will add the other two tomorrow to complete my playtime

Hugs xx

September 30, 2024

Easel Card - three ways ...

Hi Everybody, 

Easel Cards
are such an easy style to make and yet can give some beautiful results.
It was one of the first things I tried when I was new to card making and I did videos on all the variations over the years.

But I thought would be good to re-visit as there are always new people starting this hobby and they don't know how to do it.

I am also staying with my  personal challenge of using old stuff and so saving money on buying stuff I won't use.

All of these card have used a 300 gsm smooth white card and I have coloured it my self with Distress Oxides that I already have.

You can try this with anything that you already have too and some of the things I use are so old they may no longer be available to purchase. 

In the video there are three styles for you to try and over the next few videos I will be covering others.

They will be getting a little more intricate each time, though none of them are difficult

I have used shaped nesting dies and do if you have some of those then you are on your way.

Click the link above to the video and it will open a new window for you to view on YouTube.

It is a little longer then normal but I do cover three styles and the creating of the background too so I hope you will enjoy it just the same


The backgrounds are all created the same way just different colour schemes and this is such an enjoyable process that I will never buy coloured paper again

Experiment with your inks to see which colours look good together.

More tomorrow ...

Hugs xx


September 29, 2024

Denise Bryant - Winner

Hi Everybody,

I hope you are all staying well and not suffering too much from the weather.  
We are so lucky here in Blackpool as we have not had floods ... at least not in the part I live in.  
And when it snows elsewhere it doesn't stick around for ling.
We do suffer from the high winds on occasions though and that can knock you off your feet.
Those are the days I stay in and keep warm with Ruby and Ella.

This norming I have done the draw for the beautiful Christmas Tree die from Crafters Companion and the name today is ...

Denise Bryant

so would you email me your postal address please to
christina@card-making-magic.com
and I will get it posted off to you straight away.

Be sure to let me know that you have it safely and I hope you enjoy playing with it.

More tomorrow ...

Hugs xx

September 27, 2024

Friday Freebie - Christmas Tree

Hi Everybody,

Today we are touching on Christmas again as the season is fast approaching and this week we have a beautiful Christmas Tree from Crafters Companion for you to win.

It is a two part die and in the same pack there are papers and sentiments for you to add to your designs.

The magazine is full of ideas and inspiration for this set and other ideas that you may like to try.

It will give you a good read as you brose the pages with your favourite cuppa.

So if you would like this then all you need to do is leave me a comment at the end of the post with your FULL NAME

From those comments one name will be chosen at random as the winner and announced in a blog post over the weekend so be sure to come back and check if it is your name that is shown.

It doesn't matter if you have won before just have a go and see where you get .

More tomorrow ...

Hugs xx


September 26, 2024

Trellis Card & Acetate

 Hi Everybody.

Todays card is yet another variation of the Trellis card and this time I have used Acetate to make the front of the card.

It is still easy to do and just as effective as the other styles and yet uses another product that we probably already have in our crafty stash.

I have use old stuff that I already have and nothing new has been bought at all. 

The embossing folder is an old one from Spellbinders that I got when I was on their Ambassadors design team, many years ago when Stacey Caron was still the owner. 

The other old die is the Altenew Craft Your Life Kit and I used to get their kit monthly ... until the postage became too much.

The embossing folder that I have used is from my own range  ... Card Making Magic ... but Craft Stash do not restock my products anymore now that I  am no longer with them.

The vidoe is a little longer than normal but I hope you enjoy it any way.  Click the link to view it on YouTube


More tomorrow ...

Hugs xx

September 25, 2024

Using old stamps

Hi Everybody,

Both of these cards have been created using the same stamps and dies but with different colour schemes to ring the changes.

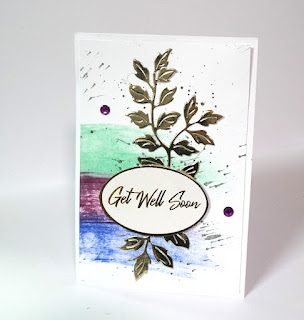
For the back ground I have used a really old Spellbinders stamp that adds distressed stripes. Each is a separate panel that is added to the card base with the inked stripes on the front.

I have chosen colours that will blend well together and not make a muddy brown, and at the bottom of the pink one there is a wax seal in the shape of a flower.

Both backgrounds have been splattered with inks and some of the colours used in the stripes.


The leaves have been cut from my favourite Rose Flourish die set but I don't think this will be available any more at Craft Stash.

I have used silver card for the leaves and added them with small foam pads underneath to give a little height.

The sentiment is different on both but you could add any that you preferred 

Two pretty cards made very quickly and easily using old products that I already have.

More tomorrow ...

Hugs xx

September 24, 2024

Roses & Die Cuts

 Hi Everybody,  

All three of these cards have been produced in the same way. They are all 5x7 with the fold at the top. They have all had an aperture cut with a die and they all have the same handmade background behind each aperture

The flowers are all cut from the same red card and the leaves from two shades of green, though the flowers have been decorated in a different way.

They are all Christmas Cards but with different sentiments on them. One is stamped and two are wooden plaques

So to start the process I created the background panel by ink smooshing in reds and silver inks and trimmed it down to fit the front  on my my card below the aperture

The aperture panel is cut in white and added with foam pads to the base card.

The flowers are all cut from the same die and this top card has had the petals inked with white and white stamens added.

They have been layered onto the top left corner of the card with leaves arranged beneath them, and the red bow added for an extra effect..

This next card has used a snowflake aperture die with the red panel underneath.

These two flowers have been stamped in white with a snowflake stamp on all the layers, and tiny diamante gems added to the centres of the flowers and the bow.

The same gemstone has been added to all the bow centres

They have been arranged to the lower left, on top of the leaves, and the bow placed to the bottom of the card.

Seasons Greetings has been stamped in Candied Apple

The last card has used a lot of the background panel to cover the card, the Grid die has been cut in silver to blend with the red and silver panel.

Theses flowers have been inked with silver and silver stamens in the middle. They have been arranged along the right side of the grid with the leaves tucked in under them. 

The bow has been edged with a white gel pen and added to the flowers.

Three cards now all ready to send for Christmas and all three, although made with the same ingredients, look different and I am happy with all of them.

All they need now are boxes to put them in.

More tomorrow ...
Hugs xx
September 23, 2024

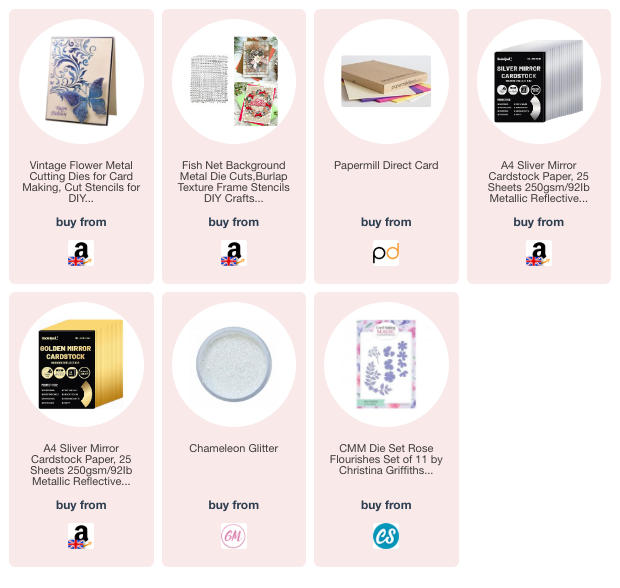
Trellis Card - Variation Five

 Hi Everybody,

Here is another variation on the Trellis card theme that will stretch your skills just a  little further.

It is another easy to do style and you can add the stirps in any way you would like,

I added an ink smooshed panel to the inside of mine, just to jazz it up a bit, and it has made a lot of difference to the end result.

One of the butterflies camouflaged a finger print on the inside of the card and now no one will ever know that it was there.

Trellis Card - Variation Five

Another things you could do, to make it look different again, is to add some parchment to the back of the trellis.

That way the inside would be diffused and yet it would look lovely from the front.

Lots of choices with this design and they are all there for you to make.

More tomorrow ...

Hugs xx


September 22, 2024

Janet Boyne - Winner

 Hi Everybody,

At least it is not raining here, though I don't know if it will stay that way all day, but we live in hopes.
Ruby and I will go out later for a short walk. I didn't take her out yesterday as walking was far too painful but I will see how it goes later.

In the meantime the draw has been done for the Spellbinders Ampersand.
This is such a useful die and can be used to link many different words for your designs.

The name today is

Janet Boyne

so would you email me please with your postal address and I will get it sent out to you straight away.

Be sure to let me know that you have it safely and I hope you will enjoy playing with it.

More tomorrow

Hugs xx  

September 20, 2024

Friday Freebie - Spellbinders Ampersand

 Hi Everybody,

This week it is the turn of another much loved company that produces beautiful dies for us to use.

Last week it was the  Altenew Poinsettia and this week we have the Spellbinders Sentimental Ampersand.

Look carefully at any word dies that you already have and see what can be teamed together for the look that you are aiming for.

Inside the magazine you will find ideas to help you and it is always a good read with your favourite cuppa. 

In the pack there are sentiments and small flowers that you can use to dress the ampersand up.

Would you like to have this in your collection???

Then all you need to do is leave me a comment at the end of this post with your

  FULL NAME

Then be sure to come back and check over the weekend if your name is shown as the winner.
I am happy to send this wherever you live and it doesn't matter if you have won before.

More tomorrow ...

Hugs xx

September 19, 2024

Trellis Card Variation Four

 HI Everybody.

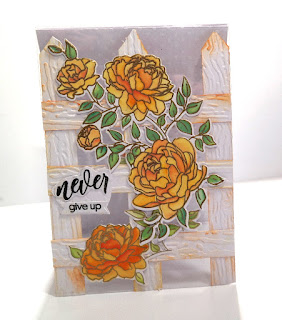
Another quick and easy variation of the Trellis Card and this one is crated to look like a gate or fence panel.

I have used some card that looks wooden to make things easier and I have inked the edges to make it blend.

This video is not long  but I hope you enjoy it just the same.

Trellis Card - Variation Four

Click the link to open a new window in YouTube to view the video and be sure to leave me a comment. "Like" and subscribe if you haven't already.

It all helps to let YT know that you would like more videos from me. 

And a comment here on the blog would be very much appreciated too.

More tomorrow ...

Hugs xx

September 18, 2024

Altenew Flowers

Hi Everybody,

All the flowers for these cards are created from the Hello Beautiful Craft Your Life Kit from Altenew that I have had for a long time.

The woodgrain panel is also from a really old Altenew Stamp and I thought it would be good to bring them out of retirement and put them to use again.

All the flowers have been coloured with the layered stencil in the kit and all mounted to the cards with foam pads to give them some height. 

And all are A6 sized cards with sentiments from my own stash.

This was yet another playtime session to use up items that are already on my desk and I was not disappointed with any of them.

There is no pint in me linking to any of the product as they are old and probably not renewed by the company involved.

So unless you already have them then the best thing to do is look at your own collections and use the nearest thing that you have.

Shopping your own stash is a real eye opener and can save you a ton of money in the process, and it is always a pleasant surprise when you come across something you may have forgotten about.

Items that you bought years ago, meaning to try, and then tucked in the drawer, and left. 
And then when they re-surface you can't remember how to use them

Who is guilty of that ??? 

I know I am but it is a habit I am overcoming and I haven't bought anything new for quite some time.

More tomorrow ...

Hugs xx


September 17, 2024

Creating with Altenew Flowers

Hi Everybody,

Todays card is created with flowers made from the Craft A Flower kit from Altenew. It is the Sulfer Cosmos flower and it is lovely.

I have cut my layers for the flowers in blue and then once they are assembled I gave gone over the petals with the Wink Of Stella pen.

The flowers have been added to a handmade inky background and an aperture cut into the card for effect. 

The finished card is a 5x7 with the fold at the top, and it is much prettier in the hand as the flowers sparkle when turned in the light.


This was a playtime session and for the yellow flowers I used the Layered Rose, again from Altenew, and this die was free with a magazine a long time ago.

These have also been added to a handmade background and the white net added to the top, but this card is only an A6 size.

I had fun making these flowers and the time spent was very relaxing.

More tomorrow ...

Hugs xx

September 16, 2024

Trellis Card - Variation Three

 Hi Everybody,

Here is another version of the popular Trellis Card and this one is so very easy to make. 

The video is not long and so won't up take too much of your time to view.

This is the second time I have done a similar type of card and the first one was about ten years ago. So well over due for a refresh.

It is easy to do and the width of the strips can be altered to give you yet another look.

You could also add them in a different pattern, for instance a sunray effect on the card and this would look lovely. 

In the first video I added them as a weave on the card with lots of flowers too.

But you can have fun doing them any way you wish. Click the link to view the video and I hope you enjoy it.

Trellis Card Variation Three


Please leave me a comment and "Like" the video and be sure to subscribe if you aren't already.

Thank you 

More tomorrow ...

Hugs xx

September 15, 2024

Gail Knapton - Winner

 Hi Everybody,

It was very pleasant here yesterday and although I am still having trouble walking I did manage to take Ruby for a little walk with Vickie and Dougal.  We didn't go far and we didn't go fast just a leisurely stroll and then home.

The draw for the magazine has been done and the name today is 

Gail Knapton

so if you would email  me your postal address please  to
christina@card-making-magic.com

I will get it sent off to you straight away. 

I hope you find it a good read and please be sure to let me know that you have it safely 

More tomorrow ...

Hugs xx