Beautiful Card Designs Made Easy

February 29, 2012

Amy Jo's Birthday Blog Hop Day 2

It's day two of Amy Jo's Birthday Blog Hop and I hope you have enjoyed it so far. There are some "Goodies" to be won along the way.

Just become a follower of the Blogs you visit and leave them a lovely comment if you like what you see.

We don't have to make any special project ... just use Amys' favorite colours of Pink, White and Black or any character from Alice in Wonderland and it can be anything you like.

We only needed to make one thing over the two days so there was plenty of time to go hopping.

But I am adding another birthday project here in pink and white as they are my favorite colours too


This little gift incorporates some tealight candles and they smell gorgeous. 

 If you want to make one of these for yoursefl you will find the written instructions  and a  short  Video Tutorial  on the website.

The flowers are from  Wild Orchid Crafts and the candles are from Ikea... lots of them in a box .
The Pink Polka dot ribbon is from  Fantastic Ribbons and they have a lovely selection for you.

If you landed here from Anita  then you are in the right place and your next stop is at Naomis'

But if you just happened on my Blog today... or you got lost along the way then start again at Amy Jo's so that you don't miss any of the fun.


I have some "Goodies" up for grabs too and all you have to do is join the followers and leave me a comment and I will draw a name at random to win  these three sets of clear stamps after the Blog Hop is done.

Hugs Christina xx


February 28, 2012

Amy Jo's Birthday Blog Hop


Welcome to Amy Jo's Birthday Bash and Blog Hop! We are so excited you could join us today to help celebrate Amy's birthday!

This is a very special unique hop and we don't have to just stick with one particular subject or theme, and we can use any of Amys' favorite things to create a card or project with that in mind.

Some examples of Amy's favorite things are the colors black, white, and hot pink, along with anything Alice in Wonderland.  Here is my card (inspired by Sue Wilson) to wish a Happy Birthday Amy Jo


If you arrived here from   Anita   then you are in the right place!

If you just happened upon my blog today, please start at the beginning with Amy Jo at Scrapping, Card Making and Living with Fibro  because you don't want to miss out on the fabulous prizes that are being sponsored!

This is a two-day hop,  however, we are only making one project. That should give you two full days to go through the entire hop and leave comments and become followers of each blog, if you are not already, to be entered to win some of our sponsored prizes!

Some of the blogs may be offering blog candy as well so this is a hop you're going to want to finish.

I am offering three sets of clear stamps to followers of my Blog so to be in with a chance to win join the gang and  leave me a comment.   The winner will be chosen at random on the 1st March.


Thank you so much for joining us and helping us celebrate along with Amy! Your next stop is the talented Naomi and I hope you are enjoying the hop.


Hugs Christina xx

February 27, 2012

Watercolouring ...

Watercolouring with Distress Inks was a series of videos I made in response to questions on how to make them work for you, as most of us have some of these ink pads in our "stash"  

I made them in three parts to cover each of the different apects such as    Skin, hair and clothes   and this link will take you to the first part.    You can access the other links from that page.

The stamp used is Day Dream Believer from the SWALK collection from Crafters Companion and the flowers are from  Wild Orchid Crafts


The whole process of water colouring with Distress Inks is so relaxing and once you get into it you will enjoy it.

I used a good water colour card from the same company, it was not expensive... and it will go through my printer too so I can work on digital images.


This image has the hair accentuated a little more and I prefer this project more. But it makes up into a very pretty card and would suit any occasion for a girl of any age.

Give it a try and don't forget to add your photos to the websites Gallery   page for us all to share in.

Hugs Christina xx

February 26, 2012

My First Challenge ...

The world is full of firsts and new things to do.  This was my first time at Blogging and  it was  a first when I decided to start my Website  and that is almost three yeras old now.

So the other day I tried my first Blog Hop, and this is the first card I have entered into a Blog Challenge. 

The challenge is with   Just Us Girls Challenge Blogspot  and it is challenge  #125  to create a project that features flowers, ribbons and buttons. 

So how close to the title of my Blog is that ....so I just had to try it didn't I????

I have entered a card and it is another one of the  Tag Cards  featured a few days ago.  The green one on that page also has the same ingredients but this one is in my favorite colours pink, pink, pink!!

And it suits my style of cardmaking with all the "Bling" it can take


The flowers on this card are from  Wild Orchid Crafts  The ribbon is Oraganza and the button is added to the bow with Bakers Twine.

 The papers are all from my "Stash" as is the doily in the background and of course the Hatpin sneaked it's way in to complete the look .

So wish me luck on my first trip into challenges.

Hugs Christina xx

February 25, 2012

Another Felt Flower ...

I am really enjoying making these felt flowers and I think they make the card just that little bit different.

I have today made a video to feature another card made with the Spellbinders and it includes these flowers as part of the title. It should be available tomorrow so I hope you will give it a viewing.


The background to this card is made using the Impressabilites onto some Parchment ... and the effect was very subtle. I  lightly ran over it with some distress inks and then attached it to the card base with some small white brads.

The flowers and leaves are felt and I used the Spiral Blossom 1 die and the Foliage leaf set.  The ribbon is a pale blue gingham and I havae used a pearl buckle as added decoration to the top.

The butterflies are from another Spellbinder and I have dotted Cosmic Shimmer Pearl PVA onto the body line of each one.

Now I know it's a bit early for butterflies ... but in my world there are always beautiful butterflies.

Hugs Christina  xx

February 24, 2012

Decorative Hatpins

Adding embellishments to my cards is one of the things that I really enjoy doing and I openly admit to being a "More is More" kind of cardmaker.  I just love all the pretty things that go to making a truly feminine card .... not much good with male cards!!

Yesterday I covered felt flowers created with Spellbinders and today I would like to show you some beautiful Hatpins.


These are always a luxury touch and they are not hard to do.  There is a video on the website about   Decorating Hatpins


The Hatpins that I use are 3" long and come complete with end protectors as a safety feature ... and that way the recipient cannot hurt herself on the sharp point.

I buy mine from the Sparkles Group and they are offering you a  5% discount  on your purchases.

Make your choice ... and at the checkout add the code CGDIS5 and the discount will be automatically applied. 

You will find the pins in gold and silver and in different lengths in "Specialist Findings"


Add the pins to the card ... threaded through ribbons or flowers ... but don't forget to tell the recipient that the pins can be removed and used as a lapel pin for her jacket. 

Maybe another idea for Mothers Days eh??

Hugs Christina xx

February 23, 2012

Felt Flowers

I am sure you know by now that I love to add flowers to my cards whenever I can ...  and so this morning I bought lots of felt squares in different colours.  It was not expensive (47pence) and each sheet is about the size of A4 card ... so not a bad price!


With the help of the Spellbinder Spiral Blossom  I set to and cut out flowers in most of the colours and leaves from the Foliage dies in the two shades of green .


I was very pleased with the result and used my hot glue gun to hold the flowers together ... but if you don't have one then a few stitches will keep them in place. 

On some of them I have gone around the edge with glitter glue and left it to dry and that gives a really pretty effect.


And this is the card I made with one of the flowers tucked in place along some satin ribbon.

I have added a bow and there is a piece of  Card Candi added to the centre to neaten the knot.

A miniature tag tucked under the flowers says "With Love" and then I added the  Pearls  along the edges as a finishing touch. 

A card that is very feminine and "Mothers Day" is just around the corner.

Hugs Christina xx


February 22, 2012

Windy weather...

Can you hear it??? It's blowing a gale out there and I still have to go out and do my shopping.

Yesterday I was card making again and this time I was asked to make a really special birthday card for an 80th Birthday.

The requirement was that the card had to ... be a large card (yep can do that) ... be in pink  (no problem there then)...to have ribbon on it (that's my kind of card)... to have flowers on it ...(Oh! it just got better and better) ... and to have a matching box (Oh Yes...  all sorted)


Here is the card I came up with and when the young man came to collect it he seemed quite pleased with it ... but you know what men are like... they say yes it's fine and that's it ... so who knows... but he did give his permission to show you the card so here it is....


... and here is the box to match... complete with Flowers, Ribbons and Pearls .... OooooH! that title rings a bell.

And now I am off to the supermarket for goodies....anybody fancy meeting up for a coffee????

My daughter says that pensioners (me) should only shop on weekdays and leave the supermarket free on Saturdays for those who have to work during the week ... I won't repeat what I replied.

Hugs Christina xx

February 21, 2012

Christening Card...

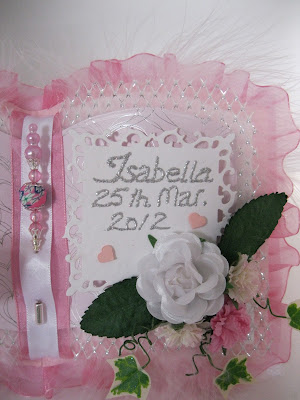
I have been working to prepare a very Special Christening card.   It is for my Great Grand-daughter.

She was born last October and is my grandson's first child.

The Christening is on the 25th March and she will be named Isabella Mandy Victoria and she is simply beautiful.


I have used the "Bookatrix" embossing board from the   The Glitter Girls    to create the pages and dressed up each one individually before sticking them together... but then I have added the whole lot to an A5 card with the fold at the top and this will allow the "book" to stand up.


I have made it in pale pinks and white with the addition of feathers and ribbons and a pretty pink Hatpin in the centre... and I really am pleased with the result.


The flowers on the front of the card are from  Wild Orchid Crafts.   The feathers were in my "stash"


I hope that her parents will keep the card safe for her until she gows up a little, and then show it to her and tell her it was all hand made by her Great Grandmother with lots and lots of love.


I made a box to give the card and I have lined it with pale pink tissue paper... and of course the Spellbinders came in really useful too. 

Just need to lose two stone and a new dress for the day and then I'm done....


Hugs Christina xx

February 20, 2012

I have a Blog Award ...

I have a Blog Award and I am so honoured,  especially as my Blog is so new.

But I would like to thank Sharon  at  Card creations by Sharon Joy  for this award and I add it with pride to my page....


The LIEBSTER BLOG AWARD is used to show appreciation of smaller blogs (under 200 followers)  and to help spread readership and joy.

As part of the tradition the award is to be passed along to five other blogs that have motivated and inspired me. 

It comes from the German meaning Dearest or  Beloved, but can also mean Favourite.

To accept the Award you must:
1. Link back to the persons blog who gave it to  you, and thank them.
2. Post on your blog.
3. Give to five other Bloggers who you appreciate and value.
4. Leave a comment on the five blogs you choose and  let them know.

These are the choice I have made, and why, that I would like to pass the award on to ...

Creative Bug on the Loose  ...  Naomi as she was the one that encouraged me to start the Blog in the first place.... so this is all her fault!

Crafty Bloggers ... Kathleen as she was the one who helped me to remove the  annoying Word Verification from the Blog.

Best of Betsy'    ... Betsy  because she makes some beautiful cards.

Marisa Designs  ... because I just love the  LOVE  red box project Marisa  has made with Spellbinders.

Bless This Mess ... Denise  because she also has some pretty projects for you to try.


I hope you will pay each one a visit and see some of the things they have done, and thank you again to Sharon for nominating me for this award....


I am so pleased ... like the cat with the cream.

Hugs Christina xx


February 19, 2012

New week ...new video!

The sun is still gracing us with it's presence and it has been really lovely day.  I took my film crew (Griff) out  to lunch and he enjoyed it very much.

There is nothing like a good Roast Beef and Yorkshire pudding ... unless of course you make it your self ...and I couldn't be bothered.  So it was out to the nearest restaurant for that delicacy and it slipped down very easily too I might add.


The new video has been added to the website and it features this lovely card.  It is an 8" square and I have also included how to make a feature of the back of the card too, so it looks good from every side.


You don't need to buy larger card stock for this as you can get the look from your A4 card quite easily.

And this is another idea that you won't be disapointed in if you use the Spellbinders that you have in your collection.

I hope you enjoy the video and the card that you can create.

Hugs Christina   xx

February 18, 2012

Sunshine Day!

It's weekend and the sun is shining and I have got loads done today. Feeling quite pleased with myself on the quiet.... though none of it is housework!!

I have been filming again with my film crew (Griff) and we have two more videos ready to go.


This is one of the featured cards and I just love this pink and white colour way as it always looks so fresh and spring like.

This card is staying with the same set of beautiful dies that I have been using in all the other  Spellbinder Tutorials  as they are such a versatile combination,  and the cards that you can make will all be stunning. 

There need be no end to your creativity and you will always be pleased with the result ....guaranteed!

So I have no excuses left .... Blog done, cards made, Facebook updated, emails answered.... and now I have to go and take the vacuum cleaner for a walk around the house.... but tomorrow.... well tomorrow is Sunday and I have promised to take my film crew (Griff) out for Sunday lunch and hopefully the sun will shine yet again.

Hugs Christina xx


February 17, 2012

Spectrum Noir Pen System ...

I have been colouring in my own digital downloads, or creating paintings,  for quite some time now and I have tried lots of different colouring mediums.

I love to watercolour with Distress Inks as it gives such a lovely finish to my projects.

There are many tutorials on the subject of using distress inks  (including mine)   for some really good tips on how to get the look you want.

Over the years I have used Pastels, Oils, Pencils and Acrylics  ... but then along came Alcohol Pens and the whole world changed.

They opened up a whole new area for the colourist and they give such professional results even if you are not an artist.... and I don't for one minute claim to be an artist.

Some of the brands I have tried have been Copics, Sakura, Flexmarkers, Promarkers and Aquamarkers.

But the ones I am trying at present are the new Spectrum Noir pens  from   Crafters Companion


This is such a pleasant way to colour in, and the colours blend in beautifully ... but don't let the kids have them ...Oh No!!

The image is another of the "Wrinklies" from  Just Inklined  and this delighful character is Albert.

He has been coloured with the new pens and I am very happy with the result.

I will certainly be practising more with this system and perfecting my skills with the blending so that I can get the best results possible with these pens ... and hopefully the recipients of my cards will like what they get.

And a quick P.S.  and that is the  New Video  that I made on Monday is now on the website and I hope you will enjoy it.


Hugs Christina xx


February 16, 2012

More from Just Inklined...

These cards are more from  Just Inklined.  I got my images when they were offered for free as I always love a good freebie ... Oh Yes!!   The gorgeous Maude was also from them. 

You can buy them as indivdual images from their website,  but now they have added them all to CD's.  

There is the  "Big One" and  "The Next Big Thing"  and both offer you really good value for your money ... and if you don't feel confident enough colouring in then the digi  stamps come ready coloured too.

I have had both of these for a while now and had the chance to look around them, and there is something for every age group and gender on them.  You will be able to make a card for any occasion.


This lovely scene above is the "Terraced Houses",  it has been coloured in with Promarkers... and the flowers are from Wild Orchid Crafts   ... and of course the Spellbinders to create the shape to mount the image onto.


This one is the "Post Office" and is a very pretty scene. I have added some text paper for the backgound.


This one above is "Kiss the Cook" and would be ideal to send for a summer birthday ... especially to the man that does all the cooking at family get togethers ... like Griff!!


The background to this card is the Faux Leather Technique and the link will take you to the video tutorial for how to get the look. All you need is some masking tape and your Distress Ink.


I just love this cute character with his carrot, and I have made this up into female cards, with great success as well as this one on a more male theme.

I don't think you would be disapointed with either of the CD's  and you are sure to be kept busy for quite some time .... have fun!

Hugs Christina xx

February 15, 2012

Going Solo ...

This morning I thought I would make a video on the card I was playing with ... without the aid of a safety net and no Griff ... and this is the card I came up with.

It uses some really pretty flowers from  Wild Orchid Crafts  and they have been added to a large, cream  luggage Tag. 

This corsage is a mixture of  Roses and Cherry Blossoms and I think it has gone together really well.

I thought I would try green for this card as it is not a colour I would choose often ... yellow is another that I tend to shy away from. 

The Paper Doillies are coloured with  Distress Inks and added as a panel, and also on the Tag itself.

The colours I chose to distress them with are Bundled Sage and Forest Moss.

The blending tool is homemade and if you would like to make your own then have a look at Blending Tools  and save yourself some money in the process.


The  Hatpin and end protector  is from the   Sparkles Group   and you will find them under Specialist Findings. 

You can get them in several different lenghts but my choice is the 3" one as it fits very neatly onto a card front.  I have added spacers and several sizes of pearls to create the effect.

Don't forget to tell them who sent you!!

Push it through the flowers and pop the end protector back on  for safety, but remember to tell the recipient that it can be removed and then worn on the lapel.  So a card and a gift in one go ...

... and the video tutorial will be added to the website shortly. Hope you will enjoy it.

Hugs Christina xx


February 14, 2012

Happy Valentines' Day

I hope you have all had a good day so far and got lots of Valentines from the one you love.

Griff loved his card but the first thing he said was ...." Some woman has left me a card,  I think she must know my wife though coz she's left me one of hers" 

I got my card at breakfast,  along with some flowers and an invitation to dine out this evening..... of course I said Yes ... and so the diet will have to start tomorrow ..... again!

But it has pride of place ... alongside the one he bought for me on top of the TV.


Now I hope you like this very beautiful lady .....  her name is Maude Doodlebun , and she is from  Just Inklined 

You will find many fabulous images there for you to download and colour in.... my favourite section is the "Wrinklies" they are just a wonderful set of fun characters ... for people of a certain age!

Maude has been coloured with Promarkers and I have used Glossy Accents on her glasses. Once it is dry it shines and looks like the lenses.

The flowers are from Wild Orchid Crafts  and they are a selection of Cherry Blossom,  10mm and 25mm white roses,  and some blue and white flowers that I don't know the name of.

The leaves are punched from the Ash Branch punch from   Leonie Em   You will find them in the product section under Extra large punches.

The sentiment is from Lili of the Valley and there are several different ones all on one sheet.  This one says ... Believe that you are wonderful..."   and I think that Maude is just that!!

Hugs Christina xx


February 13, 2012

What a cutie ...

I love to make girly cards because then I can go to town on all the lovely embellishments that I have in my  ever growing "Stash" ... you know the one I mean .. the one that spreads all over the house in no time at all ...

 Yes?  You got one of those too?

Feathers, lace, gemstones, flowers, ribbons and pearls just add the finishing touch, and if it's pink as well .... what can I say ... I am in heaven!!

But having said that I love this card I have made in blue.  It is a pre coloured image from the Pretty Sweet CD from   Polka Doodles   and there are several  little girls for you to  choose from ...  you will be spoilt for choice.


There are backing papers and sentiments for you to add to your designs to compliment the look, and with the addition of the ribbons from Fantastic Ribbons what more could you want.


There are also some un-coloured images on there too,  so that you can print them off and use your favourite medium to add the colours of your own choosing.
This one has been coloured in with the  Spectrum Noir pens from Crafters Companion  and they are very easy to use to give you professional results.
The finishing touch on both of these cards is the beautiful flowers and there is a huge selection of colours and styles from Wild Orchid Crafts 
 
 
They have flowers that will suit any season and some fabulous embellishments that you can choose to add to your cards.
 
 
And both of these cards have boxes   that have been decorated to match them as a special touch.
Hugs Christina xx

February 12, 2012

Are you ready for Valentines Days?

Today has been far from relaxing and there have been three videos made over the weekend.

The one I mentioned yesterday has now been added and if you refer back to yesterdays post then you will be able to use the link.  It will take you to the White on White card featured with the Spellbinders.

But next week is Valentines Day.  Have you got your card ready to send to the one you love?

I have and here is a sneaky preview of Griffs card.  I have kept the colours gentle (just like him) and I hope he will  like it.


The top part of the card has been embossed with an embossing folder  from  Creative Expressions    Look for "That Special Touch"  for the masks to give  some really pretty ideas. 

This one is the Vintage Plumes.

The bottom is covered with some stripey paper and the join is covered with the Hearts Border from .... Yes you guessed it ... Spellbinders!!

I have also used the Scalloped Hearts and the Classic Hearts amd added gingham ribbon for the bows, and threaded throught the border.

I'll let you know what he thinks on the 14th....

Hugs Christina xx

February 11, 2012

New video on the way ...

Today has been very busy with preparing another video that I want to add to the website and I hope you will enjoy making this   White on White Card  card.

 It is another staying with the Spellbinder theme as they have been very popular... and yep!  Griff had to get his ladder out again!!

I have stayed with the same set of dies that I suggested in the other    Spellbinder Videos   so that people will have the chance to get more comfortable using them... but it doesn't matter which sets you have they will ALL  make gorgeous cards.


The video will show you how to make this Special card and it would be lovely to give it as a Wedding Card.  You could personalise it with the happy couples names or the date of the Wedding day... and it needn't  be all one colour.

You could add in the Brides colour choice and make it even more special for her.

Or how about making it in a rich ruby red, gold, silver or pearl for those extra "Special Anniversaries"  and once again add the couples names to the front of the card. 


The list goes on and on .... and once I get started on Spellbinders there's just no shutting me up.

Hugs Christina  xx

February 10, 2012

The word verification thingy.....

As you know I am very new to the Blogging world and learning something every day.  But I was asked to turn the annoying word verification  OFF ... which apparently is on by default. 

Well! I pressed every button and link on this interface and I could not find it any where.

Blogger is now using a new style look to the Dashboard,  and as I am new,  this is the only one I have used.  So I was at a loss on how to do this.

I was sent a link from a kind follower (Thank you Wendy)  and she pointed me in the direction of another Blog that may be able to help.

So over I went,  but I couldn't follow those directions either ... because there is nowhere on the new style dashboard to  switch the word thingy off.

My little fingers flew over the keyboard to email the Blog owner for more help and she duly wrote back to me .... and she couldn't find it anywhere either....  So at least I didn't feel quite as stupid.

But   Kathleen at  Crafty Bloggers  very kindly gave me further instructions and now I am pleased to say that ... word verification is OFF. 

So thanks  Kathleen too for your help,  and if you are stuck with anything then she is willing to help you sort it out.


Hugs Christina xx

February 09, 2012

Waste not want not ...

I love to make cards with  Spellbinders  as the result is almost guaranteed.  But what to do with the little bits that you are left with when you have cut something out.

Well the simple answer is don't just throw them all away as they can be used on other projects to great effect. I am not for one minute suggesting that you keep every single bit ... but be selective and see what comes to mind.

Just get your imagination going and you can find some way to incorporate some of them onto your cards.


I cut out the large shape from the  Holly Motifs in black card for another project,  and there are some large and interesting shapes that remain... so being a frugal crafter I  wanted to make use of them.

The black edging on the left of this card has all those left over bits looped over the main card and the effect is rather good ... well I thought so!

So it pays to look at all these dies in a different way and make use of what is otherwsie known as scrap.... and create for yourself some lovely cards. 

And there is another video in the series I have done  to help you get   More from your Spellbinders

Hugs Christina xx

February 08, 2012

Freebie for you ...

Well I have been up since 5am ... couldn't sleep with things whirring round my head ... and yet I don't seem to have done very much so far.

I have all sorts of ideas buzzing away and I have to get them down on paper before I forget, ( sign of age!!) and so when I wake in the middle of the night the brain starts going and that's it for me ... no more sleep.

So rather than lie there thinking  ... go to sleep, go to sleep, I may as well get up and get something done.  So this is what I have achieved this morning.

These young men are more of the digital drawings from  Showers of Cards and Flowers  and they are "freebies" so grab them while you can.  They have been coloured in with Distress Ink ... and there's not a flower in sight, not even a trace of pink. (Sigh!) 


I have covered the process of using these fabulous inks to water colour with and the tutorial is in three parts.  One features the skin, the second the hair and the third the clothes.

 I don't profess to be an artist but this works for me and so this is how I go about
                          Colouring with Distress Inks


The backgrounds to both been done with the   Cloud Effect   which makes them look as if they are outside ... maybe waiting for pals to come out for a game of football... who knows.

Now because they are digital images they will need to be printed onto your paper, and off course printer ink and water don't mix.

Your work will bleed and look awful, but there is a way to stop this and it is very simple.... cheap hairspray!!

Works wonders at sealing the ink quickly, cheaply and efficiently... and that way you won't have a spoiled image.

 I have used a light card of 160gsm as that goes through my printer with no trouble at all.

On the first spine has been wrapped with rafia and the sentiment  and the footabll are from the Pretty Tuff CD from   Polka Doodles.   Just the finishing touch a boy needs.

The second card has some Spellbinder borders and the sentiment is red ... but it looks pink!!


Hugs Christina xx

February 07, 2012

Another Competition ...

Last year I seemed to have got the bug for entering competitions. 
A few days ago I showed you a card that I entered into one of them ... and I didn't win.

         Well this is another card I sent to yet another magazine and ....


                            ... I din't win this either (Sob! sob!)

 But at least I had a try ... and I thought this card was so lovely.

I was so pleased with the end result that I did a video on how to make this Mosaic Card  and it uses some gilding flakes  and a piece of double sided adhesive sheet to  get the result.

Much prettier in real life than the photo shows.

The image and the sentiment are from Lili of the Valley  and their stamps are utterly gorgeous. You will be spoilt for choice if you visit so be warned.

The flowers and the pins are from  Wild Orchid Crafts  and are such a beautiful addition to any card

But I also entered yet another competition with these three card projects and this time I was ....


 ..... no not the winner ... but one of the Runners up!! And guess who was really pleased with herself.

I went around with a smile on my face for days and showed the picture of my cards, in the magazine, to anybody that would take take a look.

Even the postman was treated to this exclusive look at my cards.... I think he thought I was mad!

And again Lili of the Valley stamps for the rabbits and the child and the Poppies are from Clarity Stamp  ... Another website with an amazing array of stamps.

So maybe this year will see me entering all over again and who knows what will happen this time.

Hugs Christina xx


February 06, 2012

... Panic Over!

Whew! thank goodness for that.  After the problems yesterday when trying to add the new video I am happy to say that it is now sorted.   And so this where you will find the tutorial to create this
                              Aperture Card with Spellbinders.

The videos will now be in High Defintion to show more detail and the music in the background has had to be changed as the other one was lost along with the software used for editing them.

But the new piece is vey pleasant and relaxing so I hope you will enjoy the tutorials just the same.


So this is the card that I wanted to share with you and this is the lilac version of it.  But it would look just as good in any colour. Imagine it all in white for a really special wedding card.

There are some neat ideas for the ribbon as well and it gives a real vintage look to organza.

The flowers and leaves are all cut from Spellbinders and you will find here the tutorial to show you how to Create Your Own Pearls

I am going to de stress now with a nice cup of Cappucino ... any body want one???

Hugs Christina xx

February 05, 2012

Video Hitch ...

Over the three years that Card Making Magic has been around I have made several video tutorials that have been added regularly.  Just short ones so that you don't have time to fall asleep ... but long enough to show you what I am trying to achieve.

We have had slight hitches along the way but usually things go well.  So let me tell you how they are produced.   My husband (Griff) stands on his little ladder and films over my shoulder ... and whenever my head gets in the way he pulls my hair to get me out of the shot.... and sometimes he misses and oops! there's my head. (Soreeee!)

We laugh and we argue while these films are being made but  hopefully you  find them enjoyable.


So yesterday we made a video of the making of this card and I was hoping to add it to YouTube later in the day. Everything went well and the cards turned out very pretty .... but when we came to the editing of it something went really wrong.

As the PC was turned on the message read that there was an error and that the software used to edit the video was irrepairably damaged and should be removed. So what should have been a relatively quick task turned into an all day job and at the end of it .... still no video was produced.

So this morning the task is on to start again and hope fully Griff  (who does the editing) will be able to sort things out.  But we think that the music will be lost and all the start and end bits to the videos will have to be done again so it may take us a little time to get sorted.

The card itself is another one using my Spellbinders and is one of a series that can help you with  Starting Your Spellbinder Collection 

The links to the other two tutorials are on that page.

It is a much prettier card in real life than the photo shows and as soon as I can I will get the video on the card onto the website..... once my production team (Griff) gets things as he wants them again.

In the meantime have a really good day.

Hugs Christina xx


February 04, 2012

Hello Ducky!!


This lovely little chap is a free download from   Showers of Cards and Flowers 

Naomi is just venturing out into the world of creating digital images and there are more for you on her pages.
This is my interpretation of her lovely duck and I have used a template for Creating Clouds

 Pay her a visit and see what else is on offer as a "Freebie"  .... I love a freebie!

There are two images for you to download and one of them is already coloured. The other is a line drawing that you  can colour your self and make the most of any of the colouring mediums that  you have ...  and make him a her if you wish....there's nothing wrong with a pink or a blue duck!!

The flying birds are hand drawn,  just little "V" with a fine liner pen, and the fence is a small stamp from one of the sets from Polka Doodles range of stamps. All the individual elements in the collections can be used on other designs with great effect.

With the addition of some Googly eyes and ribbon from my "Stash" I think he looks rather cute and ideal for a small childs' birthday..... but what do you think?

Hugs Christina xx

February 03, 2012

Competition Entry 2011


This is a card I entered into a magazine competition last year ... but I didn't win (Sob)

The image is  "Daydream Believer" from the SWALK collection from   Crafters Companion and there are lots of different designs to choose from ... and some to suit all your male cards too.

The style of card is a  Pocket Card  and it is very easy to create. It just takes two matching pieces of card to make the pocket in the centre,  and in there you could add a gift token or just a pretty sentiment or verse.

All the instrutions to make this and many other folds are at  Card Making Magic  and it would suit any occasion.

The beautiful flowers are all from Wild Orchid Crafts  and there many, many styles of flowers to wet your appetite, as well as other gorgeous embellishments that you won't be able to resist.

For me flowers make such a pretty addition to all your girly cards.... and I am happy to make girly cards till the cows come home.   Especially pale coloured ones....

The ribbon is from my "Stash" and the Butterfly is from a Martha Stewart punch.

And if you make the card why not add it to a matching box and then send it with lots of love.

Hugs Christina xx


February 02, 2012

My First Day as a Blogger!!

I have finally been persuaded to join the ranks of Bloggers and this is the start with my very first post.

I have been making cards for a number of years and when I first started they were not very good... but having said that I sold many of them and the buyers came back for more. I even had commisions to work to and that was very complimentary to me... and a great boost to my confidence.

I bought so much crafting stuff, and some of it not very good,  that quickly filled my dining room with boxes and bits... and was a massive task to clear everything away every time we had someone for dinner.  So from there I progressed to the small bedroom ... which my husband was using as his hobby room... and he was relagated to the dining room instead (poor man)

But it made more sense to craft in an area that I could close the door on each time I had done some cards.... hides the mess you see!!

Soon I wanted to do more and so I started researching into taking this further.  My first idea was to create a website that would be full of information and projects for "NEWBIES"

A website that would be easy for people to follow and so in 2009    Card Making Magic  was born


I worked hard and added as much as I could to the information that I was giving to create a particular look so that others would be able to follow my ideas. I started with the basics of what you would need to get going with this lovely hobby  and worked my way up to adding Video Tutorials.

Lots of poeple ...me included ... like to watch something being done before it sinks in and so that seemed the next step to take. There are lots of easy techniques and card ideas in the videos and as the time on YouTube has been extended I am able to do more.

As Card Making Magic reaches it's third birthday it continues to go from strength to strength and there are a lot more ideas and projects all buzzing around in this head and I can't wait to show them to you.

I  am always amazed when I get the emails telling me how much my website is appreciated and that people come back time and time again, and hopefully now they will have a blog to visit too with more information and cards that will help all new Cardmakers get started.

Thanks for stopping by and I hope you will come and visit me here and on the website over and over again.

Hugs Christina xx