Beautiful Card Designs Made Easy

July 31, 2012

Bumble Bug

This is another line drawing from Naomi  and as yet she is free. She is  part of a collection that will be available to purchase on  Creative Bug on the Loose .... but for  now she is  .... FREE.

So if you would like to colour her in for your own use then head on over there and get her while you can.

This is Bumble Bug  and she is the third one  in the series ...  and this is my favorite one.

I have added her to a shaped card and the flowers are paper roses.

The largest one is from Spellbinders Blossom 3 and has a pink pearl centre.

The Butterfly is from my "Stash" and the diamante Swirl is from Want2Scrap  which makes her very special.

The image has been coloured with Spectrum Noir pens and they are available from Crafters Companion

You will find the videos on colouring with this system here in the Tutorials.

Hugs xx

July 30, 2012

Naomis' Freebie ....

This lovely little drawing is one of a collection of four and she can be found on Naomis' Blog  Creative Bug on the Loose 

Naomi  invited me to colour her in  and make her into a card for you to see and so here she is.

This is the first one in the collection and I think she is adorable.

She has been coloured with Spectrum Noir Pens.

For the time being she is  FREE  so head on over to Naomis' Blog and get her while you can.

Once the collection is complete they will added to the blogs online shop for you to buy.

They are line drawings and ready for you to colour in any way you want.

I have added the Lady Bug to some Rafia Lace and added  small paper Doilys behind her.

The Belle Rose Swirl is from Spellbinders.

The ribbon is tied in a bow and has the addition of a Vintage button to cover the knot. 

The flowers are tiny paper roses and I have sparkled them up with Glamour Dust. I hope you like her and will take advantage of the freebie that is on offer.


Hugs xx

July 29, 2012

Blue Jeans

Most teenagers these days like to chill about in jeans and a T-shirt  and although I am not a teenager I have lately started to wear these my self.

It is such a comfortable outfit and of course many images now also feature the same kind of outfits

And so staying with the Spectrum Noir pens I thought I would add a video that covered the colouring of Jeans.

This young man is from the magical pen of KennyK Downloads  and you will find some wonderful images there if you browse around.

And if colouring is not your thing then you can also buy them ready coloured for you just to add to a card.

I have added this Tutorial to the series on these pens and I hope you will find it useful.

Spectrum Noir Jeans  will also show you some variations in the colour scheme so that you can vary the jeans that your character is wearing.

The finished card is an 8" square and the sentiment is from the "Pretty Tuff" CD from Polkadoodles

There no flowers to tell you about on this card (Sigh!)  But there will be again soon !!

Hugs xx 

July 28, 2012

Part 2 of Dark Skin ...

Thank you so much for all the lovely comment s and emails that I have had about this series.

Both Parts 1 and 2  to this video have now been added to the website and they are on the page Spectrum Noir Dark Skin 

I have really enjoyed doing this particular card and I am very pleased with the result.

But of course the pens make it a real pleasure to blend and having the correct paper to work on makes all the diference too.

The sentiment on this card is from the "Pretty Tuff" CD from PolkaDoodles

You can buy the pen sets from Crafters Companion along with the refills and replacement nibs.

The flowers are from Wild Orchid Crafts and the lace was a lovely piece I found in my "Stash"

The Pearly Swirl is from Want2Scrap  and I have added them to both of these cards.

I have stayed away from the flowers for the boys card but the addition of the pearls just makes it that little bit more special.

Hugs xx

July 27, 2012

Spectrum Noir Dark Skin ...

Earlier this month I added the video for Pale Skin  and the response was very much appreciated.

But it triggered off some emails asking me to cover darker skin tones too. 

I have used another baby image from Mo's Digital Pencil and this is "Boy On the Pot"

The photo shows how the same image can take on a different look with the use of these alcohol pens.

And so Spectrum Noir Dark Skin  has been added to the series and already has several comments on YouTube.

I am really pleased with this new tutorial but agian because of the length it has had to be edited into two parts.

Part 2 will complete the card using this and the "Girl on the Pot" image as well.  I hope you will find the ideas useful and then maybe add your pictures to the Gallery Page on the Card Making Magic website.

The pens are available from Crafters Companion  and if you are in America try this link instead Crafters Companion USA    Happy Crafting ...

Hugs xx

July 26, 2012

A card for any reason ...

This is a card that is for any reason you can think of or just to tell some one that you care.

It is created with the aid of  Spellbinders  and some "Bling" from   Want2Scrap

The ribbon was from the wrapping from a new pair of PJ's  and the backing  paper was  free from a  magazine subscription.

So all  together a really  inexpensive card ....  I  just need someone to send it to now.

I have  had a  lovely day out for lunch with my friend Pat and so this card is quickie that was made earlier today and for no particular person.

But I enjoyed making it and it can go into the reseve box for whenever it is needed.

Hugs xx

July 25, 2012

I'm having a rant.....

Ooooh! I am so mad .... let me explain. I have not used my credit card for ages and so when we went to Canada I paid for the flights using it.

I emailed the credit card company to tell them that I would be out of the country until the 7th July and they acknowledged that email.

Then once the fights had been added to the card I paid the bulk of it off early and emailed them again explaining that I had done this to save any fees. That was also acknowledged.

Then when I got back I had a bill for the rest of the money so I rang them ... and I asked the woman for the exact figure to clear the card back to zero again and she gave it to me.

So I instantly paid it over the phone and asked was that the account now cleared and she said ... "Yes it was now back to zero". I wrote on the statement ... "Paid in Full" .... and patted myself on the back.

Today I have had a statement telling me that there is an interest charge .... so I have been back on the phone again very, very angry.

I asked how could there be an interest charge on a zero balance????

Apparently the interest is calculated in advance on the next statement and because I had paid it early the interest had been reduced but still added to the zero balance..... Er what!!!

I was not a happy bunny... I was being penalised for having paid off my account early.

Off she went to see what she could do ... and came back telling me that the sum had been removed and that the acount WAS now cleared.

And the moral to this story is ... don't be good and pay your cards off early .... wait for the bill and make them wait till the last week ... but avoiding any late fees ... before you settle it.

Rant over .... back to cards tomorrow

Hugs xx

July 24, 2012

Creating a Spectrum Noir background ...

Now having completed the baby image from Mo's Digital Pencil  that  I have been using over the last few videos it is now time to add the beautiful baby to a special background.

For this card I have stayed with the  BLUE  set of  Spectrum Noir  pens from  Crafters Companion   and added in some of the darker ones to get my backgound.

Click to Enlarge

If you enlarge the photo take a look at the background piece.

You will be able to see just how pretty it is...
and the   Spectrum Noir Background  video will show you how to replicate the look.

As always if these techniques are known to you then please don't think that I am talking down to you.

But many new people visit these pages and the Card Making Magic website and it is my intention to help them get a good start with their cardmaking hobby.

I know there are people in their 80's,  and some as young as 10,  that visit and make use of  the tutorials and that makes me very happy. 

And if they are happy with what they come up with then so am I.
Each of these cards has the addition of flowers from Wild Orchid Crafts  and the  beautiful "Bling" is from Want2Scrap 

The deorative pins are hand made .... by me .... and the supplies are from the  Sparkles Group

They are created with a blank 3" hatpin and they come complete with end protectors.

You will find them in the Specialist Findings and don't forget to add  CGDIS5  at the checkout This will tell them where you have come from and will allow you to get your discount.

Hugs xx


July 23, 2012

Busy weekend ...

I didn't get to add a post over the weekend but I have not been idle.  Oh No !!!

Click to Enlarge
My "Film Crew" and I have done two more videos. 

As I told you yesterday the Spectrum Noir Clothes video had to be edited into two parts  and that was because YouTube will only allow videos up to 15 minutes long.

Longer  than that  and you get chopped off ... in your prime so to speak !!

And so here is Spectrum Noir Clothes Part 2


This one centres on using the blender pen for the first time and it creates a different look for the fabric on the babys'  dress.

It is very easy to do and the video shows you how ...  but there are lots of ways to make this blender work for you ...  and hopefully I will cover them as I go through the series.

Here is a finished card with the Blender Pen used to create the Polka dots and I have also used one of the  pens I used for the background to colour some white  ribbon and the Pearly Swirls,  which are also white to start with and from  Want2Scrap

But if you enlarge the picture take a look at the background because that is the fetaured item in the next video.... and I hope you will like it.

Hugs xx

July 20, 2012

Spectrum Noir - Clothes

Because of the restrictions about the length of a video with YouTube this tutorial has had to be edited into two seperate parts.

So the first part will cover creating folds and shadows in a white dress.

Part two will be added tomorrow  and I will show you some effects that can be achieved with a Blender pen.

Here is the first one and it is Spectrum Noir Clothes Part 1

I have really enjoyed putting together these tutorials and there are lots of ideas emerging as I make them. 

But for now it is time for me  to go and put my feet up with a glass of white wine and watch some TV for awhile.

Another video tomorrow ....

Hugs xx

July 19, 2012

More tutorials on the way ...

In the pipe line there is a tutorial on colouring clothes with Spectrum Noir ...  but I have been asked about other skin tones  .... and that is on the way too.

But they all take time and  I am happy that the response to these  vidoes has been so well accepted.

So thank you for all the lovely emails and comments that I have had.

Darker skin tones are something that many people are afraid to try and so I thought  it needed a tutorial  all by itself.    I have tried to stay with the colours that are available in the six pen sets to save some  expense ...  and I will of course give you the list of the pens used.

I have been colouring for a long time and it is only the product that is new. So if you have bought the pens then hopefully you too will have got something out of these tutorials that can be of help.

This is another image from Mo's Digital Pencil and the "Bling" is a Diamante Swirl from Want2scrap

Hugs xx

July 18, 2012

Copyright Infringement ...


This a quick post and no pictures and is to get out the message from Maurie J Manning.  

This is the wonderful artist whose magical pencil creates the beautiful images that I have been using for my videos.

It would appear that someone has been stealing some of her drawings and altering them. Maybe changing them fro boys to girls or vice versa, or altering the clothes that some of the characters are wearing.

She has also been adding her own name to the images to sell.

Can I urge you please that if you should wish to purchase any of Mo's drawings to colour them for yourself then you only buy them direct from her website ... Mo's Digital Pencil  and this link will take you to all the wonderful characters that Mo has on offer.

I have such respect for any one that can create such beautiful drawings and my personal view is that to steal them and claim them as your own is despicable.

Hugs xx

July 17, 2012

Pearly Baby

I hope you are not getting tired of these babies  ... though with such a lovely image I don't see how you can.

The next video in this series will be about clothes and I will show you some tricks with the pens to get the different looks.  It will be added later in this week  because at the moment my "Film Crew" is rather busy.

Around the edge of this card I have added the look of pearls ... but to use the real thing would cost too much

And so I have used glue to produce the look and the video   Create Your Own Pearls   will show you how to get the look and save money in the process.

Clicking the picture will  enlarge the photo  for a better view and I have varied the size of the pearls for greater effect.

 The charm on the left of the card is a silver baby shoe and I have added it to the  tag  with a silver mobile phone cord.

The number is fabric and raised on foam pads.

I have made the card to an 8" square as that gives lots of room to add the border, and I embossed a square onto it first.

I have added an "A" frame to the back to enable the card to stand ... and I don't need to add an insert to the card doing this.

The   Spellbinders Fancy Tags 3   has the addition of Nestabling around it and that is from Want2Scrap

I am pleased to tell you that my Spellbinder and Nestabling videos are featured on the Want2Scrap Blog page and I thank them for the compliment


Earlier this week I mentioned Micro Glass Beads and I have had several emails asking me about this product as it is quite new. The link will take you to a more detailed explanation and how to use them on your cards.

Hugs xx


July 16, 2012

Spectrum Noir and Hair ...

Continuing with the series on the Spectrum Noir Marker Pens ... and still using the same baby image that I started this series with ...  today I have added the next one  ... for colouring her hair.

Click to Enlarge
The only thing extra that I have used is a fine liner pen to get the wispy strands in the babys' fine hair.

I have really enjoyed colouring this image and you can get your own from Mo's Digital Pencil  and this link will take you to her website.

The video was added to the website this morning and here is the link if you would like to see it.

Spectrum Noir Hair  is one way to get the fine hair look for this particular baby

Of course not all hair is done this way and hope fully over the next few videos I will be able to cover  a lot more.

I really hope that they are helping those of you that are new to this colouring system, and they are available online from  Crafters Companion.

That  link will take you to the UK based website and if you are in the USA try this one instead  .... Crafters Companion USA   

And if you live somewhere else then you can try either address and see if they ship to your part of the world.... or maybe your local craft shop will have them in stock.

And if you know the pens already and have worked with them a lot ...  and know or have your own way of working with them ... then just ignore my ramblings !!

Hugs xx


July 15, 2012

Tip for pen tops...

Since the videos have been added for the Spectrum Noir pens I have had many emails about them.

But one of the things I said in the video was about my disapointment with the numbers wearing off the pen tops very quickly, and so making it awkward to identify the pen at a later time.

Well the problems has been solved by a lady who watches my videos  and she sent in this very simple tip to stop that from happening.
She suggested that when you buy the pens ... and before you start to use them ... coat the top of each one with some kind of laquer.  And so I raided my cosmetics and found some clear nail polish and set to work doing just what she had said.

I covered both ends to every pen that I had ... and then I did the same thing along the barrel of  some pencils that I needed to keep the colour groups on. 

It took a little whitle to dry but once it was I then had the perfect preservation for all my Spectrum Noir Pens.

So thank you to Miriam for this wonderful tip and it is one that I am sure many many people will follow as well. 

Hugs xx

July 14, 2012

Spectrum Noir Pale Skin ...

Click to Enlarge
So yesterday saw the introduction of these pens and today we will get started with colouring in a pale complexion.

I will cover other skin types over the course of these videos and I will only be using the pens that are in the six pen collections.

For this one I have used the Skin Tones and the video will show you which of the set in particular.

When you are colouring in you may think it does not look correct but you will need to allow the alcohol to evaporate for the final result.

So don't throw anything away until it is all finished and even then you will be able to salvage some part of the the image that you are not happy with.

But remember that the more you practise the better you will get.... and I  am retired so I get lots of time to practise

And now here is the video for  Pale Skin   and it doesn't matter if you are using a different character from your own collection.

If you want to follow on with me then keep your chosen stamped or digital image safe and we will continue with the hair in the next video.

Hugs xx

July 13, 2012

Spectrum Noir Introduction

Here is the first of the promised videos and this one will introduce the pens to those that are new to them.
They are an alcohol based colouring system that has many good point in it's favour.

They are more affordable than some of the other pens on the market and that has got to be something to be considered for us crafters.

They are refillable and the nibs are replaceable too so that's another plus point.

The video is availble on the website and here is the link.....Spectrum Noir Introduction 

I have another one ready to add tomorrow and that will cover skin tones.... and bit by bit I will cover different coloured skins, hair colours, clothes, transparency, creating back grounds and making embellishmnets fit the colour scheme.

Hope you will enjoy them

Hugs xx

July 12, 2012

I'm being lazy ...

Since we got back from Canada we have been very lazy. Griff says it is jet lag and that he feels his will last about three months....  No chance !!

So today I have been busy preparing everything I need for the new videos I want to do and tomorrow it is back to work with a vengence.  So my "Film Crew" will have to get his hat on again and get up his ladder.

This is some of my  Spectrum Noir pens and some of the paper that I use to colour on.... which is a  160gsm Text and Graphic  card from   Staples         
This will be the start of a set of videos showing how I use them.   I do not pretend to be an artist ... this is just the way I make these pens work for me.
I have had several emails asking about them and so I thought that a video or two would be the best way forward rather than answer the questions individually

So tomorrow I will introduce the pen system and explain some of the things about them to those that are new to alcohol marker pens.

These are some of the cards that have been made using this system and hopefully ....  fingers crossed ....  you will enjoy the videos and find them useful to you in your own colouring.

Click the photos for an enlarged view.

The images are from   Mo's Digital Pencil  ... Lili of the Valley   and   Just Inklined  ... and all make the most adorable cards.

The "Bling" as always is from Want2Scrap and has been added to the Elephant card.

Hugs xx


July 11, 2012

Babies, babies everywhere.

Since I discovered these beautiful images from   Mo's Digital Pencil   I have had so much fun colouring them in.

I have used Spectrum  Noir pens  throughout the process and they are available from Crafters Companion

Here are some that I have coloured in using the same image but I love the way they have turned out...and although the image is the same one the effect is different each time... and I will be adding these to cards as I need them


This baby was featured in a card a few posts ago and has been coloured with Spectrum Noir pens....

Clicking the photo will give you a larger image so that you can see the different effect on each one.

I used the palest in the turquoise set and outlined it all with a pale beige.

I just love the sofness of these images and they are perfect for new baby cards or a first birthday.

My Great Grand daughter will be getting one of these on her first birthday in October.

This one has been coloured with pale greens and the effect on the dress is created with the pens.
And this one is in a pale Lilac with a Polka dot dress and this is my favorite colour scheme.
Such a delightful image deserves your best shot at colouring it in and making it into the prettieset card you can.

Hugs xx


July 10, 2012

Colouring In ...

While I was in Canada one of the things that Naomi wanted to learn was how to colour in images that  are from  stamps or  digital downloads. 

One of the images I coloured is on her blog page so why not pop over and  take a look at  Creative Bug on the Loose  She has made it up into a very pretty card that would suit any occasion and I just love them

It features one of the Fairy Babies that I bought from Mo's Digital Pencil  and there are so many beautiful images on there that you will be  spoilt  for choice. 

The artist,  Maurie Manning,  has given me her permission to use these images in a series of videos that I am going to make on using the Spectrum Noir pen system.

Naomi made a very good pupil and watched as I showed her which pens to use to get the effect for each individual thing that we wanted to do.
All the parts to this card are done with the Spectrum Noir pens and this is Naomis' first attempt at using them. 

 The card that we used was not the correct one for the pens and once Naomi gets some smooth paper she will be even more pleased with the results.

We coloured the ribbons, pearls and the acetate background with the same pens, and blended them all to match the colour scheme.

The little tag sentiment at the bottom Naomi has covered with the  Glass Beads  that I told you about the other day.

The flowers are of course Spellbinders Blossom 3 and she has inked the edges with Distress Inks.

So well done Naomi with this beautiful card.... and the videos will be here shortly.

Hugs xx


July 09, 2012

Sea Glass

Click to Enlarge
This is some beautiful Sea Glass that Naomi and I collected for Souris Beach which is right in front of her house. 

All we had to do was cross the road and there it was.... and such a beautiful view from the big window in her front room.

Enlarge the picture to see the array of colours in the glass and the smoothness of some of the pieces ... and when I learn how to make it into some lovely jewelery I will be sure to show you what I have done.

Some of the pieces are small enough to add to cards, but there are some that would make wonderful earrings.  The pinks and lilacs are gorgeous but my favourite is the very pale turquoise.

The blue is not so prominent and apparently the red is very rare.  I asked Griff if he would come collecting it off our local beach and his answer was ..... "Nope"  ..... spoil sport !!

Hugs xx

July 08, 2012

Glass Beads

This is a product that I took over to Canada to share with Naomi and the effect on your cards is quite amazing.


Click to Enlarge
They are tiny glass beads that are added to double sided adhesive sheets, and because they are so clear the image or sentiment underneath can still be seen.

I bought mine from  Creatuve Studios  and you can get both products from their website ... just click their link to take a look at some of the other super products that they have.
Click to Enlarge
I hope that the picture gives you some idea of the effect that has been added to the Rose design from Polkadoodles

The beads cover the flower but it can still be seen easily through them. I would suggest that you decant them to a larger container that you can dip your image or sentiment in to.


Ckick to Enlarge
Stamp or print off the image and colour if needed.

Then remove one side of the backing sheet from the  double sided adhesive paper and place it over the image.

Trim it  to size. Remove the other backing sheet and press the sticky side  firmly down into the beads and make sure that the area is covered.

Once you take it out of your container make sure all the beads are stuck onto the sticky sheet and remove any loose ones.

Add the extras that you want to finish your card and the result is very pretty.  Hope you like !

Hugs xx


July 07, 2012

...Hello UK

Here I am back at home. We flew through the night and got into Heathrow this morning ... and after travelling for 26 hours we are both really tired. 

We are trying to stay awake as long as we can though to get back on track with the time change ... but at 9pm this Saturday evening it is getting harder by the second.

So not many photos in this short post but this is a story I  just had to share with you. 

Just after I had finished writing my post in the airport lounge I decided to go and check on the time of our flight.

I left Griff finishing off his drink and I walked over to the display board.  I was very shocked to read that our flight had been delayed ... on the board it had flight 806 delayed 24.

 I rushed back to where Griff was and told him and his response was "You're joking'

"No" I said "come and check it with me" ..... and as we went back over to the board he wanted to go the washroom first.

While he was gone I saw two official looking men walking towards me and so I asked politely where I could get more information on a flight that had been delayed for 24 hours.    "24 HOURS ...." one of them said in a surprised voice ... "where are you going?  " Heathrow" I told him and he asked me to go with him to the Air Canada information desk and he would find out.

In the meantime Griff had come to join me and we asked questions of one of the men who was an airport policeman and he was very helpful and friendly.  H explained that the other guy ... who had gone to find out what was going on ... was the airport director.

Well eventually he came back all smiles and told us "Yes ma-am your flight has been delayed ..... by 30 minutes to 00.15 .... the 24 is the gate number" 

Guess who felt such an idiot ????

But we all ended up laughing at what was a very easy mistake to make... well I think it was anyway and it was because I was tired.... and that's the excuse I am sticking too.

Hugs xx


July 06, 2012

Bye bye Canada ...

I am squeezing in this post while I am at Halifax Airport, Canada waiting  to fly home to London Heathrow and  the next one will be from home.

It has been another hot day and neither Griff nor I are looking forward to the long journey home.

This is the boring bit waiting to board and take off.,,, and Griff hates flying at the best of times.

We are hoping to get some sleep on the flight because we have a long drive at the other end before we get back home.

This is our last view of Prince Edward Island as the ferry sailed away from the shore, and we take with us some very fond memories of our holiday with Naomi and Troy.

The sail across the Northumberland Strait took 70 minutes and the sea was so calm and sparkly.

We stopped at a town called Truro and had a walk around the park and these were some little friends that we made.

They came rushing up to us when we entered the park .... probably thought that we had food for them ... but sorry guys no such luck.
Now this is a photograph I could not resist sharing with you.

This is  Griff checking out his teeth in Naomis' magnifying mirror last night while we were all getting ready to go out for our farewell meal.

Caught unawares and I just happened to have a camera in my hand..... what more can I say except that it makes a real change from him photographing me doing something stupid.

And oh I have enjoyed adding this to this blog post.   Bless his little cotton socks ....

Hugs xx

July 05, 2012

Last Day ...

Yesterday was a bit if a disaster. Griff has proved to be rather tasty to the local bugs and he has been bitten several times whilst we have been here.


Both his left  hand and a foot have swollen up quite considerably.


Having been to the pharmacy we were advised to go to the "Walk In" medical centre ... and  we spent two and a half hours waiting to see the doctor.

I am happy to say though that he has responded well to the antibiotics he was prescribed and the swelling has gone down a lot overnight.

So today we have been out and about again enjoying our last day on Prince Edward Island.


This was the wooden train in Georgetown and we also visited the Kings Playhouse.... were Griff did his party piece on an empty stage and I filmed him ... so which one of us is the most stupid .... don't answer that !!  


We stopped by the river in beautiful Montague for a delicious salad lunch and wandered around this pretty place for an hour and more.

After a lovely afternoon we motored on to St Peters
and walked over the boardwalk across the river to the little gift shops.
Once back at Naomis we all got ready to go out for a last meal together at the local seafood restaurant.

Griff and Naomi had to select lobsters that they wanted to eat ... and then had to wait for it to be prepared.


The meal was lovely ....


... and this is Naomi tucking in to her lobster.

They were both supplied with plastic bibs and Troy and I said it was like sitting at a table with two 2 year olds  in bibs.

But it was a good night out and we all enjoyed our selves.

And tomorrow we set off for home again and have long day of travelling in front of us.

In the morning w e will be getting the ferry from Wood Island across to Nova Scotia and then our flight will leave Halifax at 23.45

Both of us are hoping so get some sleep on the flight because when we get back to London at 09.30 on Saturday morning we still have to drive back to the North West of England.

So probably no post tomorrow but once I get settled back at home we will be back to normal again and crating will resume as normal.

We have had an amazing time here with Naomi and Troy and been made to feel so welcome. Both of us are very grateful for the opportunity they have given us to visit this lovely part of Canada.

Hugs xx


July 04, 2012

Confederation Bridge

This is the bridge that crosses the Northumberland Strait from Prince Edward Island to New Brunswick and it is 11.5 kilometres long.

To get onto the island is free but to get off it you have to leave by either the ferry from Wood Island or via the Confederation Bridge which has a toll.

This is quite a modern bridge and we were surprised to find out that it was only completed in 1997.

This is a memorial at the base of the bridge to the Quartermasters and has the names of people engraved into bricks that have given service to the island crossing.

People sometimes come over by ferry and leave by the bridge or the other way round but we will be leaving on Friday the same way we came via the ferry from Wood Island.

Hugs xx


July 03, 2012

Province House

It has been a really hot day here in Canada and once again we have been exploring this pretty island.

This is Province House and it was free to wander around.  It is the birth place of  the  Confederation  and it was well explained in a short  video that we sat and watched.

At the Arts centre there was a superb performance by a group of young performers and we sat in the shade and watched.


And once that was done it was time for coffee and some lunch.... and to sit for awhile and relax in the sunshine as we watched the world go by.
A young man booking tours offered to take this photo of the two of us with a bronze statue of one on the Confederation Founders.

All too soon it was time to make our way back and we had a homemade Seafood Chowder to look forward to.

One of Naomis friends ... Patricia had offered to make us her own special recipe and bring it round for us to try.

I am not a seafood lover but I was willing to give it a try and I have to admit that it was delicious. Naomi made hot biscuits to go with it and a delicious Blueberry cheesecake to finish of Mmmm Mmmmm!!

I will definitely need that diet when I get back home ... and that is coming round at an alarming rate.

Hugs xx

July 02, 2012

The Bottle Houses

We have had full day out touring Prince Edward Island and seen some very pretty towns on the way.

We set off early in the morning and went over to the West side, and stopped for some ice cream in a pretty  place called Summerside.... and I promptly dripped chocolate ice cream down the front of a new white T-shirt.

Fortunately I had a shirt on over the top so at least I didn't look  a mess for the rest of the day.  Griff says he is going to buy me a babies bib in future ...

The main attraction we wanted to see was the  "Bottle Houses"  at Cap Egmont.

They were created from all coloured bottles that many of the towns people  helped to collect.


Thousands have been ..used to make a house, a chapel and a tavern.

They are quite amazing and big enough to walk around the inside of.

This is the inside of the chapel and there have been real weddings performed in here.


It was really peaceful and cool to sit in here for a little while and relax.


The six gabled house  is beautiful and set in lovely gardens that you can walk around.


And the perfume was delightful too.


Still more to do yet on this summer vacation... and more photos to add as we explore some more.
And this is  my handsome "Film Crew" doing what he does so well and that's filming.

And the look says ... "Are you  taking photos of me taking photos ??????"   and the answer was "Yep !!"


Hugs xx

July 01, 2012

Canada Day ...

Canada celebrates it's birthday on the 1st of July each year and this small town is no exception.

We have been down to the park area for the party and to join in the fun.

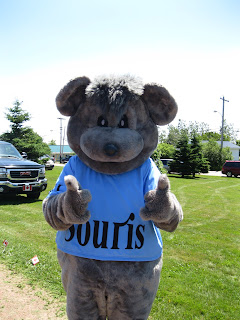
The town was named Souris  (pronounced Surrey)  by the French and it means mouse.

This character is the Souris Mouse and he went around  welcoming everybody to the park.

There was lots of stalls and entertainment as well as a talent show for the local youth .... and the sun was so hot all day long.

Now this is a couple of strange men that we found at the park all dressed up for Canada Day..... Naomis' Troy and my "Film Crew" having a laugh.

Griff bought a Canada T-shirt and has flags draped around his neck ... and Troy has red glasses with flashing lights along each side.

But we had fun and tonight there is more to come.  Music on the beach ... which is just outside Naomis'  front door.... and we are having a BBQ with all of their friends.

Great vacation so far and very kind weather too.

Hugs xx