It is easy to make for yourself and I have kept the tutorial precise and easy to follow so that you will have no trouble crafting along with me.
I have even more versions to share with you so be sure to come back and watch
My little corner of Blogland where I can share my creations with you. There are many video tutorials as well as links to good quality websites for all your crafting needs.
It is easy to make for yourself and I have kept the tutorial precise and easy to follow so that you will have no trouble crafting along with me.

I have a few versions of how to make this card to show you and rather than add them all in one extra long video I decided to make a few and keep them shorter.
Here is the first one for the
Be sure to come back and check for more ways to make these easel cards.
Hi Everybody,
I hope you are all well and having some fine weather. It's not too bad here today and I will be going out later for a little walk with Ruby.
I have more videos coming up with ways to create the easel card and some of these may be well known to you. But there are always new people arriving on the scene and they may not know how to create this really lovely, but easy to make, card.
Hopefully these videos will help them to get the kook.
I have done the draw for Fridays offering and the name today is
Valerija Jakolic
would you email me please with your postal address to
christina@card-making-magic.com
and I will get it posted to you straight away.
Be sure to let me know when it arrives with you and I hope you enjoy playing with it all.
More tomorrow ...
Hugs xx
Today I am moving on to the Triple Easel Card and this is another easy but beautiful card to add to your repertoire.
You can create this card from any Nesting shapes that you have in your stash, or indeed any dies that will give you three different sizes that will blend together, and it will look good with whatever you use.
It is another design I have covered in the past but this is the new version of an old favourite.
The background in the video is also created by hand with ink smooshing and some silver embossing to match the colour scheme.
 I
I You will find several more variations of these Easel cards in my Playlist for Easels on YouTube
More tomorrow ...
Hugs xx
These two cards are completely different but both have used left over elements that are left on my worktop.
For this card I have cut the flowers from holographic card and added it to the to if a hand inked left over piece of card.
I rounded the corners off and added it to an embossed panel and card that have also been rounded.
Having made quite a few of my own background papers I had lots of pieces left over, and I couldn't throw them away.
So I decided to add them to extra panels and create some A6 cards with them to re stock my charity box.
The card to the right has Washi Tape around the edges and the blue panel added to the centre.
The butterfly is cut from silver mirror and added to some parchment.
I also added some silver dots to the front to blend it all in and the sentiment for both is from an older pack that I already have.
So by using these pieces I have made two more cards and used up what would otherwise have gone in the trash can.
More tomorrow ...
Hugs xx

Hi Everybody,
So far this is only the second video in this series as I covered the single style on Monday with three different ways to get that look for yourself.
They are easy to do and yet look very impressive to your recipient and there are many ways you can dress them up ... or down ... as the whim takes you.
I have kept this card to a gold and white theme and it would make a lovely wedding card too.
You can also vary the size, and where you place the stops, for different looks to your card and once you get the hang of making it you can play around even more
The second card in the video has been created with another of the inked background panels that are so quick to make and very addictive.
I hope you enjoy watching the video and all you need to do us click this link to view on YouTube.,.
More tomorrow
Hugs xx
And of course once the video was complete I had all these beautiful images left over.
So it was time to get busy and turn them into cards.
I wanted to make card of different shapes to each other and so I decided on a square, a DL, an Oval and a small A6 and this is the result.
Hi Everybody,

Hi Everybody,
I hope you are all staying well and not suffering too much from the weather.
We are so lucky here in Blackpool as we have not had floods ... at least not in the part I live in.
And when it snows elsewhere it doesn't stick around for ling.
We do suffer from the high winds on occasions though and that can knock you off your feet.
Those are the days I stay in and keep warm with Ruby and Ella.
This norming I have done the draw for the beautiful Christmas Tree die from Crafters Companion and the name today is ...
Denise Bryant
so would you email me your postal address please to
christina@card-making-magic.com
and I will get it posted off to you straight away.
Be sure to let me know that you have it safely and I hope you enjoy playing with it.
More tomorrow ...
Hugs xx
Today we are touching on Christmas again as the season is fast approaching and this week we have a beautiful Christmas Tree from Crafters Companion for you to win.
It is a two part die and in the same pack there are papers and sentiments for you to add to your designs.
The magazine is full of ideas and inspiration for this set and other ideas that you may like to try.
It will give you a good read as you brose the pages with your favourite cuppa.
So if you would like this then all you need to do is leave me a comment at the end of the post with your FULL NAME
From those comments one name will be chosen at random as the winner and announced in a blog post over the weekend so be sure to come back and check if it is your name that is shown.
It doesn't matter if you have won before just have a go and see where you get .
More tomorrow ...
Hugs xx
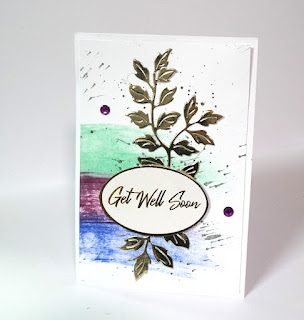 The leaves have been cut from my favourite Rose Flourish die set but I don't think this will be available any more at Craft Stash.
Hi Everybody,
All three of these cards have been produced in the same way. They are all 5x7 with the fold at the top. They have all had an aperture cut with a die and they all have the same handmade background behind each aperture
The flowers are all cut from the same red card and the leaves from two shades of green, though the flowers have been decorated in a different way.
So to start the process I created the background panel by ink smooshing in reds and silver inks and trimmed it down to fit the front on my my card below the aperture
This next card has used a snowflake aperture die with the red panel underneath.
These two flowers have been stamped in white with a snowflake stamp on all the layers, and tiny diamante gems added to the centres of the flowers and the bow.
The same gemstone has been added to all the bow centres
They have been arranged to the lower left, on top of the leaves, and the bow placed to the bottom of the card.
Seasons Greetings has been stamped in Candied Apple
It is another easy to do style and you can add the stirps in any way you would like,
I added an ink smooshed panel to the inside of mine, just to jazz it up a bit, and it has made a lot of difference to the end result.
One of the butterflies camouflaged a finger print on the inside of the card and now no one will ever know that it was there.

Another things you could do, to make it look different again, is to add some parchment to the back of the trellis.
That way the inside would be diffused and yet it would look lovely from the front.
Lots of choices with this design and they are all there for you to make.
More tomorrow ...
Hugs xx
Hi Everybody,
At least it is not raining here, though I don't know if it will stay that way all day, but we live in hopes.
Ruby and I will go out later for a short walk. I didn't take her out yesterday as walking was far too painful but I will see how it goes later.
In the meantime the draw has been done for the Spellbinders Ampersand.
This is such a useful die and can be used to link many different words for your designs.
The name today is
Janet Boyne
so would you email me please with your postal address and I will get it sent out to you straight away.
Be sure to let me know that you have it safely and I hope you will enjoy playing with it.
More tomorrow
Hugs xx
This week it is the turn of another much loved company that produces beautiful dies for us to use.
Last week it was the Altenew Poinsettia and this week we have the Spellbinders Sentimental Ampersand.
Look carefully at any word dies that you already have and see what can be teamed together for the look that you are aiming for.
Inside the magazine you will find ideas to help you and it is always a good read with your favourite cuppa.
In the pack there are sentiments and small flowers that you can use to dress the ampersand up.
Would you like to have this in your collection???
Then all you need to do is leave me a comment at the end of this post with your
FULL NAME
Then be sure to come back and check over the weekend if your name is shown as the winner.
I am happy to send this wherever you live and it doesn't matter if you have won before.
More tomorrow ...
Hugs xx
I have used some card that looks wooden to make things easier and I have inked the edges to make it blend.
This video is not long but I hope you enjoy it just the same.
Click the link to open a new window in YouTube to view the video and be sure to leave me a comment. "Like" and subscribe if you haven't already.
It all helps to let YT know that you would like more videos from me.
And a comment here on the blog would be very much appreciated too.
More tomorrow ...
Hugs xx
All the flowers for these cards are created from the Hello Beautiful Craft Your Life Kit from Altenew that I have had for a long time.
The woodgrain panel is also from a really old Altenew Stamp and I thought it would be good to bring them out of retirement and put them to use again.
All the flowers have been coloured with the layered stencil in the kit and all mounted to the cards with foam pads to give them some height.
And all are A6 sized cards with sentiments from my own stash.
This was yet another playtime session to use up items that are already on my desk and I was not disappointed with any of them.