Beautiful Card Designs Made Easy

September 15, 2016

International Ambassadors Informal Blog Hop

Hi Everybody,

Today is another chance for you to go blog hopping with the International Ambassadors and for our theme this month we have chosen Fall.

 I have created a card that is a million miles away from my style and this card was inspired by Christine Smith from CraftiPotential

I have used the  Fall Foliage  set from Spellbinders to make stamps with craft foam from the dies and this is a set that has been around for quite some time

I have used all the autumn colours of Distress inks to stamp the leaves onto some smooth white stamping card.

I used the border stamp from Clearly Besotted along the left side and I rounded the corner off at the bottom right

This panel has been raised on foam pads to give some dimension to the card.

So why not pop along and see what the other Ambassadors have come up with  and please leave us a comment to let us know that you visited....

Linda Lucas                Australia
Yvonne van de Grijp  Netherlands
Christine Emberson    UK
Christina Griffiths       You are here ..

Have fun 

More tomorrow ...

Hugs xx

September 14, 2016

Water Colour Wednesday - Bear Hugs

Hi Everybody,

Just a quick and short post today as I have more videos coming with "Goodies" from Craft Stash that are sure to please you.

This cute Teddy Bear is the Bear Hugs stamp set from Clearly Besotted.

 It comes complete with several sentiments that will ring the changes for your designs.

There are matching dies to cut both the Teddy and the banner for you and several sentiments  to go inside it

I have used the Diagonal Stripes to create the side panels to my card and I used Blueprint Sketch Distress Ink

The card is a small A2 and I dotted it with some blue sequins as a little extra.

The bear has been water coloured with Gansai Tambi and it didn't take me long to make this simple little card

More tomorrow ...

Hugs xx

September 13, 2016

Tuesday Tutorial - Elegant Ovals

Hi Everybody,

Today I have used several older dies and worked them all together. 
I have  used  a 5x7 background along with some ovals and vines to create a really pretty card that I hope you will like.
Spellbinders Supplies:

Other Supplies:
With die #7 from Matting Basics A create a hinged card
With #3 from Exquisite Labels 11 cut one panel in white
(Die #1 is always the smallest)
Using the largest die we are going to create frames from Elegant Ovals
 so with =4 cut once in white for the base layer
With #4 and 3 cut the frame in white and
With dies  #4  and #2 cut another in white and keep the extra centre piece

Add foam pads to the back of these trimming them to fit if needed so that they don't show at the front of the frame
Cut and emboss with pale green card as many vines as you would like to add to your floral display
Place all the layers on top of each other with the wider frame in the middle.
Flat glue into the centre the piece that was extra centre piece
Stamp and emboss a sentiment onto  the smallest die # 1 and add this to the top of the centre oval 
Fill this bottom part  with flowers and vines

More tomorrow ...

Hugs xx


September 12, 2016

Not A Card !!!

Hi Everybody,

The other day I was cleaning and tidying my craft room and I found several canvases tucked away in a cupboard.

It seemed such a shame to have them sitting there doing nothing.

And so I got out the paints and sprays, embossing pastes and stencils and set to work.

The intention was to video the making of this but I got a bit carried away with myself and before I knew it hours and gone by and the canvas was finished .... Ooooops!

It now hangs on the wall in my craft room and the size of it is 9" x 13 " so quite a good size and I have to say that I am very happy with it

Aaaand I still have several canvases still to use


I used a lot of  Wild Orchid Flowers  flowers  and leaves on this.

The string of pearls, metal embellishments and the organza butterfly in the top left corner are also from WOC.

The chalk paints I have used on the base coat, the natural fibres and the cheesecloth are all are from AnnaMarie Designs

There is also an abundance of glitter sprinkled around from Glitter Magic

More tomorrow ...

Hugs xx

September 10, 2016

Card Winner ...

Hi Everybody,

Beautiful day here and it is Griffs birthday. Tomorrow I am taking him to see Amaluna Cirque de Soleil in Manchester and we are both really looking forward to it. Every time it has been advertised on TV I have said that I would really like to see that show ... and tomorrow is the day.


The winner for yesterdays card has been chosen and the name this week is you 

VAL JONES

Would you email me your postal address please to
christina@card-making-magic.com 
and the card will be in the post to you straight away.

I hope you will like it and please let me know when it arrives with you

Day off tomorrow ...

Hugs xx

September 09, 2016

Friday Freebie 135

Hi Everybody,

I have another card with the glue technique on it for todays give away and this idea was featured in a YouTube video quite sometime ago.

But it is an idea that you may like to try and so I make no apologies for adding the link again ... Using Glues

It Is ideal to use for the men in your life and the finished size is about 6x8"

So if you would like to have this card then all you need to do is leave me a comment at the end of the post.

Please come back tomorrow to see if your name is listed as the winner and then if it is you will need to email me your postal address.

I am happy to send the card anywhere and you don't need to have your own blog.  Nor does it matter if you have won one of my cards in the past you can still enter again if this is one that you would like to have

More tomorrow ...

Hugs xx

September 08, 2016

Woodland Scene

Hi Everybody,

Today I am featuring the new die set that comes free with Septembers 
Die Cutting Essentials 15

This will help you to create the prettiest of Woodland Scenes  and is a complete card front for any of your Christmas cards

But don't put it away again after the season is over because with a little change here and there this is something that you can use all year round

It would make excellent male cards.

For this one I have dressed it up with a summer theme.


I have added green grass and hills rolling away in the background and the sun setting in the distance.

There are more ideas on the video and I show you how to make this into a shaker card. 

Pop over to YouTube now and watch the   Die Cutting Essentials - Woodland Scene  
The magazine will be in the shops soon or you can buy it direct from Moremags
You can also subscribe to have the magazine delivered to your door monthly at the same link and save money at the same time 

More tomorrow ...

Hugs xx

September 07, 2016

Water Colour Wednesday - Best Birthday

Hi Everybody,

Todays clean and simple card is using  the  Best Birthday  matching stamp and die set from Clearly Besotted

You don't need to buy the dies to create this card because you can simply fussy cut around the image ... but I have to buy both if they are available ... don't ask me why !!

So to make this card I stamped the two outside characters directly onto my base card and stamped the central one onto another piece 

I water coloured them all in and then die cut the piglet out and added it on foam pads to the centre position on my card

The sentiment and balloon strings are from the same stamp set and the only extras on the card are some silver sequins that I have dotted around

They just don't look silver in the photograph .
 I inked around the edges of the card and matted it onto some grey before layering it onto the white base

More tomorrow ...

Hugs xx


September 06, 2016

Tuesday Tutorial - Swirl Stripe

Hi Everybody,

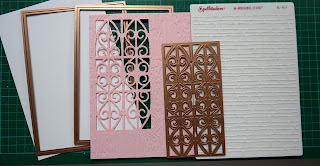
Today I am going to be using this really pretty panel die from Spellbinders that was designed by Becca Feeken.  It is in two parts and creates a panel that is about 3 x 6" and I have only used the centre part of the set for my card.
Spellbinders Supplies:
Other Supplies:
Instructions:
Using  die #7 from Matting Basics A cut two pieces and Create a Hinged card
With  die #7 from Matting Basics B cut another panel in pink
( Die #1 is always the samllest)
Use the centre part of Swirl Stripe and place it in the upper left corner of the pink card and cut.
No need to emboss this piece as you are now going to add it to your embossing folder and run it through the machine
I added some Parchment/Vellum to the back of my patterned area and then added foam tape to the back to support it all
Wrap this panel with lace along the bottom section before adding it to the base card
Cut as many leaves as you would like to add to your creation.
I used Foliage Two for my flourishes but that die is now retired so in the supplies above I have given you an alternative die  for the same effect
Cut the Celebrate word four times in white and once in gold.
Layer them all together with the gold one on the top.
Add the leaves, flourishes and flowers to the right hand side of the card
Add the sentiment along the bottom on top of the lace.
I use a hot glue gun to hold all my additions in place
Sparkle the flowers with some glitter on the petals
Place the pearls around the flowers and onto the patterned piece
Push the Hatpin into the petals as the finishing touch

More tomorrow ... 

Hugs xx

September 05, 2016

Revamped Colouring Videos ...

Hi Everybody,

If you have followed me for some time then you may remember The Art Studio. 

They where a company that was distributing online classes and I was asked to join them.

But sadly they didn't last and they are no longer around so all the classes that I did for them have been sitting there doing nothing.

It seemed such a waste after all the work of preparation and making them along with  filming, editing and uploading them

And so my "Film Crew" has altered them slightly and they are now here for you to see. 

Here I am adding all three parts that were made to show the colouring of this really lovely image from Mos Digital Pencil

The wings in the video are slightly different from this photo but I gave that card away in a Friday Freebie some time ago

I hope you enjoy all three and the first one is quite long to show the colouring of Baby Fairy Kiki ... Sorreeeee !!

Baby Fairy Colouring Part 1 - The Body
Baby Fairy Colouring Part 2 - Hat hair and wings
Baby Fairy Colouring Part 3 - Finishing Touches

More tomorrow ...

Hugs xx


September 04, 2016

Totally Tropical ...

Hi Everybody,

Do you remember a few weeks ago some cards with the Totally Tropical Gift that came free with Papercraft Essentials 135 ??

I also did a video to give you some ideas on how to use the die and stamps and here is another one for you to try using just the stamp and water colours

I have used a separate panel to stamp the pineapples onto and heat embossed them in white.

Then with Gansai Tambi I have coloured each one in bright tropical colours.

The "Thanks" is a die  from Altenew and I bought mine from Sevenhills Crafts

There is also a  matching stamp  set to go with it which makes it a very useful addition to my "Stash"

The panel was added to my base card once everything was dry and the finished card is the US A2 size. This card was inspired by Laura Bassen one of my favorite YouTubers who works wonders with inks

More tomorrow ...

Hugs xx


September 03, 2016

Card Winner

Hi Everybody,

What a wet and windy day it is here. This afternoon is playtime with the lovely Isabella who started school on Thursday

She looked very smart and grown up in her new school uniform. I cant wait to hear all about it. 

More good news is that on the same day my Grandson (Isabellas Daddy)  got the keys to his own restaurant and is now in the process of doing it all up.

This is a card I made for him and I will keep you posted as to the new opening day 

Once opened ... if you live in the neighbourhood then maybe you could give it a try 

Now onto the winner of the Yellow Rose card from yesterday.

The name that has been drawn from the hat is you ...

Alison Scott
so if you could email me please with your postal address to
christina@card-making-magic.com
then I will get it into the post for you straight away

More tomorrow ...

Hugs xx

September 02, 2016

Friday Freebie 134 - Yellow Rose

Hi Everybody,

This is a pretty card created with Spectrum Noir  Pens and Pencils ... but don't ask me which colours I used ???

It is finished on the inside and it is a 5x7 clean and simple card for any occasion

If this is  a card that you would like to own then all you need to do is leave me a comment at the end of the post.

You will need to come back tomorrow and check if it is your name that is listed and if it is you will need to email me with your postal address

What more can I say

More tomorrow ...

Hugs xx


September 01, 2016

Two new Videos ...

Hi Everybody,

I have been busy once again producing new videos on YouTube

They highlight the free gifts coming with magazines from Practical Publishing this month

This one uses the Christmas Tree stamp that is on the stamp sheet and the video is called  Festive Fun

This gift will  be free with Septembers Creative Stamping 34

The second video is the called
Door Embossing Folder, Wreath Die and stamps

You can get your copy of this magazine direct from  this link SC&P 154

Both will be on sale on the 8th September in your selected supermarket or craft shops as well as WHSmiths.

There may be other hobbies or interests that you have and you can see the whole range of publications or to take out a subscription visit  Moremags  and your choice will be delivered to your door each month.

More tomorrow ...

Hugs xx


August 31, 2016

Water Colour Wednesday - Snow Buddies

Hi Everybody,

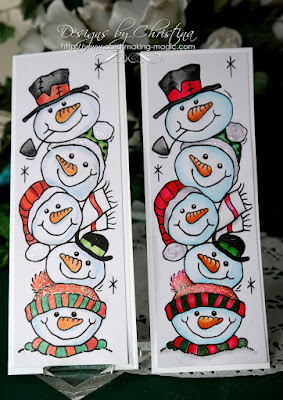
The stamp I have used for todays card is from Woodware and called Snow Buddies.

It is one that I bought at the craft show last weekend and it is about 3x7" in size so makes a really good card front.

I have added both onto a long card base that will fit neatly into a DL envelope.

The one on the left has been coloured with pencils and the one on the right is water coloured with Zig Clean Colour Real Brush Markers

I much prefer the vibrancy of the right hand card and I really enjoyed the water colouring too.  I have added extra sparkle to both cards with glitter on the bobble hats

This cute stamp set really caught my eye  as the characters are already stacked for you and so very easy to produce aaaannnddd  ... it was only £5.50 .. a real bargain !!

Which is your favorite from the two??

More tomorrow ...

Hugs xx
August 30, 2016

Tuesday Tutorial - Frames and Apertures

Hi Everybody,

For this card I am using a mixture of dies ... some old, some new to create this really charming card in subtle colours. It has several levels created with the frames and it is much better in the hand.
Spellbinders Supplies:
Other Supplies:
With die #7 from Matting basics A create a hinged card in white
(Die #1 is always the smallest)
With #7 from Matting basics B cut the layers as follows :
1 in plain peach
1 in patterned peach 
1 in parchment
1 in plain white
With the plain peach layer use the Grate Effect die to cut a pattern into it
With the white layer use another Matting basics die to create a frame to the thickness you would like and add foam pads to the back of the frame
From the circles dies take nos: 4,5 & 6
Use 4 and 6 to create another frame from white card and add foam pads to the back of the circle frame
Keeping the parchment and the Grate Effect panels together use #5 to cut a circle from the two layers. 
Keeping them together ensures that they will line up on your card
With a thin bead of glue around the edge glue these two together 
Still on the edge of the previous panels add narrow foam pads so that they cannot be seen from the front
Glue the patterned peach panel to the base card and then add these two layers on top
Add these two raised frames to the parchment panels neatly to cover the apertures
Cut the flowers and leaves from the Make A Wish die set and use Distress Inks to add some colours
I used Tattered Rose which is a lovely peachy pink and Crushed Olive with Bundled Sage 
Add some Wink of Stella clear glitter to all the shapes and allow to dry
Arrange the flowers and leaves as you like around the central aperture
Cut the word Blessed from the Botanical set three times in black card and glue them together for strength and glue them into the position you would like 
Dress the edges with pearls
The top card is peach and the bottom card is created in greens 

More tomorrow ...

Hugs xx


August 29, 2016

Shabby Chic Birthday

Hi Everybody,

This really pretty card is in very subtle shades of green and is one of the paper stacks available from AnnaMarie Designs

They are the Blissful Paper Pads and they come in several different colours and sizes so there is sure to be a size that suits your needs.

I have added lots of layers to the card and distressed the edges of some of them and I have lined the inside of the card to match

The leaves are cut from the papers with the Foliage die from Spellbinders and the paper is substantial enough to make into leaves

The wooden tiles are also from AMD and I have added them with hot glue to keep them in place

The flowers and the miniature picture frame, which I have filled with pearls,  are from Wild Orchid Crafts and they have a new range of flowers on their website that are simply gorgeous.

I have added the sparkle to the petals with Glitter Magic   and the pearls are from Want2Scrap

More tomorrow ...

Hugs xx


August 27, 2016

Card Winner Today ...

Hi Everybody,

Sorry for the late post but I have had a lovely day in Harrogate at the Great Create Craft Show buying lots of "goodies" to use on my cards.

I also had fun catching up with my crafty friend AnnaMarie and it is always a pleasure to see her.

In the background is AnnaMaries stand at the show and she has some beautiful items to make lots of wonderful creations ... and they are also on her website at AnnaMarie Designs 

But now that I am back home again I have finally done the draw for Fridays card and the winner this week is you ...

Margaret Corgi Owner
please email me your postal address to
christina@card-making-magic.com
and the card will be on its way to you

I hope you will like it and please let me know when it arrives with you.

More tomorrow ...

Hugs xx

August 26, 2016

Friday Freebie 133

Hi Everybody,

Todays card is one that I coloured in the early days with Spectrum Noir and I cannot remember the colours I used

It is a 5x7 inch card and the inside is finished on this one. It says "With Love" on the front but that could easily be changed if you wanted to use the card

The spotty card is from AnnaMarie Designs  and there are some lovely patterns and colours on her website

The flowers are from Wild Orchid Crafts with sparkly glittered petals and white ribbon from Meiflower

It is better in the hand than the photo shows and I don't think you will be disappointed with it.

So if you would like to own this card then all you need to do is leave me a comment and come back tomorrow to see if it is your name chosen from those comments to win the card.

More tomorrow ...

Hugs xx


August 25, 2016

Beautiful Tags

Hi Everybody,

In todays new video on  YouTube  I have created a Shabby Chic Tag from start to finish and the reasoning behind this is that shop bought tags are either too small or too flimsy and I need something a lot more sturdy,

The picture shows you the tags in three different colours but they are all made using the smae ingredients  with just the odd adjustment made here and there.  
The video is called  Shabby Chic Floral Tags and I hope you will enjoy it.
Please give it the "Thumbs Up" if you do and don't forget to leave me a comment ... Pretty Please !!
I have used the flowers, flower centres, wooden sprays, lace and metal embellishments that are all from Wild Orchid Crafts and they have a wonderful selection for you to choose from


They have all been sparkled with Glitter Magic and the pearls are from Want2Scrap

All the card that I have used in lovely pastel colours  is from Papermill Direct

They all look  really special but the pink one has to be my personal favorite and the finished size of each one is 3 1/2 x 7" so a good sized tag to add to the larger gift, or simply add it to a card front if you preferred

More tomorrow ...

Hugs xx


August 24, 2016

Water Colour Wednesday - Floral Card

Hi Everybody,

I have been plaing again with Ink Smooshing and this is the result for todays card.

It is a mixture of  Dusty Concord, twisted Citron and Broken China Distress Inks and the effect is quite vibrant once it is dry.

I flicked some ink splatters onto the card with some Silk Lustre from Spellbinders Celebrations Collection

I have used the floral stamp set from Sheen Douglass and it was available on Crafters Companion website

But I cannot find it any more to link too so I am afraid you would have to do your own search if you wanted to find it.

I  have stamped the sentiment onto some parchment and embossed it with white powder and then wrapped it around the water coloured panel

I add some silver glitter tape along the left side and rounded one of the bottom corners  before attaching it to my card base.

A few enamel dots added to the centre of the flowers completes the card for today.

More tomorrow ...

Hugs xx

August 23, 2016

Tuesday Tutorial - Floral Sapphire Card

Hi Everybody,

Did you manage to get the little Sapphire Machine when it was offered on C&C?
 It really is a useful machine and takes up no space at all on your worktop. And yet it has the ability to cut through card like butter with any small dies that you may have in your own collection.

It was offered for sale with Set B which is 13 dies that you can use as soon as you get the machine.
It is with this set that I have made this small but really pretty clean and simple card
If you didn't get one and the Sapphire is now sold out then there is an alternative with 
Spellbinders Prizm

Spellbinders Supplies:

Other Supplies:
With die #7 (from the main dies only) in Matting Basics A cut two pieces and create a hinged card
With die # 7 in Matting Baiscs B cut another panel to layer onto the base 
From the rectangles in the Sapphire B set use the largest and place it into the mat panel and cut 
There is no need to emboss this as we are going to do that in the next step
With your embossing folder add the card and run it through your larger machine
Add foam pads to the back of this panel especially around the aperture to support it.
Find some pretty paper that will sit inside the aperture and glue this direct to the base card so that it can be seen through the opening
The foam pads will keep the embossed panel raised away from this paper panel as you add it to the base card
Stamp the sentiment of your choice onto some white card and cut it out with the middle rectangle die from Set B and add a foam pad underneath this too
Position this into  the centre of the aperture

Decorate with Diamante around the opening and add a Diamante flourish to look as if it is running through the opening

Decorate further with flowers and glitter and the shiny centrepiece to the flower and that's it ... clean and simple, quick and easy !!

More tomorrow ...

Hugs xx