Beautiful Card Designs Made Easy

June 07, 2016

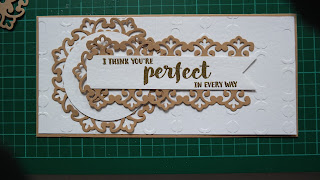
Tuesday Tutorial - Another idea with Parisian Dies

Hi Everybody,

This is the second visit to Parisian Accents and Motifs as this is such a pretty dies set and can be used in lots of ways.  
The first one was added on the 26th April with   Parisian Accents and Motifs 
  If you don't have this particular set then you can try this idea with any of the ones you do have and get a really good result.
Spellbinders Supplies:
Other Supplies:
Instructions:
With an A4 piece of Kraft card score and fold it in half and with the fold at the top trim the card down to  4 1/4 x 8 1/2" to create a long base
Cut a white mat that is slightly smaller than the base card and emboss this panel then add it flat to the base card
Cut the large shape from the Motifs
Cut two of the border strips and the largest die from the Accents all in Kraft Card
Stamp and heat emboss the sentiment of your choice onto some white card and trim to a banner shape on one end.

Arrange the border strips around the banner and glue in place.
Cut the shape from the Accents set into two pieces and arrange one of them at the end of the banner shape as shown in the photo
Add foam tape to the back of this assembled piece
With foam pads add the largest shape to the left of the card front and cut a size of circle that will sit in the middle in white
Add your banner piece to the top adding more foam pads to the right side to balance the banner out.
Dot with pearls to match your design and a pearl flourish  for an added touch

Don't forget to visit the  Tuesday Tutorials Page  barbecue ALL the videos are listed there for you to click any time you want

More tomorrow ...

Hugs xx

June 06, 2016

Beautiful Hatpins ...

Hi Everybody,

Over the weekend I have been busy making some more of the Hat pins that I like to add to my more feminine cards

I love making these and end up with quite a lot because I get carried away with the designs

I think they make a really lovely touch to a card
Because they have end caps over the sharp point they can be removed from the card and worn on the recipients lapel

I buy 3" silver pins and create the designs myself but the basic hat pin is from the Sparkles Group 


You will find them in the FINDINGS section on their website along with beads and charms too if you need them

More tomorrow ...

Hugs xx



June 04, 2016

Todays FF Winner ...

Hi Everybody,

Thanks to you if you entered your name for this card and I am happy that many of you would like to receive a card from me.  It is very humbling to know that you enjoy my work and think it worthy of owning.  

The names are as always drawn at random so that it is fair for everyone and it doesn't matter if you have won before either you can still add your comment and try for another.  

I have a name chosen for todays draw and the winner of yesterdays Silver and White card is ...

Bernice Geroulis
Would you email me with your postal address to 
christina@card-making-magic.com
and the card will be on its way to you.

I hope you will like it and please let me know when it arrives with you.

Tomorrow is craft show day and my "Film Crew" and I are off to Bolton Arena.
I have my list of Goodies all made out ready and the weather is supposed to be nice so it will be a lovely trip out for us. We will have a stop off for Sunday Lunch on the way home so no blog post tomorrow  ....  But some lovely cards lined up for next week,

Hugs xx


June 03, 2016

Friday Freebie 121

Hi Everybody,

This card has been offered before but the winner never came froward to claim it and so here it is again and maybe this time it will go to a good home.

It was also part of the video that used Majestic labels Eight  along with some other ideas on using that particular die.

The blue card in the film is being offered next week as FF122

It is prettier in the hand than the photo shows and it is in white and silver.

The large rose on the front is grey fabric and I have wrapped lace and organza ribbon around the layers.

If you would like to win this card then all you need to do is leave me a comment.

From those comments a name will be chosen and the winner announced in tomorrows blog post.

More tomorrow ...

Hugs xx


June 02, 2016

Shabby Chic Birthday ...

Hi Everybody,

Todays card is really pretty and has been created with the Grand Circles dies from Spellbinders.

It is now available to view on YouTube and is titled 
Shabby Chic Round Birthday Card

The colours I have chosen are pale pink and blue and at the bottom of the page I have listed all the supplies

The beautiful dried flowers are from AnnaMarie Designs and can be bought as a complete bundle

You will need to look around for the Grand Circles as they are now retired from Spellbinders website. Try Ebay or Amazon as people do sell them on and you may find them at a good price.

I hope you enjoy the video 

More tomorrow ...

Hugs xx


June 01, 2016

Water Colour Wednesday - Marching Mice !!

Hi Everybody,

Todays card is using the Strike Up The Band stamp set Gansai Tambi Water Colours.  This little stamp set is so versatile and I featured it another Water Colour Wednesday a few weeks ago.

This time I have used the mice with a different sentiment and some of them are marching the wrong way to the main band. 

 You can have so much fun with this and arrange your band however you wish.  I think there could be another video here !!

More tomorrow ...

Hugs xx

May 31, 2016

Tuesday Tutorial - Oval Regalia and Ice Cream Colours

Hi Everybody,

For my card today I chose all the palest colours I had in my "Stash" and they all remind me of ice cream. I really like the way this one came together and it was very easy to do. I hope you like it and will think about this colour combo for your own cards. The links to all the products are at the bottom of the page
Spellbinders Supplies:
  • Matting Basics A & B
  • Oval Regalia
  • Foliage
  • Romantic Vines
  • Horsehair embossing folder
Other Supplies:
  • Flowers
  • Ribbons
  • Glitter
  • Card
  • Flourishes
Instructions:
With die #7 from Matting Basics A cut two panels in cream card and Create A Hinged Card
With #7 from Matting Basics B cut one more in cream  and two more in pale pink and turquoise
(Remember that die #1 is always the smallest)
Leave the pink panel complete as this is the under layer
With the cream and turquoise panels cut out Oval Regalia and then use your embossing folder to add texture to the negative piece from the turquoise layer
Cut a shape in cream with die #3 from Oval Regalia
Stamp and heat emboss a sentiment and layer it onto the pink card leaving a small border around the edge
Add foam pads around the negative turquoise panel and add it carefully to the top of the pink card Wrap with ribbon before adding these to the base card
Flat glue the oval die cut in cream to the space and add the smaller cream die cut on top  with foam pads. Add foam pads to the back of the layered sentiment and add to the oval
Choose pale pink, cream and turquoise flowers to compliment the card and add in foliage and flourishes as you like them
Dot the petals with glue and sprinkle with glitter then add pearls around the display

More tomorrow ...

Hugs xx 

May 30, 2016

Peachy Rabbit ...

Hi Everybody,

Peach is a lovely colour to use for card making as it is soft and warm.

Here I have used it for a pretty floral card with a water coloured Bo Bunny rabbit as the focal point.

I have coloured her with Gansai Tambi paints and added in flowers that blend with my theme

It was relaxing it to do some water colouring and I quite like the card too.

I used a white Sakura gel pen to add polka dots to her dress, but they don't show up very well on the photograph

The flowers are from Wild Orchid Crafts along with the bows centre piece. I have sparkled the petals with Glitter Magic  The organza ribbon is from Mei Flower

 I have had the stamp for a long time and if my memory serves me correctly it was free with a magazine many moons ago.

More tomorrow ...

Hugs xx

May 28, 2016

Card Winner ...

Hi Everybody,

The day is bright and beautiful here and hopefully it will stay this way for the Bank Holiday.  
If you have anything planned I hope you have a good time and the weather is kind to you also.

The draw has been done for yesterdays Friday Freebie and the name pulled from the hat this week is you ...

Christi 

Please email me 
christina@card-making-magic.com
with your postal address and the card will be winging its way to you
I hope that you will like it when it arrives and please let me know when you have received it 

I have some good things lined up for you for next week with a lovely card for the Tuesday Tutorial and a really pretty Wednesday Water Colour.

On Thursday there is a new Shabby Chic card on YouTube and I hope you will enjoy that one.
I am going to chill tomorrow ... in the sunshine !!

More next week  ...

Hugs xx

May 27, 2016

Friday Freebie 120

Hi Everybody,

A pretty card with parchment on the front is on offer today as the Friday Freebie.

It is a 5x7 card and has lovely dotty card under the parchment. Both are from AnnaMarie Designs

So maybe this is a card that you would like to have and if it is then all you need to do is leave me a comment at the end of the blog post.

From those comments a name will be drawn and the winner announced in tomorrows blog post so please come back and check if it is you if you add your comment

It doesn't matter if you have won before and I am happy to send the card to you wherever you live.

The winners names are always there for you to see in the Winners Page

More tomorrow ...

Hugs xx

May 26, 2016

Shabby Chic - Lilac and Lemon

Hi Everybody,

Today I have a video on YouTube for you to see how this card was put together. The list of supplies is at the bottom of the page but I also used some dried flowers that smell lovely and add a really special touch to the card

The video is titled  Shabby Chic - Lilac and Lemon   and I hope it gives you some ideas of how you might like to make your own cards in this style.  I have added lots of "Frippery" to this design and used a really pale lemon teamed with the lilac.

Painting the flowers adds to the vintage look and you can use paint or Gesso to get the whiteness onto them with a paint brush. 

The flowers/Lace/Cameo are all from Wild Orchid Crafts and they have some wonderful products for you to view.  

New Web Page

Over on my website I have created a special page that I will add all these Shabby Chic videos to as I go along so that they can all be accessed in one place whenever you need to browse. 
At the moment there are two but as each card is made and filmed it will be added to the page.

It will be permanently in the NavBar on the left of each website page and  the individual photographs on that page are clickable links. Click and open them to go directly to my You Tube channel with the tutorials.
It is titled Shabby Chic 

More tomorrow ...

Hugs xx